- Skip to primary navigation
- Skip to main content
- Skip to primary sidebar
- Skip to footer

Sweet and Salty Cheesecake with Cherries | Ottolenghi Simple
January 15, 2019 by admin 11 Comments
So I’m here to end my exploration of Ottolenghi Simple on a sweet note with these cheesecake cups. I’m not the biggest dessert person out there. My sweet tooth tends to rear its’ ugly head occasionally but on the whole, I can totally skip this course. I’d rather be cooking savory dishes but I do get the itch to bake or to make a sweet dessert every now and then. That’s when I get the side eye at home. My partner doesn’t like it when I bake AT ALL. He has more of a sweet tooth than I do and he hates caving in to sugar. Especially right now while he’s on the Keto diet (lol)! More on that later…
A few changes I would make.
Not only is this great to look at, it’s a satisfying end to a meal. I could only eat this in very small portions though. Thinking back, I would dial the sugar down a bit, especially in the cherry compote. Cherries can be so sweet, naturally. I think 3/4 cup sugar was too much. I could have easily halved that amount. The compote probably would have taken a longer cooking time to thicken but that’s ok. With the cheesecake, I went straight to my food processor as I knew it would make quick work of mixing together cream cheese and the rest of the ingredients.
I also would make more use of the citrus in this recipe. The orange peel was used in the compote but not the juice. I would add maybe a 1/3 cup of the juice in the compote to add acidity. For the cheesecake, the zest of a lemon was used. I might add a tablespoon or two of lemon juice to the cheesecake as well. For the crumble component, I increased the salt slightly. My feta cheese didn’t seem very salty in the cheesecake (always taste your ingredients). A few grains of Maldon sea salt on top as a garnish wouldn’t hurt either. I like a lot of contrast in my sweets. I admit it.
A great cheesecake dessert for entertaining.
This dessert would be so convenient for serving guests. Everything could be made a day or two ahead. It’s a three component dessert but nothing is particularly complicated. The cheesecake and cherry compote could happily live in the refrigerator and the hazelnut crumble in an airtight container on the counter. This recipe makes 3 cups of crumble, which was way too much for 6-8 servings of the dessert, in my opinion. You could easily halve this portion of the recipe. Leftovers would be great over ice cream or yogurt in the morning and could be kept longer in the freezer.

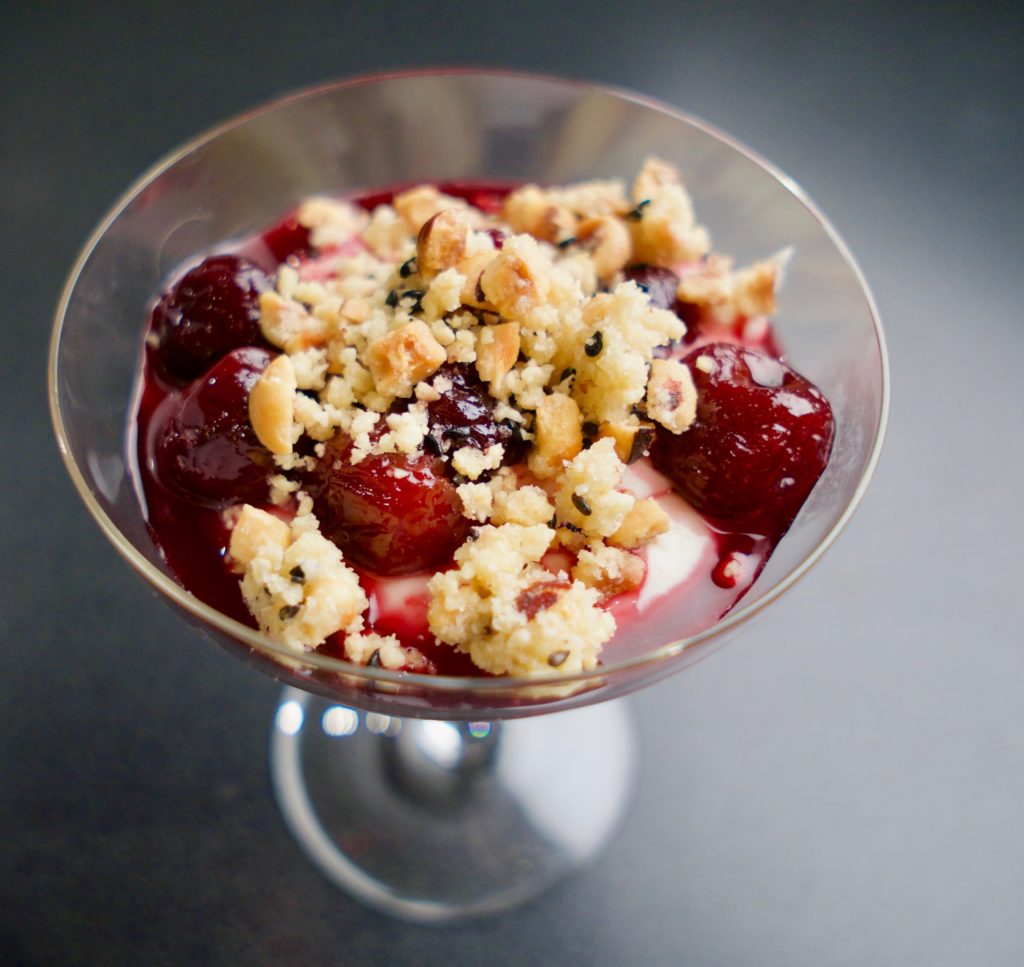
Sweet and Salty Cheesecake with Cherries
Ingredients, for the cheesecake.
- 4 ounce feta
- 8 ounces cream cheese room temp
- 1/2 cup sugar
- 1 lemon zested
- 1/2 cup heavy cream
for the Crumble
- 1 cup hazelnuts, roughly chopped
- 4 tbsp unsalted butter diced, cold
- 1 cup almonds ground
- 1/4 cup sugar
- 1 tbsp black or white sesame seeds
- 1/4 tsp salt
for the Cherry Compote
- 1-1/4 lbs cherries frozen
- 3/4 cup sugar (or to taste)
- 3-4 star anise whole
- 4 strips orange peel
- In a food processor or stand mixer, add the feta cheese and process until fairly smooth. Add the cream cheese, sugar and lemon zest and pulse to combine. Add cream and pulse to mix. Set aside in refrigerator to thicken.
- Preheat oven to 350 degrees F.
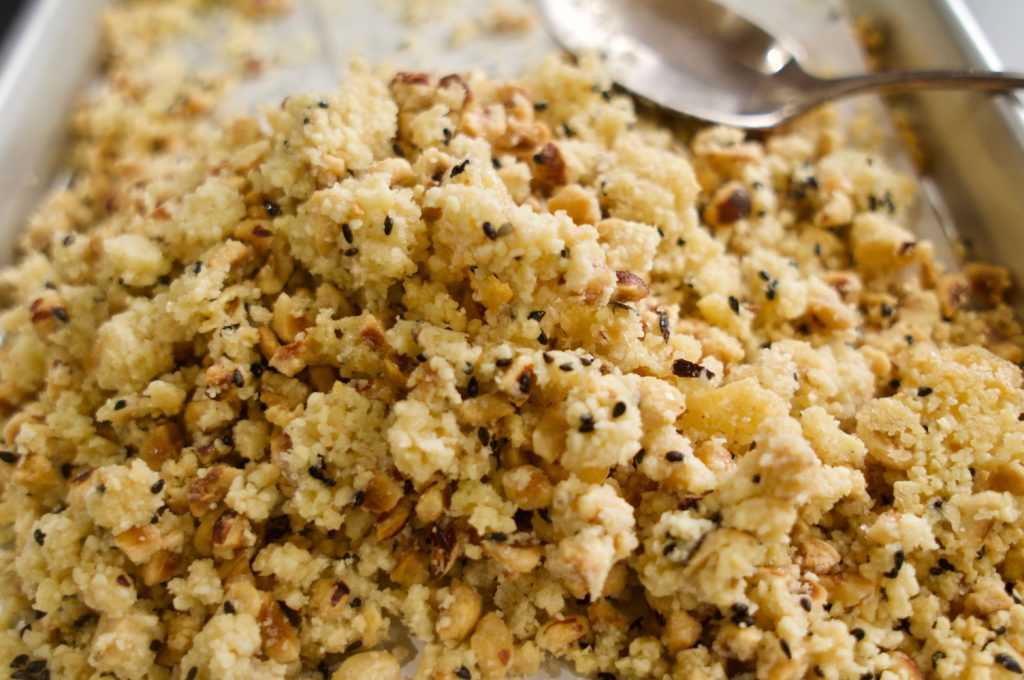
- Make the crumble. In a medium bowl, add the chopped hazelnuts, ground almonds and sugar. Stir to combine. Add the butter and (using fingers) rub the butter in until mixture forms fine, pea-sized crumbs. Stir in salt and sesame seeds. Transfer to a rimmed baking sheet and bake for 12 minutes or until golden brown. Leave to cool, then break apart until crumbly.
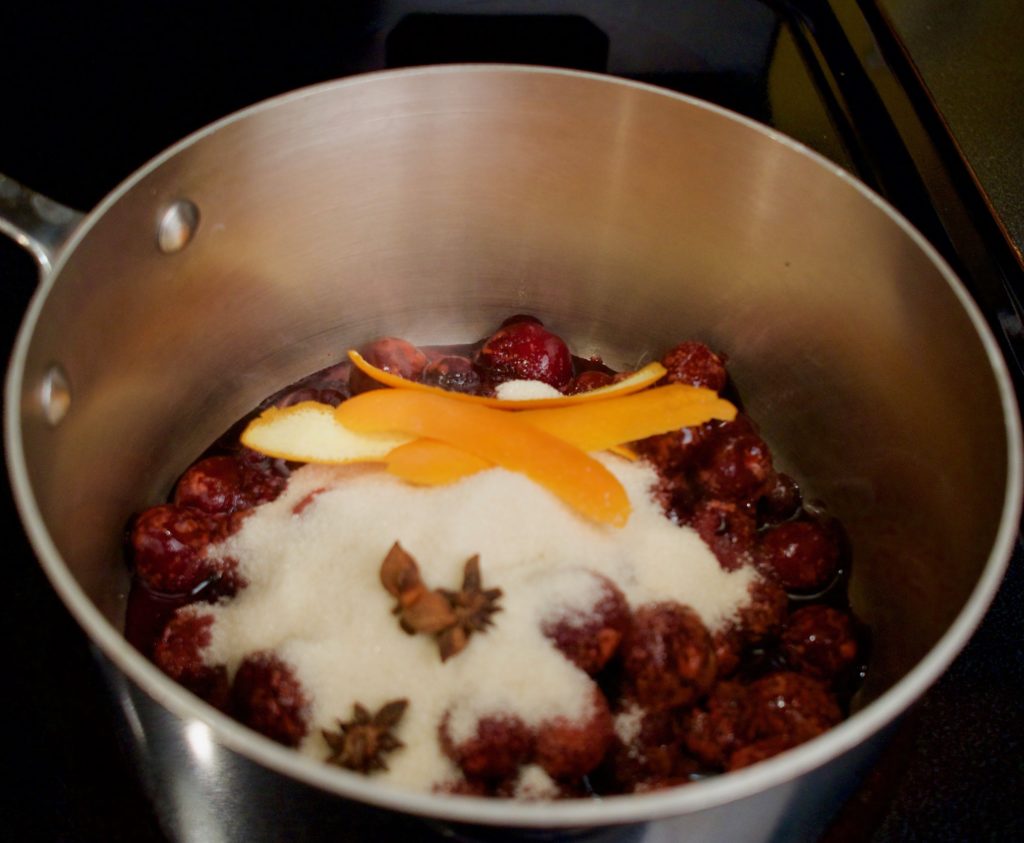
- For the compote, add the cherries to a medium saucepan. Add the sugar, star anise and orange peel strips. Bring to a boil and cook over medium-high heat for 10-15 minutes or until slightly thickened. Allow to cool at room temperature. Remove star anise and orange peels.
- To assemble, spoon cheesecake mixture into serving glasses or bowls. Top with cherry compote and crumble.
Pin it for later!

In memorandum of Suzy Post
I would like to dedicate this to a great lady who has sadly passed; Suzy Post. She was an insatiable woman, full of energy and infectious spirit. She openly gave her opinion to everyone, whether you wanted to hear it or not. A great contributor to our society, she will be sorely missed. She happened to drop by while I was testing this and a few other recipes, so I fed her and another friend. I think she liked this recipe the best that evening as she was loathe to share it with her companion. You can read more about her here and here . Farewell Suzy. We will all miss your brisket.
Reader Interactions
January 16, 2019 at 12:08 am
I’m so sorry to hear about your friend. I’m glad she enjoyed your dessert!
January 16, 2019 at 12:43 am
It was time for her to go. It was great to know I got the chance to feed her one last time before she left this world.
January 18, 2019 at 6:46 pm
What a beautiful memory you have with your friend! And the recipe sounds delicious!
January 18, 2019 at 6:53 pm
I love that you used hazelnuts and almond flour instead of regular flour for your crumble! I’m going to have to try this!!
January 18, 2019 at 6:55 pm
January 24, 2019 at 8:10 am
Thanks Lyndsy! Please do try it! Even if it’s just the crumble topping. Great for breakfast or a topping for ice cream 😉
January 19, 2019 at 5:25 pm
January 24, 2019 at 8:11 am
Thank you Melissa!
January 20, 2019 at 9:48 pm
I am on a dessert/bread kick lately. This looks so yummy 🙂
October 16, 2019 at 2:32 pm
Had this in a country pub in Sussex today. Unbelievably delicious and rich. Will be making it very soon!
October 16, 2019 at 7:02 pm
I’m glad you can make and enjoy it at home! Cheers!
Leave a Reply Cancel reply
Your email address will not be published. Required fields are marked *
My Current Favorites

- Skip to primary navigation
- Skip to main content
- Skip to primary sidebar
Ottolenghi's Apple and Olive Oil Cake
Published: Dec 13, 2020 · Modified: Aug 3, 2023 by Irina Totterman · 11 Comments

Ottolenghi apple and olive oil cake with maple icing is a fabulous fall dessert loaded with chunks of apple, flavored with cinnamon, and covered with a luscious maple frosting. If you are searching for the most delicious apple cake, your search ends here.

WANT TO SAVE THIS ?
This cake recipe was created by the British-Israeli chef Yotam Ottolenghi and appeared in the famous "Ottolenghi: The Cookbook."
Apple and olive oil cake recipe
Ingredients, recipe variations, how to make apple olive oil cake, expert tips, love apple recipes try these next, recipe card.
It is the ultimate apple olive oil cake made with fresh apples, extra-virgin olive oil, and a hint of cinnamon. Its maple frosting is simply irresistible.
This cake is not just delicious; it is an absolute crowd-pleaser. Customers at the Ottolenghi shop rave about it, with many admitting to ordering the cake just for the maple icing.
- Ottolenghi's apple and olive oil cake recipe is easy and straightforward.
- It is a must-make fall favorite dessert prepared with tart apples and sultana raisins to bring the texture, ground cinnamon and vanilla for beautiful flavors, and olive oil for the cake's moisture and depth of flavors.
- Maple icing made with maple syrup and cream cheese is a perfect frosting for other layer cakes, cupcakes, etc.

For ingredients and detailed instructions, refer to the recipe card below.
- Sultana raisins are one of the stars of the cake. Replace them with regular raisins if you desire.
- Flour: The recipe calls for all-purpose flour (the same as plain flour). But you can switch some parts of all-purpose flour for whole wheat flour or even buckwheat flour - the flavor of buckwheat beautifully pairs with apples.
- Ground cinnamon: The original recipe requires ½ teaspoon, although you can increase it to 1 teaspoon of the spice.
- Salt enhances the flavors of the cake.
- Leavening agents: baking powder and baking soda help raise the cake.
- Olive oil : Ottolenghi's recipe calls for a good extra virgin olive oil that brings moisture to the cake. Feel free to replace it with flavorless grapeseed or vegetable oil if preferred. Read more about how to make a cake moist .
- Sugar: Use granulated white or caster sugar interchangeably.
- Vanilla: Mr. Ottolenghi uses scraped seeds from ½ vanilla bean. Use ½ teaspoon of pure vanilla extract or alcohol-free vanilla flavor instead if desired.
- Eggs: The recipe calls for whole large eggs and large egg whites. Use chilled eggs and an egg separator to separate egg whites from the yolks.
- Lemon zest: Use one untreated lemon to get 1 teaspoon of lemon zest using a zester grater.
- Apples: Ottolenghi's recipe calls for Bramley apples, but you can easily replace them with Granny Smith apples. Please, always use medium-sized apples: you will need about 1 lb 12 oz. (800 g). Indeed, you can experiment with Pink Lady apples, Honey Crisp, Gala apples, or other types of apples.
- Butter: Use unsalted butter. Take it out of the fridge 2 hours before making the icing.
- Brown sugar: Use golden or dark brown sugar. To increase the molasses component, use light brown muscovado sugar instead.
- Maple syrup is the star of maple icing that is so delicious that you will never want to replace this ingredient.
- Cream cheese is an essential ingredient. Make sure to bring it to room temperature before you start.
The original Ottolenghi’s apple cake is a layered cake sandwiched with delicious maple icing.
- Feel free to make a single-layer cake and use half of the icing on top.
- Add a fancy touch by decorating the top of the cake with caramelized apples and a couple of cinnamon sticks. Or simply dust the cake with icing sugar.

Step 1. Preheat oven to 375°F (190°C). Butter an 8-inch (20 cm) Le Creuset springform pan and line its bottom and sides with parchment paper.
Step 2. Using a flour sifter, sift dry ingredients (flour, ground cinnamon , salt, baking powder , and baking soda ) in a large bowl.
Step 3. Place sultana raisins and water in a saucepan and simmer over low heat until the dry fruit completely absorbs the water. Set aside.
Step 4. Peel fresh apples with a vegetable peeler, remove the heart and seeds, and cut them into ⅓ inch (1 cm) cubes.
Pro tip: Use shredded apples instead of apple chunks for a tender cake texture.
Step 5. To make the cake, place olive oil, sugar, and vanilla extract in the bowl of an electric mixer and beat.
Pro tip: Alternatively, you can use a stand, hand mixer, or balloon whisk.
Step 6. Gradually add lightly beaten whole eggs and continue to mix until the mixture becomes smooth (photo 1) .
Step 7. Then add apple cubes, sultana raisins, lemon zest grated with a zester grater, and combine with a large spatula (photo 2) .

Step 8. Add the sifted flour mixture and mix (photo 3) . In a clean bowl, beat egg whites with a stand mixer or an electric mixer until soft peaks.
Step 9. Add beaten egg whites into the main preparation in two additions and gently combine them with the spatula (photo 4) .

Step 10. Pour the batter into the prepared cake tin, even the surface using a rubber spatula or a spoon (photo 5) , and bake for 90 minutes until golden brown.
Pro tip: Check doneness with a skewer: if it comes out dry from the center of the cake, the bake is ready.
Step 11. Remove it from the oven, place it on a wire rack, and let the cake cool in the pan (photo 6) .

Step 12. To make the maple icing, place softened butter, brown sugar, and maple syrup in a bowl and beat until the mixture becomes creamy and smooth (photo 7) .
Step 13. Add cream cheese at room temperature and beat till the cream becomes thick and homogeneous.
Step 14. To assemble the cake, remove the well-cooled cake from the pan and cut it horizontally using a serrated knife. Cut the top to even the surface if the cake is domed after baking.
Step 15. Place the bottom of the cake on a serving platter and spread half of the maple icing (photo 8) .

Step 16. Place the top half of the cake on the cream layer and cover it with the remaining icing. Even the surface of the cake with a bent spatula or create waves.

- Bring butter and cream cheese to room temperature about an hour before you start.
- Use an 8-inch (20 cm) round cake pan buttered and lined with parchment and precut circle cake pan liners. A springform form facilities the removal of the cake, but a regular cake pan works as well.
- Every oven is different: adjust your oven settings to 375°F, 190°C, 170°C fan, or gas mark 5.
- Use this simple cake pan converter to recalculate the amount of ingredients for different cake pan sizes. Modify the bake time accordingly: for a 7-inch (18 cm) cake, decrease the baking time by 10 minutes; to make a 6-inch (15 cm) cake, reduce the baking time by 15 to 20 minutes.
- Make-ahead option: Bake the cake in advance, wrap it with plastic wrap, and keep it in the fridge for up to one week. Slice and assemble the cake with maple icing the next day or on the day of serving.
Store this olive oil apple cake under a glass dome in the refrigerator for up to three days.
Olive oil brings moisture to the cake and adds a subtle fruity flavor, perfectly complementing the richness of other cake flavors. More, this versatile ingredient keeps the cake soft and tender, whether at room temperature or in the refrigerator.
You can substitute olive oil for 80% of the butter amount. Keep in mind that olive oil has a strong taste and flavor, so if you want a neutral flavor, try grapeseed oil instead.
While both oil and butter add moisture to a cake, oil stays liquid at room temperature while butter solidifies. This means that oil-based cakes have a noticeably moist texture compared to butter cakes.
Try out some other apple desserts from the website if you liked this apple cake recipe.
- Apple Crumble Bread
- Apple Mousse Cake
- Apple Tarte Tatin
- French Apple Fritters
- Apple And Blueberry Crumble
HUNGRY FOR MORE? Subscribe to my newsletter and follow me on Facebook , Pinterest , and Instagram for my latest updates.
Apple Olive Oil Cake Recipe

5 from 5 reviews
This Ottolenghi apple and olive oil cake is a fabulous fall dessert loaded with chunks of apples, flavored with cinnamon, and covered with maple icing. If you are looking for the most delicious apple cake, this is the one.
- Author: Irina Totterman
- Total Time: 1 hour, 30 minutes
- Yield: 1 0 1 x
- Category: Cakes
- Method: Baking
- Cuisine: British
For the cake:
- 2.8 oz ( 80 g ) sultana raisins
- ¼ cup ( 60 ml) water
- 2 ¼ cups ( 280 g ) all-purpose flour
- ½ teaspoon ground cinnamon
- 1 pinch of salt
- ½ teaspoon baking powder
- ½ teaspoon baking soda
- ½ cup ( 120 ml) olive oil
- ½ cup + ½ tablespoon ( 160 g ) granulated sugar
- 1 teaspoon vanilla extract
- 2 whole eggs, room temperature
- 2 egg whites, room temperature
- 1 teaspoon lemon zest
- 3 medium-sized Granny Smith apples
For the maple icing:
- 3.5 oz ( 100 g ) unsalted butter, softened
- ½ cup ( 100 g ) golden brown sugar
- ⅓ cup ( 85 ml) maple syrup
- 7.7 oz ( 220 g ) cream cheese, room temperature
* If needed, please refer to Baking Conversion Charts .
**Don't you have the correct baking pan on hand right now? Try this simple Cake Pan Converter !
Instructions
- Preheat oven to 375 ° F (190 ° C). Butter an 8-inch (20 cm) springform pan and line its bottom and sides with parchment paper.
- Place sultana raisins and water in a saucepan and simmer over low heat until the water is completely absorbed by the dry fruit. Set aside. Peel apples with a vegetable peeler, remove the heart and seeds, and cut into about ⅓ inch (1 cm) cubes.
- To make the cake, place olive oil, sugar, and vanilla extract in the bowl of a stand mixer and beat. Gradually add lightly beaten whole eggs and continue to mix until the mixture becomes smooth. Then add apple cubes, sultana raisins, and lemon zest grated with a zester grater and combine with a rubber spatula. Finally, add the sifted dry ingredients (flour, ground cinnamon , salt, baking powder , and baking soda ) and mix.
- In a clean bowl, beat egg whites with a stand mixer or an electric mixer until soft peaks. Add it into the main preparation in two additions and gently combine it with the spatula. Pour the batter into a cake pan , even the surface with a spoon, and bake for 90 minutes. Check the cake's readiness with a skewer: if it comes out dry, the cake is ready. Remove the cake from the oven and let it cool in the pan.
- To make the maple icing, place softened butter, brown sugar, and maple syrup in a bowl and beat until the mixture becomes creamy and smooth. Add cream cheese at room temperature and beat until the cream becomes homogeneous.
- To assemble the cake, remove the cold cake from the pan and cut it horizontally using a serrated knife. If the cake is domed after baking, cut the top to even the surface. Place the bottom of the cake on a serving platter and spread half of the maple icing. Place the top half of the cake on the cream layer and cover it with the remaining icing. Even the surface of the cake with a bent spatula or create waves.
- Use this simple cake pan converter to recalculate the amount of ingredients for different cake pan sizes. Modify the baking time accordingly: for a 7-inch (18 cm) cake, decrease the baking time by 10 minutes; to make a 6-inch (15 cm) cake, reduce the baking time by 15 to 20 minutes.
- Make-ahead option: Bake the cake in advance, wrap it with plastic film, and keep it in the fridge for up to one week. Slice and assemble the cake with maple icing on the day of serving.
- Serving Size: 1 slice
- Calories: 491
- Sugar: 49 g
- Sodium: 211 mg
- Fat: 20.3 g
- Saturated Fat: 6.8 g
- Carbohydrates: 74.5 g
- Fiber: 2.5 g
- Protein: 6.6 g
- Cholesterol: 57 mg
The nutritional information has been calculated using an online recipe nutrition calculator such as Verywellfit.com and is intended for informational purposes only. These figures should be used as a general guideline and not be construed as a guarantee.
The recipe was adapted from https://thehappyfoodie.co.uk/ . It was originally published on November 21, 2018. The recipe has been revised to include improved content and photos .
More Cake Recipes

About Irina Totterman
I'm Irina, an experienced home baker with over 30 years of expertise and the blogger behind Baking Like a Chef (since 2018), where I share baking recipes, tips, and tricks. My recipes have been featured in the renowned French Chef Simon and Le Journal des Femmes.
Reader Interactions
Leave a reply cancel reply.
Your email address will not be published. Required fields are marked *
Save my name, email, and website in this browser for the next time I comment.
This site uses Akismet to reduce spam. Learn how your comment data is processed .
December 04, 2018 at 10:35 pm
Love it! Hope I will get the same perfect result with my culinary touch)
October 14, 2019 at 11:10 am
I always have a surplus of apples this time of year. This cake is the perfect thing to make with them. It looks really moist and the frosting looks yummy.
Irina | Baking Like a Chef says
October 16, 2019 at 9:50 pm
Vicky, the maple frosting is incredibly delicious! You might get addicted:) Thanks for your comment.
October 14, 2019 at 11:18 am
Fancy and easy?! That's just what I'm looking for for upcoming holidays! I want to throw a great party but I also want to enjoy time with my guests, this dessert lets that happen!!
October 16, 2019 at 9:54 pm
Beth, in spite that my taste buds are quite spoiled with French desserts, this Apple cake is my favorite!:)
Candice says
October 14, 2019 at 11:38 am
This cake is delicious! Wow. So moist, and so decadent. And I don't think I'll ever want to have anything apple without maple syrup again... yum!
October 16, 2019 at 9:55 pm
Candice, once you try this maple icing, you will fall in love and will make it over again:)
ali randall says
October 14, 2019 at 11:44 am
The apple picking season has me home with two pecks of apples and I have been looking for the right apple recipes. Found this and it looks like the best way to treat everyone who wants a little dessert. Love it!
October 16, 2019 at 9:56 pm
I have already made this Apple cake multiple times. Each time is turns amazingly delicious!
Adriana says
October 14, 2019 at 1:33 pm
Gotta love apple season so many yummy treats can be made like this fantastic cake of yours. I wish I had a slice now.
October 16, 2019 at 9:58 pm
Adriana, thanks. This Apple cake is REALLY GOOD! I wish I could send you a slice:)
FREE ONE-WEEK MEAL PLAN & GROCERY LIST
Sign up and get a 9-page PDF with recipes and a grocery list!

Ottolenghi Cheesecake

Studies show that people who cook for themselves have healthier diets, if for no other reason than they’re not ingesting the chemicals found in pre-packaged foods. You know the rule of thumb: if you can’t pronounce the ingredients on the side of the box, you probably shouldn’t be eating them.
This Yotam Ottolenghi cheesecake, from his cookbook Ottolenghi Simple , is going to be our Easter Sunday dessert. He calls it his Sweet and Salty Cheesecake with Cherries , and it’s wonderful not only because it’s delicious but because you can make it in advance and put it together right before serving. If you’re producing a big meal, an easy-to-assemble-yet-still-spectacular dessert is the perfect solution to that feeling when you’ve been cooking all day and you’re starting to run out of steam by the time you get to dessert prep. I tried this recipe with frozen cherries and ripe cherries (it was a fluke that the grocery store had them at this time of year,) and I thought the fresh cherry version was definitely next level. I hope you love it!
Ingredients
For the cheesecake:
- 3 1/2 ounces feta cheese
- 10 ounces cream cheese, room temperature
- 1 teaspoon lemon zest
- ½ cup plus 1 tablespoon heavy cream
For the crumble:
- ¾ cup blanched almonds, chopped
- 2 tablespoons unsalted butter, cold and diced
- 2/3 cup almond meal
- 2 tablespoons sugar
- 1 tablespoon black sesame seeds (or white)
- 1/8 teaspoon salt
For the cherry compote:
- 1 pound, 5 ounces frozen, pitted cherries, defrosted
- 7 tablespoons sugar
- 4 strips of orange, peeled finely from fruit
- 2 tablespoons olive oil, to serve
- Break the feta cheese down in a large bowl to make as smooth as possible. Add cream cheese, sugar and lemon zest and whisk to combine. Gently whisk cream into mixture and leave to set in the refrigerator until ready to use. (cheesecake mixture keeps up to three days.)
- Preheat oven to 400 degrees.
- To make the crumble, put almonds, butter, almond meal, and sugar in a bowl. Rub the butter into the other ingredients with our fingers until mixture is the consistency of breadcrumbs. Add sesame seed and salt and spread out on a baking sheet. Bake 12 minutes, or until golden brown. (this crumble keeps up to a week.)
- To make the compote, put cherries, sugar, and orange peel into a medium pan and bring to a boil over medium-high heat until sauce thickens. Set aside to allow to cool and remove anise and orange peel.
- When ready to serve, spoon cheesecake into a dessert bowl and top with some of the crumble. Spoon on the cherry compote and add more crumble. Drizzle with olive oil and serve.
Note : The original recipe called for star anise in the compote, and hazelnuts in the crumble. I opted to leave out the anise, on the basis that I can’t stand the flavor of anise, and I prefer almonds to hazelnuts because hazelnuts can be bitter. If you want to go with the original recipe, ad four pods of anise to the compote to cook with orange peel, and substitute almonds for hazelnuts.

One Comment
Leave a comment cancel.
Your email address will not be published. Required fields are marked *
Email Address *

Former White House Social Secretary and co-author of Treating People Well with Jeremy Bernard.
Follow me on
- facebook-official
- pinterest-p
Subscribe to our newsletter
Nathalie Bakes
A little bit of baking from around the world
Poached Pears In White Wine & Cardamom (Ottolenghi)
A healthy dessert! Finally! Well, at least it’s fruit-based:-)
I was looking for a light, fruity dessert to end my hearty dinner party on and found these poached pears in white wine & cardamom recipe in Yotam Ottolenghi’s Jerusalem cookbook (check it out, it’s awesome!).
These poached pears are a nice twist on the traditional red wine version. The cardamom adds an exotic flavour to the pears and combined with the saffron give the sirup a honey-like flavour. The saffron also lends the pears beautiful golden colour.
This dessert is perfect for a dinner party: it’s easy and quick to prepare and can be made in advance.
Source: Jerusalem by Yotam Ottolenghi
Poached pears in white wine and cardamom (Ottolenghi)
A light, easy to make and beautiful poached pears with white wine and oriental spices from Ottolenghi’s Jerusalem cookbook.
- 500 ml (2 cups) dry white wine
- 1½ tbsp lemon juice
- 150 g (3/4 cups) caster sugar
- 15 cardamom pods (lightly crushed)
- ½ tsp saffron threads
- pinch of salt
- 4 firm pears (peeled)
- crème fraîche (to serve – optional)
Gently crush cardamom with a rolling pin or the bottom of a skillet to slightly crack open pods without releasing seeds.
Combine cardamom, wine, sugar, lemon juice, saffron, and salt in a medium saucepan over medium heat, stirring until sugar dissolves. Bring to a simmer. Add pears; add water if needed to completely submerge pears.
Cover with lid slightly ajar and simmer, turning occasionally, until pears are tender but not mushy, about 15-30 minutes, depending on your pears. Check that the pears are ready by inserting a knife into the flesh – it should go in smoothly.
- Using a slotted spoon, transfer pears into four serving bowls. Increase heat and boil poaching liquid until reduced to by about two thirds or until thick and syrupy. Pour over the pears and leave to cool down.
- Serve cold or at room temperature, with optionally crème fraîche on the side or spooned on top.
Recent Posts
- Ottolenghi’s Peach Tart with Rosemary and Lime
- Tarte aux pêches de Yotam Ottolenghi
- Raspberry Tart with Mascarpone Cream
- La tarte framboise de Cyril Lignac
- Tarte aux fraises et à la rhubarbe
- Basic doughs
- Biscuits and cookies
- Biscuits et cookies
- Choux pastry
- Confiseries
- Crèmes glacées
- Desserts fruités
- Entremets et verrines
- Fruit desserts
- Gâteaux et cakes
- Mousses & entremets
- Pains et viennoiseries
- Pâtes de base
- Recettes du mois
Popular Tags
- Newsletter Email Address There was an error. Please try again. You are subscribed!
- News & Trends
- Most Recent
Yotam Ottolenghi's Chicken and Spaghetti Is My Go-To for Busy Weeknights
My easy trick shortens the cooking time by two-thirds.
:max_bytes(150000):strip_icc():format(webp)/DevanGrimsrud-1c4a33f61aec432292b0be01d47afd57.jpg "easy desserts ottolenghi")
Simply Recipes / Mark Beahm
Welcome to Ready. Set. Cookbook! , a column where we share the cookbook recipes we earmark and turn to again and again on the busiest weeknights. These highly craveable recipes will help you get dinner on the table in under an hour.
On busy weeknights, I turn to quick and easy recipes that lean on pantry staples and can be made in one pot. Most of the time that means a simple pasta dish. And lately I’ve been particularly smitten with Yotam Ottolenghi's one-pan crispy spaghetti and chicken from Ottolenghi Test Kitchen: Shelf Love . True to Ottolenghi’s style but slimmed down and simplified, this recipe uses smart techniques to coax so much flavor from just a handful of ingredients.
My Smart Weeknight Trick: Use Boneless Chicken Thighs
As written, the recipe takes 1 hour 30 minutes to make, but I’ve made it many times with a smart ingredient swap, and am pleased to tell you that it is possible to make in under an hour. My secret? Swap out bone-in, skin-on chicken thighs for boneless chicken thighs .
Since boneless chicken thighs cook relatively quickly, you don’t have to cook them in the oven. This cuts down on cooking time from 30 minutes to just 10 minutes. Just make sure you look for boneless thighs with the skin on for more flavor.
Another Reason To Love This Recipe: It’s Made for Multitaskers
The recipe is laid out to help you multitask. Prep the onion and garlic while the chicken browns and make the breadcrumbs, wipe your countertops, and wash the cutting board, while the chicken and pasta cook. By the time you serve dinner—in under one hour—your kitchen will be spanking clean.
Simply Recipes / Mihaela Kozaric Sebrek
How To Make Ottolenghi's One-Pan Spaghetti
Recipe Note : The recipe calls for bone-in chicken thighs. Use six boneless chicken thighs—skin on or off, up to you—and cut the cooking time by a third to just 10 minutes. I've added tips below for how to make this recipe with boneless chicken and save you a lot of time. This recipe serves four to six.
Ingredients:
- 2 tablespoons olive oil
- 6 chicken thighs, skin-on and bone-in (about 1 pound 9 ounces) (see Recipe Note )
- 1 large onion, cut into 1/2-inch dice
- 4 garlic cloves, minced
- 2 tablespoons thyme leaves
- 3 tablespoons tomato paste
- 9 ounces dried spaghetti, broken into thirds
- 1/4 cup finely grated Parmesan
- 1/4 cup fresh breadcrumbs, finely blitzed
- 1/2 cup parsley, finely chopped
- 1 1/2 teaspoons finely grated lemon zest
- salt and black pepper
1. Preheat the oven to 425°F. ( If using boneless chicken thighs, you can skip the oven—no need to preheat it .)
2. Put 1 tablespoon of oil into a large, oven-safe sauté pan, for which you have a lid, and place on high heat. Season the chicken with 3/4 teaspoon of salt and plenty of pepper and add to the hot oil, skin side down. Let cook for 7 minutes, without turning over, to brown well.
3. Turn the heat down to medium-high, then add the onion and stir, turning the chicken over. Cook for 5 minutes, until the onion has softened and is lightly browned. Add the garlic, 1 tablespoon of thyme, and all the tomato paste and cook, stirring, for 1 minute more. Arrange the chicken skin side up, add 1/2 cup plus 2 tablespoons of water and cook for 10 minutes, stirring occasionally, until most of the liquid has reduced.
Add another 1 3/4 cups water, 1/2 teaspoon salt, and a good grind of pepper, then add the spaghetti, stirring to submerge and evenly distribute it. Use tongs to lift the chicken pieces so that they sit on top of the spaghetti, skin side up. Bring to a simmer, cover with the lid, and bake in the oven for 30 minutes, at which stage all the liquid should have been absorbed.
If You're Using Boneless Chicken
If using boneless chicken thighs, you don’t need to cook them in the oven. Simmer the chicken and pasta on the stovetop for 10 minutes with the lid on, until both are cooked through. In the meantime, turn the oven on to broil on high. You'll need it to brown the breadcrumbs.
4. Meanwhile, in a small bowl mix together the Parmesan, breadcrumbs, parsley, lemon zest, and the remaining 1 tablespoon of thyme.
5. After 30 minutes in the oven, remove the pasta pan and reset the oven broiler to high. Sprinkle the breadcrumb mix over the pasta and chicken, drizzle with the remaining oil, and broil for 3–4 minutes, until nicely browned and crisp. Allow to settle for 5 minutes before serving warm, directly from the pan.
Even if you don’t bake the chicken and pasta in the oven, do not skip broiling the breadcrumbs. The crisp browned bits are delicious.
Reprinted from Ottolenghi Test Kitchen: Shelf Love . Copyright © 2021 by Yotam Ottolenghi. Photographs copyright © 2021 Elena Heatherwick. Published by Clarkson Potter, an imprint of Random House.
- International edition
- Australia edition
- Europe edition

From pavlova to cheesecake: Yotam Ottolenghi’s 10 perfect dessert recipes
Chocolate puddings, millionaire’s shortbread and knickerbocker glory all get the Ottolenghi treatment in this exclusive extract from his new book, Sweet
M y first job in a kitchen was whisking egg whites. It was the 1990s, and I was training by day and assisting the pastry chef in a fancy restaurant at night. I spent most of my time beating egg whites for vanilla soufflés; three months in, I was a soufflé expert.
So it must be fate that I made my name with egg whites, sugar and lots of air: those giant meringues that adorn the Ottolenghi shop windows (even if the truth is, I’m ambivalent about them: I like meringue, just not so much of it). But I’ve always had a serious love of all things sweet. There’s nothing like a perfectly light sponge flavoured with spices and citrus, or a mega-crumbly icing-sugar-dusted cookie to raise the spirits. And, yes, I know about the adverse effects of too much sugar, but there’s nothing wrong with a treat.
My long-time collaborator Helen Goh came to the UK from Australia in 2006. At first, I couldn’t understand why she’d left a successful career as a pastry chef (and a psychotherapist) behind – first cooking savoury food, then dreaming up cakes and sweet things in London. Watching her cook, the penny dropped: she has an insatiable drive for perfection. We share the notion that there is no limit to the number of times you can test a cake, or to the thought that can go into a tart to get it just right.
This article includes content provided by Facebook. We ask for your permission before anything is loaded, as they may be using cookies and other technologies. To view this content, click 'Allow and continue' .
Our Sunday afternoon tastings were quite something. In just one session, we’d sample three versions of two cakes-in-progress (one flavoured with vanilla, say, another with pandan, a third with Chinese five-spice); a biscuit Helen had tried in the US and wanted to Ottolenghify; confectionery (Italian nougat and chocolate nut brittle); three cordials; and, to round things off, a pancake or waffle. Those afternoons often ended in sugar-induced delirium.
These days, our tastings are not quite the same, because we’re both now parents. Our deliberations are shorter, our cakes more child-friendly. Our children are also our fiercest critics. Just the other day, I offered my son Max a slice of cake. “Did Helen make it?” he asked.
“I’m afraid not,” I said.
“No, then,” came his answer.
Having been put so firmly in my place, all I could do was go back to the kitchen to whip up some egg whites…

Rolled pavlova with peaches and blackberries
This showstopper (pictured top) makes a real statement. Don’t be put off by its size: large pavlovas are much easier to roll than small ones. We’ve paired late-summer peaches with the blackberries of early autumn, but use whatever fruit you like. The meringue can be baked up to a day ahead. Fill it with fruit and cream up to four hours ahead of time, though it’s best to leave this as close as possible to serving. Serves 10 to 12.
250g egg whites (ie, from six large eggs), at room temperature 375g caster sugar 2 tsp vanilla extract 2 tsp white-wine vinegar 2 tsp corn flour
For the filling 400ml double cream 1 tsp vanilla extract 30g icing sugar, sifted, plus extra for dusting 5 large, ripe peaches, washed but unpeeled, halved, stoned and cut into 0.5cm-wide segments 300g fresh blackberries 60g toasted flaked almonds
Heat the oven to 220C/425F/gas mark 7. Line a 35cm x 30cm shallow baking tray with enough greaseproof paper to hang 2cm over the sides.
To make the meringue, put the egg whites in the bowl of an electric mixer with the whisk attachment in place and whisk to soft peaks on a medium-high speed for about a minute. Add the sugar a tablespoon at a time, whisking all the time, and continue to beat for at least five minutes, until the mixture turns into thick, glossy meringue. Turn the speed to low, add the vanilla, vinegar and corn flour, then raise the speed to medium and whisk for a minute, until combined.
Spoon the meringue into the lined tin and use a spatula to spread it out evenly. Place in the heated oven and immediately lower the temperature to 200C/390F/gas mark 6: it’s this contrast in temperatures that helps create that crisp exterior and gooey, marshmallow-like insides. Bake for 35 minutes, until the meringue is pale beige in colour and crusty on top, then remove and set aside until cool. The meringue will puff up in the oven and deflate slightly when cooled. (If you’re making it a day ahead, once cool, cover the tray with a tea towel and keep at room temperature.)
For the filling, beat the cream to very soft peaks – about a minute with an electric whisk on a medium-high speed; longer if whisking by hand. Add the vanilla and icing sugar, and whisk to incorporate.
Place a clean tea towel flat on top of the meringue (or use the one already covering it, if you made it the day before) and quickly but carefully invert it on to the work surface, so the crisp top is now facing down. Lift away the tin and carefully peel off the baking paper, then spread the meringue evenly with two-thirds of the whipped cream. Cover with 500g sliced peaches and 200g blackberries, and sprinkle over 50g almonds.
Now to roll the meringue. Starting with the longest side closest to you, and using the tea towel to assist you, roll the meringue up and over, so it comes together into a log. Gently pull away the tea towel as you roll, then slide the meringue seam side down on to a long tray or platter; don’t worry if it loses its shape a bit, or if some of the fruit spills out.
Pipe or spoon the rest of the cream down the length of the roulade, top with the remaining fruit and nuts, dust with icing sugar, and serve.
Chocolate, banana and pecan cookies

The banana creates moisture and adds flavour; pecans are the classic match, but walnuts work, too. The secret is to slightly under-bake these cookies, to keep them soft and fudgy. Once rolled into balls, the dough keeps in the fridge for two days, or can be frozen for up to three months (they cook straight from frozen, too: just add a minute to the baking time). Eat within a day of baking. Makes 24.
110g unsalted butter at room temperature, cubed 110g caster sugar 1 large egg, lightly beaten 125g plain flour ½ tsp baking powder 20g cocoa powder ½ tsp ground cinnamon ¼ tsp salt 100g 70% cocoa chocolate chips (or 100g dark cooking chocolate in 0.5cm pieces) 50g mashed banana (½ small banana) 170g pecan halves, finely chopped 100g icing sugar
In the bowl of an electric mixer with the paddle attachment in place, beat the butter and sugar on a medium-high speed until light and fluffy, then add the egg and beat to combine. Sift the flour, baking powder, cocoa powder, cinnamon and salt into a bowl, then add to the butter mix, beating on low speed for 15 seconds. Beat in the chocolate and banana until combined, then transfer to the fridge for two hours to firm up.
Once firm, form the dough into 24 3cm balls, about 20g each. Put the pecans in a bowl, then drop in each ball, rolling it around to coat and pressing the nuts in, so they stick.
Put the cookies on a baking tray lined with greaseproof paper and refrigerate for at least an hour.
Heat the oven to 190C/375F/gas mark 5 and line two oven trays with baking paper. Put the icing sugar in a bowl and roll the cookies one by one in the sugar, pressing it in as you go, so it sticks. Arrange the cookies on the trays 2-3cm apart, then flatten them to about 1cm thick.
Bake for 10 minutes, then remove: the cookies will be soft to the touch. Leave to cool for 10 minutes, then move to a rack. Serve warm or cool.
Middle Eastern millionaire’s shortbread

This transforms the famously cloying biscuit into something much better, with a slight bitterness and a touch of salt to offset all the sweetness. The shortbread can be made up to four days ahead and stored in an airtight container; it freezes well, too. The finished biscuits keep for up to a week in an airtight container in the fridge. Remove 20 minutes before serving, to take off the chill. Makes 16.
For the shortbread 40g icing sugar 35g corn flour 40g caster sugar 175g unsalted butter, melted and cooled ½ tsp vanilla extract 250g plain flour ⅛ tsp salt
For the halva 200g halva, crumbled into small pieces 80g tahini
For the tahini caramel 200g caster sugar 120ml water 100g unsalted butter at room temperature, cubed 80ml double cream 150g tahini paste ¼ tsp sea salt flakes
Heat the oven to 200C/390F/gas mark 6. Line a 20cm square tin with baking paper, making sure the paper comes well over the edges.
For the shortbread, sift the icing sugar and corn flour into the bowl of an electric mixer with the paddle attachment in place, then add the caster sugar and mix on a medium speed. With the motor running, slowly pour in the cooled melted butter and beat to combine. Add the vanilla, turn the speed to low, then sift in the flour and salt, and beat until the dough comes together.
Tip the mixture into the lined tin and use your hands to even out the top. Bake for 25 minutes, until golden brown, then remove and leave to cool. This will take an hour – don’t start the caramel too soon, or it will set by the time the shortbread is cool.
For the halva layer, put the halva and tahini in a small bowl and mix with a wooden spoon to combine. Spread this over the cooled shortbread and use the back of a spoon to smooth it into an even layer.
For the caramel, put the sugar and water into a small saucepan on a medium-low heat. Stir occasionally, until the sugar has dissolved, then increase the heat to medium-high. Bring to a boil and cook for 12 minutes, until the sugar is a deep golden brown. Remove from the heat and add the butter and cream – take care, because it will splutter. Whisk to combine and, once the butter has melted, add the tahini and salt. Whisk to combine, then pour evenly over the halva layer in the tin, so it’s all covered. Transfer to the fridge and chill for at least four hours, until set. Cut into 10cm x 2.5cm bars, sprinkle a pinch of sea salt over the middle of each bar and serve.
Neapolitan pound cake

We’ve gone for classic Neapolitan colours with the pink icing (heaven for a child’s birthday party), but white or cream icing will also work. The degree of pinkness (or any colour, for that matter) will depend on the type of food colouring you choose: you’ll need anything from a whole tube (if you use a basic liquid gel) to an eighth of a teaspoon (if you use a concentrated gel). Always start with a little and take it from there, because it’s much easier to add more than to take any away. Un-iced, the cake will keep at room temperature for up to three days, wrapped in cling-film; it can also be frozen for up to three months. Once iced, it’s best eaten on the same day. Serves 10.
90ml full-fat milk at room temperature, plus 20ml extra for the cocoa paste 6 large eggs, at room temperature 1 tbsp vanilla extract 200g self-raising flour 100g plain flour, plus extra for dusting ½ tsp salt 300g caster sugar 300g unsalted butter, soft but not oily, diced, plus extra for greasing 2 tbsp Dutch-processed cocoa powder A drop or two of food colouring (gel or paste, ideally)
For the icing 45ml full-fat milk, warmed 260g icing sugar, sifted 30g unsalted butter, soft ½ tsp vanilla extract A drop or two of food colouring (gel or paste, ideally)
Heat the oven to 200C/390F/gas mark 6. Grease and flour a 23cm bundt tin and set aside.
For the cake, put the milk, eggs and vanilla extract in a medium bowl and whisk lightly, just to combine. Sift the flours and salt into the bowl of an electric mixer with the paddle attachment in place, then add the sugar and mix on a low speed for 30 seconds. Add the butter and half the egg mixture, mix until well incorporated, then increase the speed to medium and beat for one minute. Scrape down the sides of the bowl, then add the remaining egg mixture in two batches, making sure the first batch is fully incorporated before adding the second. Scrape down the sides of the bowl again, then divide the batter equally between three small bowls.
Warm the extra 20ml milk in a small saucepan, then put it in a small bowl with the cocoa powder. Stir to make a smooth and very thick paste, then mix into one of the bowls of cake batter. Tint the second bowl of cake batter with the food colouring, adding a drop or two at a time until it’s the colour you want. Leave the third bowl of batter as it is.
Spoon the three bowls of batter into the prepared tin in six alternate blocks, two of each colour, then use a skewer or knife to make one zigzag-shaped swirl through the mix, to create a marble effect (don’t be tempted to overdo the swirling, or you’ll lose the marbling).
Bake for 40-45 minutes, until a skewer comes out clean, then remove and set aside for 10 minutes.
For the icing, combine the warm milk and icing sugar in a small bowl. Add the butter and vanilla, whisk smooth, then add a drop or two of food colouring and mix again. Spoon over the cooled cake, so it drips unevenly down the sides, leave to set for a few minutes, and serve.
Knickerbocker glory

This is our go-to happy-making dessert. The conical glass, the long spoon, the colours, the connotations: knickerbocker glory is the definition of good old-fashioned fun. That said, happiness shouldn’t be dependent on props, so don’t be put off if you don’t have traditional sundae glasses or spoons. To make things easier, the ice-cream we’ve gone for is a semifreddo, which doesn’t need churning. Fresh raspberries are lovely, of course, but frozen ones also work well. You’ll need to freeze the glasses before assembling. Serves six.
For the semifreddo 600g raspberries (fresh or frozen and defrosted) 2 tbsp icing sugar 200ml double cream 1 large egg, plus 2 large egg yolks 1 tsp lemon juice 180g caster sugar ⅛ tsp salt
For the candied pecans 1 tbsp maple syrup 1 tbsp liquid glucose 1 tbsp caster sugar 120g pecan halves ⅛ tsp flaky sea salt
For the chantilly cream 300ml double cream 2 tbsp icing sugar, sifted 1 tsp vanilla extract
To finish About 5 red plums, stoned and chopped into 3cm chunks
Blitz the raspberries to a puree, then pass this through a fine sieve into a bowl, to remove the seeds. (Use the back of a large spoon to scrape the fruit through the sieve; you may need to do this in batches.) Measure out 260ml of the puree and set aside, then sift the icing sugar into the rest (there should be about 100ml), pour into a jug and refrigerate.
Whip 200ml double cream to soft peaks, then refrigerate.
Pour enough water into a medium saucepan to come 2cm up the sides: you want the bowl from your mixer to sit over the pan without touching the water. Bring the water to a boil, then reduce to a low simmer.
Whisk the egg, egg yolks, lemon juice, sugar and salt in the clean bowl of an electric mixer, then place the bowl over the simmering water and whisk continuously for about five minutes, until the sugar has dissolved and the mixture is very warm. Put the bowl back on the mixer with the whisk attachment in place and beat on a medium-high speed until it is thick and cool: it will thicken quite quickly, but takes 10 minutes or more to cool. Add the 260ml raspberry puree and whisk on a low speed to combine. Scrape down the sides of the bowl and carry on mixing until well combined. Fold in the cold whipped cream from the fridge, then scrape the lot into a large freezer-proof container, cover with cling-film and freeze for at least 12 hours.
Put some tall glasses in the freezer to chill. Heat the oven to 190C/375F/gas mark 5 and line an oven tray (with a lipped edge) with greaseproof paper. Put the maple syrup, glucose and sugar in a small saucepan over a low heat. Stir gently, until the sugar has melted, then add the pecans and salt. Stir so the nuts are coated, then tip on to the tray. Roast for about eight minutes, until the syrup is bubbling around the nuts, then remove and leave to cool. Once cool, the glaze should be completely crisp (if not, return the tray to the oven for a few minutes, then leave to cool and set again). Break or roughly chop the nuts into 0.5cm pieces, and set aside until ready to use.
For the chantilly cream, put the cream in the bowl of an electric mixer with the whisk attachment in place, add the icing sugar and vanilla, and whip to soft peaks. Transfer to a bowl and refrigerate.
To assemble the knickerbocker glories, take the semifreddo from the freezer 10 minutes beforehand, so it’s soft enough to scoop. Remove the glasses from the freezer and divide the chopped plums between them. Drizzle half a tablespoon of the sweetened raspberry puree over each serving, add a tablespoon of pecans, then spoon a large scoop of semifreddo on top. Drizzle over the remaining sauce – about half a tablespoon per glass – followed by a small tablespoon of nuts and a couple of big dollops of whipped cream. Finish with a final sprinkling of chopped nuts and serve at once.
Coffee and walnut financiers

Financiers are similar to friands, another little French cake whose elegance and svelteness belie quite how much (burnt) butter is built into their being. It’s this beurre noisette that gives them that rich, nutty flavour. They are typically rectangular, and at work we make them in straight, high-sided popover tins, so the icing trickles down the sides. These tins aren’t easy to come by, however, so we’ve adjusted the recipe to work in a regular muffin or mini-muffin tin. As mini-muffins, they’re the perfect end to a meal, to accompany coffee.
Financiers are best eaten on the day they’re baked, but these will keep for up to two days in a sealed container. The batter can be made and kept in the fridge for up to two days. Makes 12 (in a regular muffin tin) or 24 (in a mini-muffin tin).
80g walnut halves, plus an extra 12–24 halves, to garnish 120g unsalted butter, cut into 2cm cubes, plus extra for greasing 220g icing sugar 90g plain flour, plus extra for dusting 1 tsp baking powder ¼ tsp salt 80g ground almonds 230g egg whites (from 6 large eggs) 1 tbsp instant coffee granules, dissolved in 70ml boiling water 1½ tsp ground espresso coffee
For the icing 250g icing sugar 2½ tsp instant coffee granules 35ml hot full-fat milk 15g liquid glucose
Heat the oven to 170C/335F/gas mark 3. Spread the walnuts on a baking tray, roast for 10 minutes, then remove and, when they’re cool enough to handle, roughly chop into 0.5–1cm pieces.
To make the batter, start by browning the butter. Put it in a small saucepan and cook over a medium heat until melted. Continue to cook until the butter is foaming, swirling the pan so the solids brown more evenly. Leave the butter to bubble away until it turns a rich golden brown, then take off the heat and leave to stand for five minutes. Strain through a fine-mesh (or muslin-lined) sieve, discarding the solids, then leave to cool slightly. It should still be warm when you fold it into the mix: if it’s too hot, it will “cook” the egg whites; if it’s too cool, it will be hard to incorporate.
While the butter is cooling, sift the icing sugar, flour, baking powder and salt into a medium bowl, then whisk in the almonds. Put the egg whites in a bowl and use a fork to froth them up a little – you don’t need to whisk them. Pour the egg whites and dissolved coffee granules into the dry ingredients, and stir until just combined. Add the browned butter and mix until the batter is thick, shiny and smooth. Fold in the walnuts and ground coffee, then cover with cling-film and refrigerate for at least two hours.
Heat the oven to 200C/390F/gas mark 6. Butter the moulds of your chosen muffin tin, dust with flour and tap away any excess. Spoon the batter into each mould, filling them three-quarters full, then bake for about 25 minutes if using a regular muffin tin, 14 for a mini-muffin tin, or until the tops are a little cracked and a skewer comes out clean.
Make the icing while the financiers are baking. Sift the icing sugar into a medium bowl and add the remaining ingredients. Mix until smooth, then set aside. Don’t worry if there are undissolved coffee granules in the icing: they look good in the finished dish.
Remove the tin from the oven, set aside to cool for five minutes, then gently tap it against a work surface, to encourage the cakes to fall out. Put the financiers on a rack to cool.
To serve, spread the icing on top and finish each financier with a walnut half, a dusting of icing sugar and a little finely ground espresso.
Fig and pistachio frangipane tartlets

When we posted a shot of these on Instagram , they got a big thumbs-up from our followers. These tarts are lovely just as they are, or with a spoonful of vanilla ice-cream, soured cream or creme fraiche. If you can’t get hold of big figs, use six smaller ones and cut them in half rather than quarters. (Alternatively, raspberries work well, too: put three large raspberries in the centre of each tart and bake.)
As with many of our recipes that call for a nip of brandy, don’t worry if you don’t have an open bottle to hand: it’s not there for its flavour, but to draw out the subtle flavour of the pistachios, so these tartlets work just fine without. You’ll need only two-thirds of the pastry here, so freeze the rest for another time. Makes 12.
For the sweet shortcrust pastry 300g plain flour, plus extra for dusting 90g icing sugar ¼ tsp salt 200g unsalted butter, fridge-cold, cut into cubes, plus an extra 10g, melted, for brushing Finely grated zest of 1 lemon (1 tsp) 1 large egg yolk 20ml water
For the pistachio frangipane cream 90g shelled pistachios, plus extra, blitzed, to finish (optional) 35g ground almonds 35g plain flour ⅛ tsp salt 125g unsalted butter, at room temperature 125g caster sugar Finely grated zest of 1 lemon (1 tsp) 2 large eggs, lightly beaten 1 tbsp brandy (optional) 3 large ripe figs, quartered
To make the pastry, sift the flour, icing sugar and salt into the bowl of a food processor. Add the butter and lemon zest, then pulse a few times, until the mixture is the consistency of fresh breadcrumbs. Whisk the egg yolk and water, then add to the mix: the dough should feel quite wet. Process once more, just until the dough comes together, then tip on to a lightly floured work surface. Knead the dough into a ball, wrap loosely in cling-film and press gently into a flattish disc. The dough will be very soft, so keep it in the fridge for at least an hour (or up to three days).
Lightly brush the moulds of a regular muffin tin with melted butter and dust with flour, tapping out any excess.
If the dough has been in the fridge for more than a few hours, let it rest at room temperature for up to 30 minutes before rolling. Tip it out on to on a lightly floured worktop, tap all over with a rolling pin to soften slightly, then roll out to 2-3mm thick. Using a 10cm or 11cm round cookie cutter, cut out 12 circles, and gently ease these into the muffin moulds, pressing them down to fill the moulds. Refrigerate the muffin tin for at least an hour.
Heat the oven to 180C/350F/gas mark 4. Line the pastry cases with baking paper or liners. Fill with a layer of rice or baking beans, and blind-bake for 25-30 minutes, until the pastry shells are light golden brown around the edges. Remove the paper and rice or beans, then leave the shells to cool in the tin.
To make the frangipane cream, put the pistachios in the small bowl of a food processor and grind until fine but not oily. Transfer to a small bowl, and mix in the ground almonds, flour and salt.
Put the butter, sugar and lemon zest in the bowl of an electric mixer with the paddle attachment in place. Cream on a medium speed for a minute or two, until light but not too fluffy, then turn the speed to low and gradually add the beaten eggs. Don’t worry if the mix curdles a bit at this stage: it will come together again later. Add the nut/flour mix, beat on a low speed until combined, then add the brandy (if using).
Turn up the oven to 200C/390F/gas mark 6. Using a piping bag or two dessert spoons, fill the baked tart cases (still in their tin) with frangipane to come about two-thirds of the way up the sides of the cases. Place a quarter-fig cut side up in the middle of each tart, and press down gently, so it’s slightly embedded in the mixture. Once all the cases are filled, bake for about 20 minutes, until the frangipane starts to brown at the edges but the middle is still slightly soft. Leave to cool in the tin for 10 minutes, then ease the tarts out of their moulds and place on a wire rack to cool. Serve sprinkled with blitzed pistachios, if you like.
Rum and raisin cake with rum caramel icing

We make this in a 23cm bundt tin. If you don’t have one, use a 23cm round springform tin instead – it won’t look quite as pretty, but it will still work. The raisins need to be prepared a day ahead, so they’re nice and plump from soaking up all the booze. Iced or un-iced, this cake will keep for two to three days in an airtight container. Serves eight to 10.
200g raisins 120ml dark rum 300g plain flour, plus extra for dusting 1 tsp baking powder 1 tsp bicarbonate of soda ½ tsp ground cinnamon ¼ tsp salt 250g unsalted butter at room temperature, plus extra for greasing 250g light brown muscovado sugar 1 tsp vanilla extract 2 large eggs 200g soured cream
For the rum caramel icing 60g unsalted butter 80g light brown muscovado sugar 3 tbsp milk 1 tbsp dark rum 100g icing sugar, sifted
A day ahead, put the raisins and rum in a large jar or container for which you have a lid. Give it a good shake and leave to macerate for a day. Whenever you walk past the jar, give it another shake.
The next day, heat the oven to 190C/375F/gas mark 5, and grease and flour a 23cm round bundt tin.
Sift the flour, baking powder, bicarb, cinnamon and salt into a medium bowl. Put the butter, sugar and vanilla extract in the bowl of an electric mixer with the paddle attachment in place, and beat on a medium-high speed until smooth and light. Add the eggs one a time, beating well after each addition, then reduce the speed to low and, with the machine running, add the flour mix alternately with the soured cream, beginning and ending with the flour mix, to stabilise the mixture and prevent it from curdling. Finally, add the soaked raisins and rum, and mix on a low speed just to combine.
Scrape the mix into the tin, smooth the top, and bake for 50 minutes, or until a skewer comes out clean. Take the cake from the oven, leave for 15 minutes, then invert on to a wire rack and leave to cool.
Make the icing only when you are ready to serve. Melt the butter in a small saucepan over a low heat, then add the sugar and cook for one minute, stirring continuously, until the mix comes together. Add the milk, increase the heat and bring to a boil. Remove from the heat, add the rum, mix well and leave to cool to room temperature. Once cool, beat in half the icing sugar using a wooden spoon. Once incorporated, add the remaining icing sugar and beat until thick and smooth. Spread the icing all over the top of the cake, letting it run slowly down the sides, leave to set a little and serve.
Hot chocolate and lime puddings

These deliver the lightness of a soufflé without any of the anxiety. There is just a suggestion of lime from the zest, but feel free to use orange zest instead if the combination of chocolate and orange appeals more. These can be made in ceramic or glass 200ml ramekins (ours are 10cm wide); alternatively, use 200ml dariole moulds. They are best served warm, but will keep for a day or two at room temperature (don’t keep them in the fridge, or the soft insides will set). Serves six.
15g unsalted butter, softened 200g 70% cocoa solid dark cooking chocolate, roughly chopped 100g 37% cocoa solid milk cooking chocolate, roughly chopped Finely grated zest of three limes (1 tbsp) Four large eggs, at room temperature 60g caster sugar, plus 30g for preparing the moulds 110ml double cream 200g creme fraiche, to serve
Heat the oven to 200C/390F/gas mark 6. Brush the ramekins or moulds with softened butter, then sprinkle with caster sugar to coat evenly.
Melt the chocolate in a medium heatproof bowl set over a pan of simmering water, making sure the base isn’t touching the water; stir with a spatula from time to time, so it melts evenly. Remove the bowl from the heat, stir in the lime zest and leave to cool for 10 minutes, until tepid.
Put the eggs and sugar in the bowl of an electric mixer with the whisk attachment in place and beat on high speed for six minutes, until very light, fluffy and trebled in volume. Meanwhile, put the double cream in a medium bowl and whisk to soft peaks.
Gently fold the melted chocolate in two batches into the egg mix. When almost combined, fold in the whipped cream until thoroughly combined: it will lose a little volume, so take care not to over-mix.
Spoon the mixture into the prepared ramekins, filling them three-quarters of the way up the sides. Put the ramekins in a large, deep baking dish, transfer to the oven and pour boiling water into the tray so it comes a third of the way up the sides of the ramekins. Bake for 20-22 minutes, until the puddings are softly set in the middle: check by gently tapping the centre of the puddings with a fingertip. Remove from the oven, transfer the ramekins to serving plates and serve at once with a little creme fraiche spooned alongside.
Lime meringue cheesecakes
Part lime meringue pie, part classic cheesecake, this is an impressive dessert. It’s one to save for a special occasion, because there’s a fair bit of work. That said, you can make two of the three layers (the base layer and the cheesecake) a day ahead, which helps, leaving just the meringue to make on the day itself.
We use a Swiss meringue for the cheesecake, because of its chewy, marshmallow-like texture. Beyond the heat treatment the egg whites and sugar receive before being whipped, there’s no extra baking, so it’s important to ensure they’re very warm, ideally reaching 71C on a sugar thermometer. In addition to the thermometer, you would ideally also have a blowtorch to brown the meringue, because that produces the best results. If you don’t have one, grill until browned. We like to make these as individual cakes, in 8cm round cake rings; slightly smaller rings are fine, if that’s all you have (you’ll just make an extra cake as a result), but don’t be tempted to use larger rings: part of the attractiveness of these cakes is their height, and you will lose that if they are too wide. You will also need a piping bag with a 1cm tip for piping the meringue “kisses”.
The base can be made a day in advance and stored in the fridge. The cheesecake (without the meringue topping) can be made a day in advance and refrigerated overnight. The nut topping can be made up to five days in advance and stored in an airtight container. Once the meringues have been browned, however, they are best eaten within three or four hours. Makes eight.
For the base 60g brazil nuts 140g digestive biscuits, roughly broken 20g desiccated coconut 70g unsalted butter, melted, plus extra for greasing
For the filling 280g cream cheese 410g tinned condensed milk 120g egg yolks (from 6 large eggs) 200ml freshly squeezed lime juice Finely grated zest of 2 limes (2 tsp)
For the topping (optional) 15g coconut chips 25g brazil nuts, thinly sliced 20g soft dark brown sugar ½ tsp lime juice
For the meringue 100g egg whites (from about 2½ large eggs) 180g caster sugar ⅛ tsp salt
Heat the oven to 170C/335F/gas mark 3. Lightly grease the sides of eight individual 8cm-wide cake rings, and line the sides with greaseproof paper so it comes 4cm above the top of the rings. Put the lined rings on a large baking sheet that is itself lined with greaseproof paper.
For the base, spread out the brazil nuts on a baking tray and roast for about 12 minutes, until lightly golden. Leave to cool, then blitz in a food processor until finely chopped. Add the biscuits to the food processor, blitz to fine crumbs and tip the nuts and biscuits into a small bowl. Add the coconut and melted butter, and mix in well using your hands. Put two heaped tablespoons of the crumb mix into each ring, using your hands to press them into the base. Even out the crust with the back of a spoon or the base of a glass, then refrigerate.
To make the filling, put the cream cheese in the bowl of an electric mixer with the paddle attachment in place. Mix on a medium-low speed until creamy, then add the condensed milk and egg yolks. Continue to mix until smooth, scraping down the sides occasionally, then add the lime juice, mix again to incorporate, then strain into a large jug. Stir in the lime zest, then pour the mix into the prepared rings so it comes three-quarters of the way up the sides.
Bake the cheesecakes for 20 minutes, until set, then remove and leave to cool. Cover lightly with cling-film and refrigerate for at least four hours, or overnight.
To make the topping, toast the coconut and brazil nuts in a small saucepan on a medium heat for about three minutes, stirring frequently, until a light golden brown. Add the sugar and lime juice, cook for a minute more, until melted and well combined, then tip on to a tray lined with greaseproof paper and leave to cool.
Make the meringue on the day of serving. Into a pan large enough for the bowl of your electric mixer to sit on top, pour enough water to come a quarter of the way up the sides and bring to a boil. Put the egg whites, sugar and salt in the bowl of the mixer with the whisk attachment in place and whisk to combine. Reduce the heat under the pan so the water is just simmering, then place the bowl on the pan, making sure the water doesn’t touch its base. Whisk the eggs for five minutes by hand, until very warm, then put the bowl back on the electric mixer stand and whisk for about five minutes on a high speed, until the meringue is stiff and cool. Transfer the meringue to a piping bag fitted with a 1cm tip.
Carefully remove the rings and paper collars from the cheesecakes, then pipe meringue “kisses” on top and, using a blowtorch, ideally, heat the meringue so that parts of it turn a golden brown. Alternatively, put the tray under a hot grill for one to two minutes.
This is an edited extract from Sweet, by Yotam Ottolenghi and Helen Goh, published next week by Ebury Press at £27. To order a copy for £20.25, a 25% saving, go to guardianbookshop.com or call 0330 333 6846.
Photographer’s assistant: Veerle Evens. Food Stylist: Laurie Perry. Prop Stylist: Louie Waller.
- Yotam Ottolenghi recipes
- Ice-cream and sorbet
Comments (…)
Most viewed.
Follow Eater online:
- Follow Eater on Twitter
- Follow Eater on Facebook
- Follow Eater on Youtube
- Follow Eater on Instagram
Site search
- Los Angeles
- New Orleans
- Philadelphia
- Portland, OR
- San Francisco
- Twin Cities
- Washington DC
Filed under:
- Eater at Home
- Okay, But Actually
An Eggplant ‘Meatballs’ Recipe, Streamlined for Easy Cooking
We took one of Ottolenghi’s famously complicated recipes and simplified everything but the flavor
If you buy something from an Eater link, Vox Media may earn a commission. See our ethics policy .
Share this story
- Share this on Facebook
- Share this on Twitter
- Share All sharing options
Share All sharing options for: An Eggplant ‘Meatballs’ Recipe, Streamlined for Easy Cooking
/cdn.vox-cdn.com/uploads/chorus_image/image/73378117/Avila_Eater_Eggplant_Meatballs_31817_1_3.0.jpg "easy desserts ottolenghi")
If you haven’t heard of Yotam Ottolenghi, then you might not have browsed a cookbook section or been on Instagram in the last 16 years. The Israeli-born chef has created an empire around vegetable-forward cooking, racking up nine restaurants in London, multiple TV specials, 12 cookbooks, and numerous awards. His colorful, inspiring dishes have helped him sell hundreds of thousands of cookbooks in an era when most folks get their recipes for free online. What’s more, his use of Middle Eastern ingredients like za’atar, black limes, pul biber, tahini, and rose harissa have compelled legions to seek them out, and in the process made them more readily available in this country. It’s not hyperbole to state that Ottolenghi has changed the way many of us cook.
And yet, everyone I know who has an Ottolenghi cookbook also has a story about one or more recipes that were so involved that they required every pan in the kitchen, or ingredients next to impossible to track down. The complexities of Ottolenghi’s recipes are so widely recognized that the New Yorker published a satirical round-up of the chef’s “easiest recipes ever”; a “simple salad” included three types of leaves, edible flowers, 16-year-old Modena vinegar (preferably older), pink miso, white miso, garlic scapes, and human tears.
I have four of Ottolenghi’s cookbooks and read his weekly column in the Guardian and yes, there are both easy wins and hard-fought struggles coming from the Ottolenghi Test Kitchen (OTK for those in the know). The latest recipe I tried, eggplant dumplings alla parmigiana, turned out to be the latter. Published in Ottolenghi’s 2022 cookbook, Flavor , it’s a version of the classic Italian vegetarian “meatballs” that have been made in frugal Italian homes for centuries whenever meat was scarce. The recipe’s headnote promises all the flavor of the classic breaded eggplant and red sauce dish, in meatball form.
I love meatballs, I love Parmigiano Reggiano cheese, and eggplant — well, he had me at eggplant. I went into the recipe knowing that I’d sink a bit of time into dinner: all meatballs require some degree of effort, vegetarian ones even more so. What I didn’t anticipate was the furious amount of scribbling I had to do in the cookbook’s margins just to vent my frustration during the three and a half hours it took to make a maddeningly inefficient recipe. Yes, it yielded vegetarian meatballs with a satisfying meatiness and creamy interior, along with an okay red sauce. It also made my kitchen look like a Category Five hurricane had stopped by a ketchup factory.
There had to be an easier, more efficient way. So I got to work.
The first step of Ottolenghi’s recipe instructs the reader to make sourdough breadcrumbs but doesn’t say how, and then tells you to toast them. I wound up with crunchy breadcrumbs that are exactly the texture of panko breadcrumbs, and darned close to the same flavor. So when I started revising the recipe, one of my first orders of business was to use panko. That change alone meant one less pan (and food processor bowl) to wash, not to mention 20 fewer minutes of prep time.
Moving on to the eggplant, Ottolenghi has you cut four eggplants (he doesn’t specify which type or size) into one-inch cubes to make 12 cups, toss them with ⅓ cup oil, and roast them. That’s a lot of eggplant for one sheet pan, so I had to keep adding time and stirring until the pieces were all cooked, which added 20 minutes to the 30 minutes he called for. Next, you pile the oily, piping hot eggplant cubes onto a cutting board and chop them some more. What could go wrong?
Two Band-Aids later, I vowed to make this a less dangerous process. So in my adaptation, I use a large, 1⅓ -pound eggplant. I peel strips of the skin (more on that later) and cut the eggplant into thick rounds, brush them with a little olive oil, and broil them for five minutes per side. Voila, evenly cooked eggplant in less than half the time. Then, instead of chopping the slices, I mash them with a potato masher in a bowl. Easy, safer, and very effective.
The original recipe then adds six tablespoons of ricotta to the chopped eggplant — annoying, since ricotta is sold in a standard 15-ounce container. Since ricotta doesn’t taste like much and adds lots of moisture to an already wet mixture, I decided to leave it out of the reworked recipe. No difference in texture or flavor noted. Ottolenghi also calls for one egg, plus one yolk. Why? Would the second egg white make the whole enterprise fail? No: it turns out that you can use an entire egg and everything will turn out just fine. As a bonus, there’s no leftover egg white roaming the fridge, waiting to be spilled or spoiled.
Ottolenghi’s recipe also calls for three cloves of crushed garlic, flour, fresh parsley, and roughly chopped fresh basil. Since the garlic is raw, it remains quite bitey. Call me a heretic, but there is a time and place for garlic powder. It melds evenly into meatballs and dips with no raw garlic taste. As for the flour, I’m assuming Ottolenghi included it to absorb the extra moisture from the ricotta, but it makes the balls extra sticky and wasn’t really necessary in later ricotta-free versions I tested, so I left it out with no problems.
The original recipe’s use of fresh basil required me to drop $3.79 for a tiny plastic packet of out-of-season basil that amounted to barely a whisper of flavor in the meatballs. So in my later attempts at revision, I used the basil only for garnishing the finished dish as instructed, all the better to taste its freshness. But I did want to give the balls a more Italian/eggplant Parmesan-leaning flavor, so I added dry Italian seasoning. Bada-bing! Major flavor was waiting for me in my spice drawer all along.
Ottolenghi’s recipe has you lightly oil your hands to roll the eggplant mixture into 16 golf ball-sized spheres. I ended up with 18 misshapen blobs the size of a baby’s fist after wrestling the preternaturally sticky mixture, a task made even more difficult by all of the errant eggplant skins it contained. The next step, to pan-fry the meatballs, should have been easy, but the meatballs stuck to the nonstick pan, turned from raw to nearly blackened no matter how much I lowered the heat, and occasionally fell apart at even the gentlest prod.
So in my adapted version of the recipe, I let the eggplant-panko mixture rest for 15 minutes, enough time for the breadcrumbs to soak up some of the moisture and cohere the ingredients. I used a tablespoon-sized cookie dough scoop to form the balls and popped them on a sheet tray to bake in a hot oven with the convection fan on. They didn’t end up quite as dark as the original eggplant meatballs (perhaps a good thing), but they did brown evenly and were nicely compact. Oh, and I also didn’t have to wash my hands five times while making them.
The book’s recipe also has you make a homemade red sauce. Simple enough, right? Wrong. Followed to the letter, you start out by sauteing garlic over medium-high heat for one minute. My garlic ended up just this side of burnt, which gave the sauce a bitter edge I didn’t love, even with the added sugar. Next you add “blitzed” whole canned tomatoes (Ottolenghi doesn’t say how to blitz them), a tiny amount of tomato paste, an inexplicable ¾ teaspoon of paprika (it’s undetectable in the finished sauce), and two teaspoons of fresh oregano (no dried alternative amount is given). After eight minutes of vigorous simmering over medium-high heat, my stove area was splattered with red polka dots, as was I.
Next, you pour 1⅔ cups of water into the reduced sauce. But why dilute what you just reduced? You could just as easily simmer the sauce over a lower heat with the lid on, thereby retaining more of the moisture while still melding the flavors. Or you know what is even easier? Opening a jar of good marinara sauce. I used Carbone’s jarred marinara, which saved me 30-plus minutes and spared me the joy of scraping red sauce splotches from the kitchen wall. And it may be blasphemy to say so, but the jarred sauce tasted a lot better than the homemade version.
The final step of Ottolenghi’s recipe instructs you to pour the hot tomato sauce into a baking dish (another dish to wash, yay!), add the browned eggplant balls, and bake for 40 minutes. Since both the sauce and the eggplant meatballs are already hot, I suppose this step is to ensure that your oven doesn’t feel left out and gets its own red sauce stains. For the retooled recipe, I gently heated the jarred marinara in a saucepan (which is deeper and less likely to splatter) on the stove, added the baked eggplant balls and simmered it for five minutes. So much more efficient.
Right before serving, Ottolenghi adds torn pitted kalamatas and more chopped basil to his dish. I omitted the olives as they didn’t add anything and competed with the meatballs for the textural spotlight. I kept the basil garnish but just tore it instead of chopping it, which is easier on the tender leaves than a knife and made my hands smell nice. Win-win.
After four retests and a heavy dose of realism, I’ve arrived at a dish that’s very similar to the original and a lot more user-friendly. I may even trot it out the next time vegetarian friends come to dinner. Or maybe I’ll just buy Mr. Ottolenghi’s latest book, Simple , instead. He seems to have gotten the memo.
Eggplant Parmesan “Meatballs” Recipe
Adapted from Yotam Ottolenghi’s Flavor
Ingredients:
1 large (1¼- to 1½-pound) eggplant 1 teaspoon salt 4 tablespoons extra-virgin olive oil, divided 1 cup panko breadcrumbs ½ cup (4 ounces) grated Parmesan cheese, plus more for garnish 1 teaspoon Italian seasoning ¼ teaspoon garlic powder Black pepper 1 large egg 1 (24-ounce) jar marinara sauce ¼ cup chopped basil, for garnish Pasta or soft polenta, for serving (optional)
Instructions:
Step 1: Line a baking sheet with foil and spray it with cooking spray. Adjust an oven rack so it is 4 inches below the broiling element and preheat the broiler on high. Cut off the stem of the eggplant and discard. Peel the eggplant lengthwise, leaving four, evenly spaced strips of skin remaining on the eggplant. Cut the eggplant into 1-inch-thick rounds and arrange on the baking sheet. Brush both sides with 3 tablespoons of the olive oil and sprinkle with salt. Broil until the slices are browned and tender when squished with tongs, 4 to 5 minutes per side. Remove the sheet pan from the oven and reduce the oven to 425 degrees with convection if you have it. It’s fine if you don’t.
Step 2: Put the cooked eggplant slices in a large bowl and set aside the sheet pan. Mash the eggplant with a potato masher or fork until you have a chunky mash. Add the breadcrumbs, Parmesan, Italian seasoning, garlic powder, and several grinds of pepper and stir to combine. Taste the mixture and add salt and pepper, if needed. Stir in the egg. Refrigerate the mixture for 15 minutes to make it easier to handle.
Step 3: Spray the foil-lined baking sheet with cooking spray again. Form the eggplant mixture into heaping 1-tablespoon balls using a cookie dough scoop or soup spoons to make 20 balls, placing them on the baking sheet as you work. Brush the remaining tablespoon of oil over the tops of the balls and bake until they are golden brown, 20 minutes.
Step 4: Meanwhile, boil the pasta or prepare the polenta, if using. Heat up the marinara sauce in a medium saucepan or in a microwave-safe serving bowl (covered to prevent splatters). To serve, add the eggplant balls to the sauce and turn to coat. Sprinkle with additional Parmesan and basil. Serve with the pasta or polenta.
Ivy Manning is a Portland, Oregon-based award-winning food writer and author of 10 cookbooks including Tacos A to Z: A Delicious Guide to Nontraditional Tacos . She is a regular recipe tester and editor for Eater and restaurants and appliance brands. Dina Ávila is a photographer in Portland, Oregon.
/cdn.vox-cdn.com/uploads/chorus_asset/file/25062901/20230725_HS_EATER_142_stock_PRODUCT_CARD.png)
Eater x Heritage Steel 8 Quart Stock Pot with Lid
Prices taken at time of publishing.
With its wide base and tall sides, our 8-quart stock pot is perfect for simmering pasta sauces or making delicious homemade stocks and soups.
- $200 at Amazon
- $200 at Heritage Steel
More From Eater
Sign up for the sign up for eater's newsletter.
The freshest news from the food world every day
Thanks for signing up!
Check your inbox for a welcome email.
Oops. Something went wrong. Please enter a valid email and try again.

Taco Bell’s New Giant Cheez-It Is the Stuff of Fast Food Fever Dreams

How This Texas Barbecue Trailer Connects Heritage to Every Dish

‘Vibration Cooking’ Is a Cookbook, a Memoir, and a Protest

How One Chef Turns Frozen Hash Browns Into a Sushi Breakfast

Finally, a Kitchen Renovation Show for People Who Actually Cook

In My Family, Marmite Is a Unifying Force
- Share full article

100 Easy Summer Recipes for Right Now
Breezy and adaptable, most of these dishes can be on the table in 30 minutes or less.
Supported by

By Margaux Laskey
- Published May 28, 2024 Updated May 29, 2024
More fun, less drudgery. That’s my goal for the summer — and specifically for my summer cooking. In my dreams, I’m whisking together a vinaigrette in a seaside cottage with a big breezy kitchen and a farm stand down the road (think Diane Keaton’s place in “ Something’s Gotta Give ”). While that’s not the reality for most of us — myself included — you can still welcome that relaxed sensibility in the recipes you cook and how you cook them (barefoot, good music playing, windows thrown open — or the A.C. on full blast).
We’ve rounded up 100 of our most delightful summer salads, desserts, easy dinners, grilling and no-cook recipes that will excite, not exhaust, you. The vast majority — with the exception of the desserts, most of which take about an hour — can be made in 30 minutes or less. (No kidding!) Quite a few travel well and taste great at practically any temperature, making them perfect for picnics. But since summer can look a lot like the rest of the year, with more sweat and sunblock, all are the kinds of dishes you can throw together on a busy weeknight when the kids are worn out from day camp and the traffic was hellish.
Salads | Desserts | Easy Dinners | Grilling | No-Cook Recipes

Pizza Salad. Get this — you can sizzle pepperoni strips, then toast bread crumbs in their fat. Sprinkle them over a crunchy-tangy mix of romaine lettuce, pepperoncini, black olives and red onion in a grated tomato vinaigrette, and you have this all-star salad.
Chicken and Herb Salad With Nuoc Cham. Sweet and tangy, a bright dressing of sugar, nuoc cham, lime juice and chile dresses a simple salad of rotisserie chicken, bell pepper and cabbage.
Citrusy Couscous Salad With Broccoli and Feta. This happy make-ahead salad can be served hot, cold or at room temperature. Orzo works great in place of pearl couscous.
Zucchini Salad With Pecorino, Basil and Almonds. “Zoodles” get soggy, but zucchini sticks maintain their pleasant bite, especially when tossed with a garlic-caper vinaigrette as it is here.
Chopped Salad With Chickpeas, Feta and Avocado. “This is one of the best salads I’ve ever had and definitely the best I’ve ever made.” Make it yourself and find out what Erica, a reader, is raving about.
Niçoise Salad With Basil and Anchovy-Lemon Vinaigrette. The key to a niçoise that tastes great from start to finish? Dressing the haricots verts and potatoes while they’re still warm so they absorb all of the flavors of garlic and anchovy.
Tomato and Peach Salad With Whipped Goat Cheese. Chunks of juicy tomatoes and peaches rest atop a bed of goat cheese blended with a touch of heavy cream and lemon zest. A summer dream come true!
Chickpea-Chicken Salad With Green Harissa Dressing. Tayb o’hari, a traditional Moroccan street food, inspires this sensational salad of shredded rotisserie chicken, spiced chickpeas, tomatoes, olives and a snazzy green harissa dressing.
Spicy Watermelon Salad With Pineapple and Lime. A party salad if there ever was one, this watermelon, pineapple, jalapeño and feta situation goes great with practically anything hot off the grill.
Avocado Salad With Herbs and Capers. You need four perfectly ripe — not too soft, not too hard — avocados for this lush, yet fresh salad, so set them aside and keep watch. It’ll be worth it.
Spicy Corn and Shishito Salad. Lightly sautéed shishitos are tossed with raw corn, an earthy cumin-lime vinaigrette and pebbles of feta for a salad that one reader called “stupid delicious exactly as written.”
Zucchini Salad With Sizzled Mint and Feta. Raw zucchini gets paired with feta and a za’atar-like mix of dried mint, toasted sesame seeds and crushed red pepper in this bright, light dish. It travels well, and eats well, at almost any temperature, so double up for your next picnic.
Tomato Salad With Cucumber and Ginger. Thai papaya salad inspires this blend of tomatoes and cucumbers, dressed with a zingy mix of lime, fish sauce and chile, then tossed with peanuts, ginger, basil and cilantro.
Corn Salad With Mango and Halloumi. A jumble of flavors that works together beautifully: soft halloumi, sweet mango, crunchy corn and cucumbers and salty pita chips. Sub in fresh peaches for the mango if you’re lucky enough to get your hands on a perfectly ripe one.
Puttanesca Chickpea-Tomato Salad. Classic puttanesca ingredients — tomatoes, capers, olives and garlic — are combined with chickpeas and Parmesan nubs for a substantial desk (or poolside if you’re lucky) lunch.
Southern Broccoli Salad. Sometimes known as “candy broccoli” because of the on-the-sweet-side mayo dressing, this classic picnic salad is loaded with bacon, red onion, Cheddar, raisins and sunflower seeds. The recipe calls for blanching the broccoli briefly, but if you’re in summer mode, letting it sit for a few hours in the fridge will soften it.
Cucumber-Avocado Salad. In this five-ingredient dish, crunchy cucumbers and silky avocados get a smattering of chopped scallions, a squeeze of lemon juice and a sprinkle of crushed red pepper.
Chopped Wedge Salad. All of the delightful parts of a wedge salad without any of the fork-and-knife gymnastics.
Dooymaaj Salad. An Iranian childhood snack of bread combined with herbs, cheese and walnuts, dooymaaj inspires this zesty bread salad where toasted lavash chips meet loads of green herbs, walnuts, feta and a tangy buttermilk vinaigrette.
Chopped Salad With Jalapeño-Ranch Dressing Put your houseguests or older kids to work chopping the ingredients for this plentiful salad inspired by those piled-high salads at California Pizza Kitchen.
Nutella Brownies. Nutella, flour, eggs and salt are all you need to make these impossibly moist brownies.
Strawberry Pretzel Pie. Inspired by strawberry Jell-O pretzel salad, which is found at church potlucks and picnics across the South, this joyful pie has a pretzel press-in crust, a cream filling and is topped with fresh strawberries.
Lemon-Blueberry Bars. As if lemon bars weren’t lovely enough, these are dotted with blueberries, which create jammy little pockets of delight.
Best Peach Cobbler. Put away your rolling pin, this peach cobbler belongs in the cake-style category, so all you have to do is spread the easy batter on the bottom of the pan, nestle in the fresh or frozen peaches and bake.
Gochujang Caramel Cookies. Like snickerdoodles with a little how-do-you-do, these classic chewy sugar cookies get a touch of heat from Korean red chile paste.
Mango and Sticky Rice Popsicles. Make this fantastic ice-pop version of mango sticky rice, the much-loved Thai dessert.
Mint Chocolate Chip Ice Cream Cake. Take store-bought crushed cookies, ice cream and ice cream sandwiches, layer them and freeze, for an impressive and riffable treat.
Summer Berry Buckle. Pick a berry, any berry and fold it into lemony, buttery batter for this simple cake. (It’s called a buckle because of the way the surface “buckles” where there’s a berry. Isn’t that cute?)
Magnolia Bakery’s Banana Pudding. Packaged vanilla pudding mix is the not-so-secret star of the New York bakery’s famous banana pudding, which will remind you of the best days of your childhood.
Brookies. Brownies plus chocolate chip cookies equal Brookies. Because no one should have to choose.
Salted Margarita Bars. Everyone’s favorite summer cocktail in dessert form.
No-Bake Lemon Custards With Strawberries. Does the thought of turning on the oven make you want to stay home and read in front of the air-conditioner? These no-bake custards are for you.
Easiest Vanilla Ice Cream. OK, so maybe the “easiest” ice cream is a pint from the store, but this eggless Philadelphia-style ice cream is the next best thing.
Sugar Cookie Bars. Children of all ages love these tender and too-sweet-in-a-good-way sugar cookie bars. Sprinkles are definitely not optional.
Lemon Poppy Seed Poundcake. This one-bowl, no-mixer-required sunshine cake is your new go-to summer dessert. Serve big slabs with berries and whipped cream.
Chez Panisse’s Blueberry Cobbler. Using only one-third cup sugar, this super-simple classic recipe lets the little sapphire berries shine.
Atlantic Beach Pie. Kind of like lemon meringue’s country cousin, this six-ingredient pie has a Saltine cracker crust and is piled high with whipped cream.
Fruit Galette. Tuck peaches, nectarines, sour cherries or practically any other fruit into the butter crust and bake for an elegant, effortless dessert.
Rice Krispies Treats. Browned butter and plenty of salt make this basic sweet anything but.
Strawberry Spoon Cake. Stir together a quick six-ingredient batter, then top with mashed strawberries and bake for an ooey-gooey summer delight.
Easy Dinners
Seared Scallops With Jammy Cherry Tomatoes. This dish just screams “impromptu summer dinner party.” Cook the tomatoes until they’re sweet and sticky, transfer them to a bowl, sear the scallops, then return them to the pan. That’s it.
Skillet Meatballs With Peaches, Basil and Lime. Meatballs go on a summer vacation in this breezy, very adaptable recipe. Serve over rice or noodles.
Bulgogi Cheese Steaks. Everything you love about the original, but with classic salty-sweet Korean flavors. Blistered shishito peppers stand in for bell peppers.
Cold Noodles With Tomatoes. In this satisfying mash-up of gazpacho and naengmyeon, the chilled Korean noodle soup, nothing gets in the way of peak tomatoes at their raw and juicy best.
Spicy Shrimp and Chickpea Salad. Quick-cooking shrimp, canned chickpeas and a three-ingredient citrus dressing make it possible to get this warm salad on the table in about 15 minutes.
Eggplant and Zucchini Pasta With Feta and Dill. Two whole pounds (!) of zucchini and eggplant are packed into this hearty vegetarian pasta, so you can make a healthy dent in your farmers’ market haul.
Crispy Gnocchi With Burst Tomatoes and Mozzarella. It has more 10,000 ratings, so what are you waiting for? Brown store-bought gnocchi, then combine them with tomatoes and melty mozzarella.
Sook Mei Faan (Cantonese Creamed Corn With Tofu and Rice). Fresh summer corn and silken tofu are used in place of canned creamed corn and meat in this vegetarian version of the quintessential Cantonese dish.
Salmon With Garlic Butter and Tomato Pasta. So, so smart: Broil salmon and cherry tomatoes on a sheet pan (so you don’t stink up the house), while you boil angel hair pasta, then toss it with garlic and butter on the stove top.
Sweet and Sour Eggplant With Garlic Chips. “Even my 8-year-old — a known hater of eggplant — declared it delicious,” said Sarah G, a reader.
Tomato Risotto. Stir this dish regularly and keep an eye on it, but do so with a glass of wine in your other hand. The best kind of multitasking.
Caramelized Corn and Asparagus Pasta With Ricotta. A pinch of sugar helps speed up the caramelization of the corn (fresh or frozen!) in this fantastic summery dinner. Sub in zucchini for the asparagus if you like.
Halloumi With Corn, Cherry Tomatoes and Basil. Seared halloumi is tossed with a sauté of fresh corn, tomatoes and basil. Raw red onion adds crunch, and lime juice a little zip.
Smashed Chicken Burgers With Cheddar and Parsley. Some tablespoons of Dijonnaise worked into the ground chicken keeps it tender and moist during cooking so it doesn’t have the texture of a hockey puck.
Summer Shrimp Scampi With Tomatoes and Corn. Everything gets the universally loved lemon-butter scampi treatment in this one-skillet dinner.
Greek Chicken With Cucumber-Feta Salad. Garlicky yogurt does double duty as a quick marinade for pan-seared chicken, and as a dressing for the cucumber-tomato-feta salad.
Sheet-Pan Baked Feta With Broccolini, Tomatoes and Lemon. Baked feta is a just-this-side-of-melted delight. Combined with tender broccolini, tangy lemon slices and jammy tomatoes, it’s a veggie lover’s dream.
Dumpling Tomato Salad With Chile Crisp Vinaigrette. A little like a spicy panzanella, but with dumplings instead of croutons, this reader favorite is the kind of dish you’re going to make — and riff on — again and again.
Coconut Fish and Tomato Bake. Plop a few fish fillets — salmon, snapper, haddock or anything similar — and a pile of cherry tomatoes onto a sheet pan, then slather them with a fragrant sauce of coconut milk, ginger, garlic, turmeric and crushed red pepper. Heavenly.
Crispy Cheddar Tacos. Shredded cheese is cooked until crisp-edged and deep golden brown, then topped with tortillas and filled with chicken. Put a napkin in your lap to catch all of the shattery bits.
Sweet and Salty Grilled Steak With Cucumber Salad. Fish sauce, brown sugar, garlic, jalapeño and lime juice first marinate the steak, then dress the cucumber-radish salad.
Grilled Zucchini With Miso Glaze. Swiping zucchini with a miso-brown sugar glaze, then searing it with high heat means this sometimes-soggy squash retains a little of its pleasant bite.
Grilled Vegetables With Spicy Italian Neonata. A spicy condiment of anchovies, salami, olives and cherry peppers, neonata is the perfect complement to soft and silky grilled vegetables.
Shish Kebab. Why does meat taste better when it’s served on a stick? Make this yogurt-marinated lamb version with beef if you prefer.
Fish Skewers With Herb and Lime. Cooking chunks of marinated fish on a skewer means the interior stays juicy, while the edges crisp and brown. Serve with a pile of fluffy white rice.
Mayo-Marinated Chicken With Chimichurri. Mayo, that miracle elixir, is spread over chicken cutlets before grilling to improve browning and evenly distribute seasonings.
Spicy Citrus Steak. Run-of-the-mill grilled steak is great, but, doused in a mouthwatering sauce of tangerine, rice vinegar, soy sauce, sambal oelek, ginger and garlic, it’s a marvel.
Shrimp Burgers. With more than 1,000 ratings, readers call these easy and adaptable shrimp burgers “phenomenal.”
Mushroom Beef Burgers. Chopped button mushrooms add an earthy, umami flavor to grilled burgers. Accidentally, or on purpose, you end up eating less meat.
Buffalo Grilled Mushrooms. Tossing charred mushrooms with tangy Buffalo sauce, then topping with blue cheese crumbles and parsley is a brilliant move.
Grilled Corn and Avocado Salad With Feta Dressing. Hit corn, scallions and jalapeño with a little fire, then toss with a tangy feta dressing and slivers of ripe avocado for a salad that is anything but boring.
Grilled Cucumbers With Tomato-Cardamom Dressing and Mozzarella. Cardamom-miso dressing gives new life to tomatoes and cucumbers. Chunks of torn mozzarella add richness.
Grilled Salmon Salad With Lime, Chiles and Herbs. “Woah,” wrote one reader about this vibrant full-meal salad that was inspired by nuoc cham. Sub in a different fish or chicken for the salmon.
Grilled Oysters With Hot Sauce Butter. A dollop of a hot-sauce-anchovy butter melts and mingles with the oyster’s liquor while grilling, keeping the delicate meat fresh and juicy.
Honey Butter Grilled Corn. Drenching grilled corn in melted honey butter creates a glaze that makes even supermarket corn shine.
Grilled Chicken With Tomatoes and Corn. Once you’re done grilling chicken breasts, slide them onto a bed of fresh tomatoes and corn. The juices drip down onto the vegetables, seasoning them with no effort on your part.
Spiced Grilled Halloumi. As simple as can be. Top slices of ruby red tomatoes with singed halloumi, then sprinkle them with coriander, cumin, crushed red pepper and a pinch of sugar.
Grilled Harissa Shrimp. A quick dip in harissa, honey and lemon juice before grilling takes run-of-the-mill grilled shrimp to the next level.
Souvlaki. Chunks of boneless chicken marinate in yogurt, garlic, cumin, oregano and rosemary for impossibly tender, fall-apart meat. Pork also works beautifully here.
Tajín Grilled Chicken. Tajín, that beloved Mexican seasoning made from dried red chiles and lime, is swirled together with agave, citrus, chipotles and garlic for a spicy-sweet glaze for grilled chicken.
Abdoogh Khiar (Chilled Buttermilk Cucumber Soup). This classic Iranian soup, made with buttermilk, yogurt, cucumbers, herbs and walnuts, is a hearty, but not at all heavy, too-hot-to-cook meal.
Fruit Sandwich. Sandwich strawberries, mango and kiwi in a layer of whipped cream-mascarpone between two pieces of Japanese milk bread for the cutest little dessert-adjacent meal you’ve ever had.
Marinated Feta With Herbs and Peppercorns. Cube feta, toss it with preserved lemon, peppercorns and chile, and refrigerate overnight. Pile it onto toast or alongside grilled chicken.
Sardine Toasts With Tomato and Sweet Onion. Buttery and salty canned sardines, sweet and juicy tomatoes and crunchy red onion play together nicely in these open-faced sandwiches.
Naan-o Paneer-o Sabzi (Bread, Feta and Herb Platter). Assemble a gorgeous platter of briny cheese, fresh herbs, walnuts and flatbread. Watermelon, grapes and crisp Persian cucumber add a summery flair.
Herby Feta and Yogurt Dip With Sumac. Fresh parsley, mint, scallion and lemony sumac are blended with feta and yogurt for an exciting dip for crudité or a lively sauce for grilled meats and veggies.
Shrimp Salad. Using both lemon zest and juice is the key to this creamy yet zippy shrimp salad. Toss in a pound of cooked orzo or ditalini for a potluck pasta salad.
White Bean Hummus With Tahini and Coriander. Instead of traditional chickpeas, white beans are used in this creamy dip. Miso, if you have it, lends a welcome earthy undertone.
Greek Goddess Dip. This bright green herby-feta dip is so good you’ll want to eat it with a spoon.
Watermelon Chaat. Juicy watermelon tossed with bold seasonings like jalapeño, cumin, paprika and black pepper make for a just-this-side-of-sweet fruit salad.
Ceviche. For a Mexican-style ceviche, combine fresh fish with tomatoes, cucumbers, red onion, jalapeños and lime juice. Serve with extra sturdy tortilla chips.
Kimchi Tuna Salad. Jarred kimchi does most of the work in this bold tuna salad that’s great rolled up in a sheet of gim or piled into a soft bun.
Sabich Bowls. The traditional Israeli pita sandwich of fried eggplant, hard-boiled eggs, tomato-cucumber salad, pickles and tahini sauce inspired these jumbly, delicious bowls.
Cowboy Caviar. Also known as Texas caviar, this black bean, corn, tomato and jalapeño salad is a cinch to make and travels well, making it great for picnics, potlucks and road trips.
Cold Tofu Salad With Tomatoes and Peaches. Silken tofu stands in for mozzarella in this vibrant vegan dish inspired by Italian caprese salad.
Furikake Tomato Sandwich. A sandwich of scarlet red tomatoes and white bread is practically perfect, but adding a sprinkle of furikake makes “the tomatoes taste even more of themselves, according to Eric Kim.
Ham and Jam Sandwich. Adding a generous smear of jam, Dijon mustard and a twist of freshly ground black pepper lends a little “je ne sais quoi” to this sweet riff on a jambon beurre.
Chickpea Salad Sandwich. Forget tuna, forget chicken. Combine chickpeas with a little tahini, Parmesan, celery and scallions for a vegetarian version of the old-school diner favorite.
Best Gazpacho. With more than 12,000 ratings, this wildly popular Spanish-style gazpacho doesn’t disappoint.
Silken Tofu Spicy Soy Dressing. Cubes of silken tofu are draped in a tongue-tingling dressing of soy, sesame, rice vinegar, chile oil and scallions.
Follow New York Times Cooking on Instagram , Facebook , YouTube , TikTok and Pinterest . Get regular updates from New York Times Cooking, with recipe suggestions, cooking tips and shopping advice .
Margaux Laskey is an associate editor of recipe development for NYT Cooking . More about Margaux Laskey
More on Food and Dining
Keep tabs on dining trends, restaurant reviews and recipes..
Breezy and adaptable, we’ve rounded up 100 easy summer recipes that can be on the table in 30 minutes or less.
Taquería El Califa de León, in Mexico City, became the first Mexican taco stand to win a Michelin star. Since then, it has been deluged with customers and fame .
Leaner than farmed fish and far more flavorful, wild salmon is in season now. Here’s how to cook and savor it .
At some restaurants, the “family meal” tradition of serving workers before customers is getting new life as a perk, a motivator and a teaching tool.
Eating in New York City
Pete Wells, our restaurant critic, ranked his top 100 restaurants in New York City .
One family has owned Totonno’s, the beloved Coney Island pizzeria, through fire, flood and a pandemic. Now the business is up for sale .
Mads Refslund’s creative ideas at the Brooklyn restaurant ILIS can be dreamily seductive, Wells writes , even if the execution isn’t always as compelling.
A Times food editor documented the high, the low and the mid from a week’s worth of TikTok restaurant suggestions.
Advertisement
- eBook Deals
- BBQ Recipes
Feed your appetite for cooking with Penguin’s expert authors
- Jamie Oliver
- Nigella Lawson
- Yotam Ottolenghi
- Rukmini Iyer
- Gluten-Free
- Family Friendly
- Freezer Friendly
Get our weekly email
Recipes, book news, deals and more
9 quick and easy recipes for berry-based desserts
by Malou Herkes
published on 23 June 2020
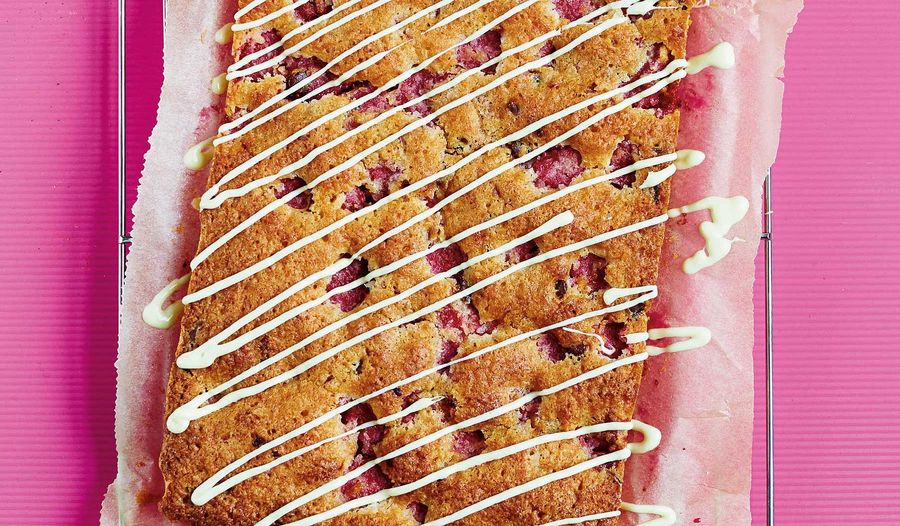
Summer is finally here and with it a bounty of seasonal berries are making their way to our shop shelves or ripening on hedgerows and garden plots. Now’s the time for strawberries, raspberries, blackcurrants, gooseberries, and for both hot summer pudding or refreshing strawberries and cream. If you’re looking for some more ways to celebrate this year’s berries or for more exciting alternatives to summer staples, here are nine desserts to inspire you.

Strawberry and Rose Mess
A NOPI-style Eton Mess, this combination of strawberry sorbet, crushed meringue, mascarpone and pomegranate seeds is really quite something. Assemble it all last minute in cute glasses for an impressive dessert.
From the book

NOPI: The Cookbook
Yotam Ottolenghi, Ramael Scully

Coconut, Raspberry and Chocolate Cake
Quick, easy and oh-so-summery, this tasty traybake is a showstopper that needs just 25-30 minutes in the oven.

The Sweet Roasting Tin

Jamie Oliver’s Berry Meringue Ripple
A five-minute dessert using shop-bought meringues, vanilla ice cream, plenty of fresh berries and shavings of chocolate, this is a simple but impressive way to round off a summer meal. Swap in whatever berries you have to hand.

5 Ingredients Quick & Easy Food

Strawberry and Pimm’s Jam
Capture the taste of warm afternoons and summer picnics into a pot of the good stuff. This jam is not just for spreading on toast – pour it over vanilla ice cream for an instant dessert.

The Modern Preserver

Ottolenghi’s Sumac-roasted Strawberries with Yoghurt Cream
Ottolenghi roasts his strawberries with citrussy sumac, vanilla and mint until soft, sticky and aromatic. Serve up with a zingy yoghurt cream and all those lovely juices drizzled on top.

Vegan Layered Pavlova with Coconut Cream
For a vegan take on a summer show-stopper, this meringue uses aquafaba instead of egg whites. Rachel Ama tops her crisp, light meringue with whipped coconut cream, plenty of fresh berries and a delicious berry drizzle.

Rachel Ama’s Vegan Eats

Hot Strawberries with Ice Cream and Amaretti (Fragole Saltate in Padella)
These ‘hot strawberries’ are quickly heated in a pan with butter and flambéed with a splash of brandy – the contrast of hot and cold is what you want here, served with ice cream and amaretti for added crunch too.

Simply Italian

Strawberry Short Cake
Wedge your strawberries and cream into still-warm buttery, crumbly short cakes for quintessential afternoon tea vibes.

The WI Cookbook

Fresh Strawberry Tartlets
These pretty pastries might make you think of a delicate bake worthy of a French patisserie but Mary has simplified hers with an easy whipped mascarpone filling, topped with strawberries and a redcurrant jelly.

Mary Berry Everyday
You might also like.
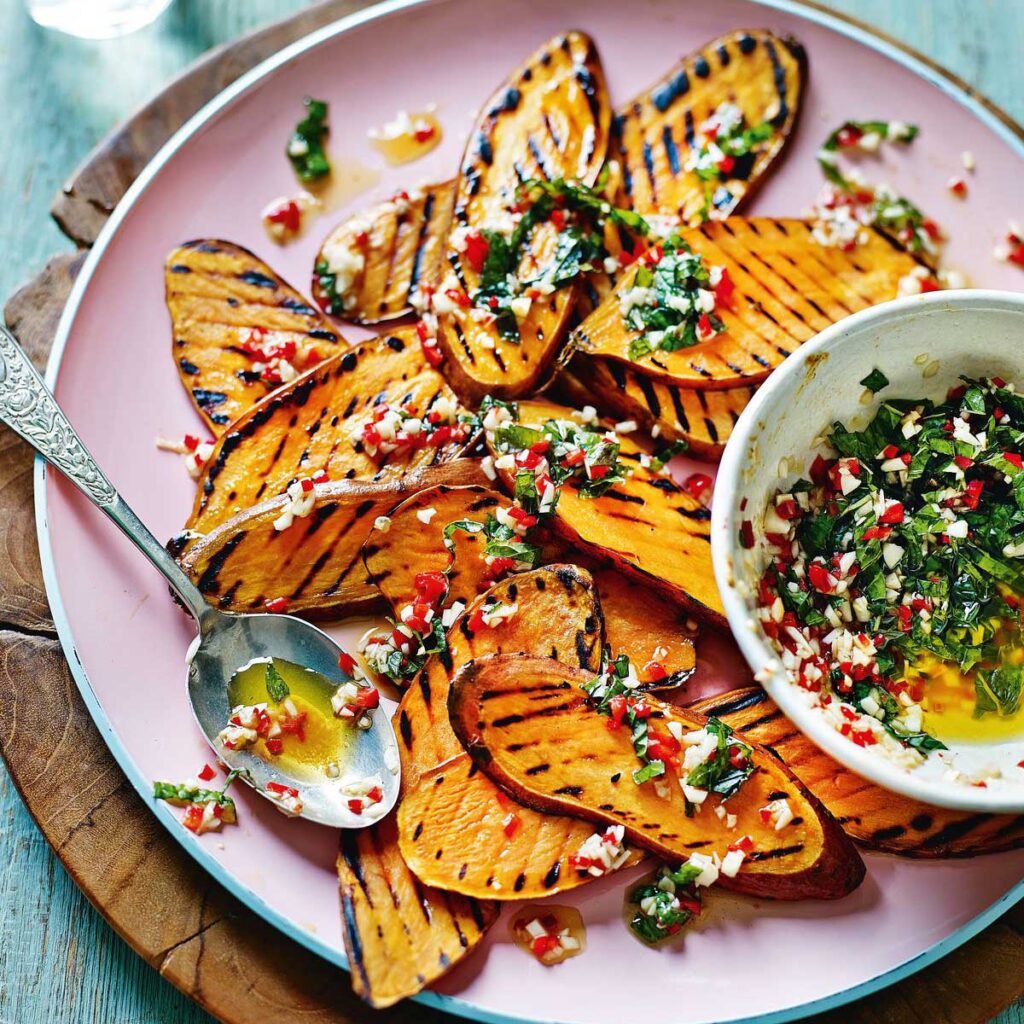
Recipe Collections
Vegan barbecue recipes.
From grilled sweet potato to crispy gnocchi, find plant-based and vegan barbecue dishes by Rukmini Iyer, Rachel Ama and more.

The best vegan burger recipes
From sweet potato to pulled jackfruit, find the best vegan and plant-based burger recipes to try this barbecue season.

Baking Basics with Nicola Lamb: How to make perfect scones
Nicola Lamb, baking expert and author of SIFT, shares her essential tips for making scones from scratch.
Subscribe to The Happy Foodie email newsletter
Get our latest recipes, features, book news and ebook deals straight to your inbox every week
Sign up to our email newsletter
Get our latest recipes, features, book news and ebook deals straight to your inbox every Friday.

We’d love to pop into your email inbox every Friday with inspiring recipes from Penguin’s world-leading cookery writers, the latest cookbook releases, ebook deals and more.
Website header and popup.
IMAGES
VIDEO
COMMENTS
Browse Ottolenghi Cake and Dessert recipes online. With a selection of Ottolenghi Classics and new recipes from the Ottolenghi Test Kitchen.
Method. Preheat the oven to 160C/325F/gas mark 3. Lightly grease a 24cm spring-form tin, and line the sides and base with baking parchment. Put the butter, 300g of the sugar (the remaining 80g is for the syrup) and citrus zest in a mixer bowl, and use a paddle attachment to combine.
Ottolenghi made easy Easy meals, packed with veg Sensational sweet treats Buy Book amazon hive waterstones Yotam Ottolenghi's Grilled Banana Bread with Tahini and Honeycomb ... This fan favourite is one of the most requested desserts in Ottolenghi's restaurants. From the book Ottolenghi: The Cookbook. Buy Book. amazon . Plum, Blackberry and ...
A simple, yet elegant dessert. Great for entertaining as all the components may be made ahead! Try this no bake sweet and salty cheesecake tonight.FULL RECIP...
Add cream and pulse to mix. Set aside in refrigerator to thicken. Preheat oven to 350 degrees F. Make the crumble. In a medium bowl, add the chopped hazelnuts, ground almonds and sugar. Stir to combine. Add the butter and (using fingers) rub the butter in until mixture forms fine, pea-sized crumbs.
To make the rosewater cream, whisk the mascarpone and crème fraîche until homogeneous. Add icing sugar, rose water, and whisk until soft peaks. Cover a bowl with the cream and refrigerate till serving. To serve the dessert, break meringues into bite-sized pieces and arrange between four serving plates.
1. Preheat the oven to 180°C fan. Grease and line a loaf tin 11 x 21cm, and set aside. 2. Place the butter, sugar, lemon zest, 1 tablespoon of lemon juice and vanilla in the bowl of a free-standing food mixer with the paddle attachment in place. Beat on a high speed for 3-4 minutes, until light, then lower the speed to medium.
How to make apple olive oil cake. Step 1. Preheat oven to 375°F (190°C). Butter an 8-inch (20 cm) Le Creuset springform pan and line its bottom and sides with parchment paper. Step 2. Using a flour sifter, sift dry ingredients (flour, ground cinnamon, salt, baking powder, and baking soda) in a large bowl. Step 3.
Method. 1 Preheat the oven to 180C/160C Fan/Gas Mark 4. 2 Place the ground almonds, both sugars, flour, butter and salt in a food processor and blitz a few times, until the mixture has the consistency of breadcrumbs. Transfer two-thirds of the mix - about 430g - to a large bowl along with the yoghurt, eggs, mahleb and nutmeg.
Directions. Break the feta cheese down in a large bowl to make as smooth as possible. Add cream cheese, sugar and lemon zest and whisk to combine. Gently whisk cream into mixture and leave to set in the refrigerator until ready to use. (cheesecake mixture keeps up to three days.) Preheat oven to 400 degrees.
Three excuses to eat more summer fruit desserts: a peach and grape clafoutis-style bake, a nut and cherry meringue cake and a creamy, crumbly blackberry yoghurt fool Summer always feels a bit like ...
1/4. teaspoon salt. 3/4. cup (90 grams) confectioners' sugar, sifted. 2. tablespoons lemon juice. This article is brought to you by Ten Speed Press. Head here to learn more about the wonderful new cookbook Sweet by Yotam Ottolenghi and Helen Goh—or here to enter to win a trip to London, Ottolenghi-style: that's two tickets to London, luxe ...
Recipe from Ottolenghi's Plenty More Cookbook. Ingredients: ¾ cup plus 1 Tbsp/185g unsalted butter, at room temperature. 2 Tbsp olive oil. 1 cup plus 1½ Tbsp/220g granulated sugar. 1¼ cups/120g ground almonds (blanched almond flour) 4 large eggs, whisked. 1 cup/120g walnuts, freshly blitzed in a food processor to a coarse powder
Instructions. Set oven to 350F. Butter a standard (9x5") loaf pan and line with parchment paper with overhanging ends. Beat the butter and sugar together for several minutes until pale and fluffy. Beat in the coconut, salt, and vanilla. Beat in the eggs, one at a time.
Yotam Ottonlenhi's pastis gascon, or French apple and brandy tart. Prep 15 min Cook 1 hr 40 min Serves 6. For the filling 2 small pink lady apples, peeled, halved, cored and cut into 1cm slices ...
Combine cardamom, wine, sugar, lemon juice, saffron, and salt in a medium saucepan over medium heat, stirring until sugar dissolves. Bring to a simmer. Add pears; add water if needed to completely submerge pears. Cover with lid slightly ajar and simmer, turning occasionally, until pears are tender but not mushy, about 15-30 minutes, depending ...
Our Best Yotam Ottolenghi Recipes. 1. Couscous, Cherry Tomato & Herb Salad. As the couscous steeps in hot water, burst the cherry tomatoes in olive oil and pan-roast the spices. Mix the cooked couscous together with raisins, almonds, fresh herbs, and lemon juice and zest, and serve with the tomatoes on top. This dish, from the SIMPLE cookbook ...
Whisk on a medium-high speed for about 4 minutes, until light and thick. Fold a third of this sabayon mix through the melted chocolate, then gently transfer the lightened chocolate mix back into the sabayon. Fold through to fully combine, then scrape the chocolate filling into the tart case, over the hazelnut 'brittle'.
Ottolenghi's Cauliflower, Pomegranate, and Pistachio Salad. 3. There are lots of make-ahead options for meal preppers. This book comes with so many meal prep-friendly recipes, whether that means prepping a couple of hours, a day, or even a week ahead. Ottolenghi even clearly points out these make-ahead moments for you!
Season the chicken with 3/4 teaspoon of salt and plenty of pepper and add to the hot oil, skin side down. Let cook for 7 minutes, without turning over, to brown well. Simply Recipes / Mihaela Kozaric Sebrek. 3. Turn the heat down to medium-high, then add the onion and stir, turning the chicken over.
We would like to show you a description here but the site won't allow us.
Stir in the egg. Refrigerate the mixture for 15 minutes to make it easier to handle. Step 3: Spray the foil-lined baking sheet with cooking spray again. Form the eggplant mixture into heaping 1 ...
Yotam Ottolenghi's Baked Orzo with Mozzarella and Oregano. by Yotam Ottolenghi. Packed full of vegetables and grated mozzarella, this hearty and warming orzo bake is quick enough to be made midweek. Topped with fresh tomatoes and a sprinkle of oregano, it makes for a beautiful and inviting dish at any table.
June 1, 2024. Craig Lee for The New York Times. A confession: I almost always pull back the sugar in a dessert recipe. (I'm sharing this here because I don't think I'm alone.) I do this ...
Grilled Oysters With Hot Sauce Butter. A dollop of a hot-sauce-anchovy butter melts and mingles with the oyster's liquor while grilling, keeping the delicate meat fresh and juicy. Honey Butter ...
Jamie Oliver's Berry Meringue Ripple. by Jamie Oliver. from 5 Ingredients Quick & Easy Food. A five-minute dessert using shop-bought meringues, vanilla ice cream, plenty of fresh berries and shavings of chocolate, this is a simple but impressive way to round off a summer meal. Swap in whatever berries you have to hand.