
The Perfect Guide to Bookbinding for Beginners
As an artist, in any form, an integral tool to keep on hand would be a sketchpad, or for some, a notebook would suffice. Painters, writers, and illustrators alike can use this tool.
Additionally, they can keep a collection of their work bound together for display or as a private keepsake. You can also use this method for other things, such as a school project, a journal , or a collection of poems.
Bookbinding is another age-old practice used by creators throughout the centuries. They bound or sewed books together, as the name suggests. Yes! That is all there is to it. It is not scary or daunting; anyone, including you, can learn to do it. Its related fields are gilding and fine binding.
Some of the first examples of bookbinding in history appeared in India. People there used large dried leaves to write their documents. They appeared around 100 BCE – long before the invention of print books.
There’s no need to seek out the services of a printing press. Now you can do your own scrapbook or journal. Interested in becoming a DIY bookbinder?
Here is a quick, easy, step-by-step guide to everything you need to know. It’s DIY bookbinding for beginners! Learn basic bookbinding at your own pace.
What Do You Need to Start Bookbinding?
Before beginning the search, it is essential to remember to start small. Another key point is that bookbinding is irreversible.
As a matter of fact, ensure that you are comfortable with the idea that your first few tries may get damaged. Until you are comfortable enough, practice your new skills on scrap.

Supplies
Here is a checklist of basic tools needed.
- Paper (obviously)
- Bone Folder
- Book Awl
- Marker/pen
- Waxed thread (linen)
- Needle
- Cutting board
Ensure you have all items ticked off before moving on to the step-by-step tutorial.
Each tool above serves its own unique purpose in bookbinding. And yes, those are some funny named tools (take it as a sign you’ll be having fun). Here are some details that make things a little easier for you:
A bone folder is a tool with a dull edge that will help you fold and/or crease your material.
A book awl is a tool used to punch holes in your material. This is a sharp tool, so proceed with caution!
Waxed linen thread can be store-bought. Or, you can create your own using beeswax and embroidery thread.
How do you book bind DIY?
Following the steps below, anyone can become a DIY bookbinding pro! Ensure you have gathered all the materials (you can pay a visit to Amazon ).
Furthermore, you can always check your local craft store. No worries if you don’t have such a store in your neighborhood. At least you can use high-quality copier paper for your first few projects, or if it’s a journal, notepaper.
Now that you’ve gathered all your material, it’s time to start.
Can I bind a book myself?
Of course, you can. Bookbinding, though daunting to think about, is quite simple. Take all the time you need. Do not rush it. This is an art, and art takes time.
What Are the Different Methods for Book Binding?
Bookbinding is an art that goes far back in history. As early as the 9th century, the first bound books appeared. THAT WAS A REALLY LONG TIME AGO! More than a millennium has passed.
What’s more, we’re talking actual books, not the bound leaves from India. With it, many versions and techniques of bookbinding developed.
With that in mind, many different bookbinding methods have emerged. In fact, some of our faves are:
Case Binding
Perfect binding , saddle stitch binding , comb and spiral binding .
- Exposed Spine Binding
Each is unique, yet they all achieve one goal.

Case binding is the most secure and protective of techniques. By the same token, these bindings, characterized by their hardcovers, are pretty standard. Yes, those.
With this technique, the pages are glued to the spine of the book. An encyclopedia is an excellent example. If you’ve ever held an encyclopedia, then I’m almost certain you’ve held a case-bound book.

Moreover, this technique is the one of choice for many books. It tricks many people into thinking that the book in question is an excellent read. For a good reason, they are more durable, and these factors also make them more expensive.
Due to the higher cost, many people would be less willing to select this technique. Yet, it adds further durability to secure the longevity of the tome. The hard covers also make the books heavier.
Nonetheless, this technique is superior if you want your books to last long.
This is the cheapest most DIY bookbinding technique on this list. This one is for you if you are here for the easy way out. These are two different techniques, so don’t get them mixed up, but they are at the same time quite like each other.
Comb Binding: With this technique, you will need to punch along one of the edges. Or, to save time, you can buy a comb binding machine . Then, thread the comb through the same holes, and voila! Easy peasy, lemon squeezy.

Spiral Binding: Again, we begin with the punched holes. They are what make the two techniques similar. But rather than threading a comb, bookbinders use individual coils.
These coils are made of different materials (sometimes plastic, sometimes metal). The spiral notebook you used in junior high is the best example we can think of.
These methods are quick, easy, and effective, but only last for so long. The pages of a book or journal held together in this manner tend to fall out pretty fast.
They also are more susceptible to tearing. These kinds of books scream DIY project. Thus, this option may not be the best fit if you don’t want your project to look self-published. These techniques also generally are not accepted by major retailers for distribution.
The good thing is, if none of those things matter to you, then you have saved loads on production costs.
Perfect Hobby For You:
- Polymer Clay
- Needle Felting
- Wood Burning
- Collage Art
Perfect binding is a cheap alternative to case binding. This technique may be the most common. It is the ideal compromise between durability and cost-effectiveness.
The perfect method uses heavyweight coated cardstock. It’s not as durable as the case binding technique. Yet it is cheaper, lighter, and protects your folded papers. It is, after all… PERFECT!
We stick the folded pages of books bound using this technique with strong glue. Here’s a handy spine calculator to tell you how thick the spine on your project should be.

This technique has two variations. One involves stapling and is the midrange, cost-effective alternative to the perfect method.
The best time to use this technique is for creating books that you intend to have a short life span. This technique would also come in handy for projects with very few pages.
This technique is the simplest one yet. All it entails is stacking the pages correctly and stapling the intended spine.
This technique has limits. It depends on both the strength and the size of the staples used. For instance, you can easily use cardstock or anything a staple can pierce for the book cover.
The other variation of saddle stitching is the thread-sewn method. It involves folding each sheet and sewing the pages together with waxed thread. The thread-sewn process is perfect for DIY projects.
What are the 2 Types of Book Binding Used the Most?
Well, the short answer is ALL OF THEM. You must find the use case that suits your needs the most. Case binding and perfect binding are more popular for retail purposes.
For example, most commercial binders or printers use one of these techniques. The perfect binding method is the most common. Yet, that does not mean they outshine any other technique.

Comb & Spiral Binding and Saddle Stitch Binding are great for creating DIY projects. In addition, they’re the favorites of students working on term papers and dissertations alike.
They use these techniques to put their assignments together to hand in for grading. These also show up in instruction manuals, and even company documents.
You might also want to consider it for your journal. In other words, there is no correct answer. Instead, use the resources that work best for you.
Basic book Binding Process Step by Step.
Here are the basics of binding your own book. Even better, I will tell you two different ways of creating bound books on your own. You’re welcome!
It would be best to know how to create a “quote, unquote” DIY type book and a more professional type of book.
Continue on to learn the basics of the spiral binding. I’ll also teach you the saddle stitch Binding technique.
Spiral Binding
Step 1: Make the Cover
Get two pieces of cardboard and cut them down to the size you want. You can use the cardboard from a cereal box or the back of a notepad. Chipboard can also work.
Step 2: Wrap the cardboard with colorful paper.
This paper should be one inch longer and wider than the cardboard base. You can use construction paper or even gift wrap. Design it how you wish with a drawing or computer graphics. Make the front fancy, with an image or a title.
Step 3: Stick the paper onto the cardboard.
Turn it so that the blank side is facing you. Brush a thin layer of liquid glue onto the cardboard and make sure you center it. If needed, smooth it down with a credit card or ruler. Work your way from the middle to the outsides.
Step 4: Clip the corners of the paper.
Use a craft blade and metal ruler to cut off the corners. Clipping the corners helps to remove bulk so that your work lies smoother.
Step 5: Cut paper for the inside covers.
Cut two sheets half-inch shorter than your cover on each side. If you have a fancy cover, try a plain inside, and vice versa. Glue it to the back of the cardboard to partly overlap the wrapped edges.
Consider sealing the front and back covers with acrylic spray sealer. Or, you can use another sealant such as topcoat or decoupage glue. Note that the ink may run if you decorated your project, so be careful.
Step 6: Cut the paper down to the same size as the covers.
You can use up to 40 sheets. If you’re using thick stock, avoid cutting more than 40 sheets. If you cut more than that, you will need to make a bigger coil, which is more likely to warp out of shape.
Step 7: Create your template and punching guidelines.
Use a ruler and pencil to draw a line about 2 mm from the edge of the paper. Or, if you prefer, you can do it on the top edge.
In that case, make the mark along that edge. Using a 3 mm hole puncher or screw punch, or even a thin nail, punch it at intervals spaced 2 mm apart. Leave some space (5 mm or so) at the top and bottom.
To clarify, you shouldn’t use a regular hole puncher: it’s too big. Use your template to guide you as you punch all your other sheets of paper.
Step 8: Use the template to punch the two covers.
Lay it on top of your front cover. Create the holes, and use the template to repeat this step for the back.
Step 9: Assemble the book.
Rest the back cover facedown. Stack the pages on top, ending with the front cover, face up.
You can put other items into your books at this point, such as sticker sheets and foldouts.
Tap the book on the table to align everything, particularly the holes. Secure the pages and the covers with binder clips.
Step 10 : Prep your wire.
Wrap some stringing wire around a pen (the thicker the pen, the better). Sixteen gauge works well. Match it to the number of holes in your paper. For example, if you punched 18 holes, wrap it 18 times.
Use wire cutters to get rid of the excess. Pull the wire off the pen and stretch it until it’s around the same length as your book.
Pass the wire through each hole, then bend the wire inwards. Use needle-nose pliers to hook the end on the coil (for reference, you can look at a spiral-bound notebook). Repeat on the other end.
Congratulations! You’ve spiral-bound your first book.
Saddle-Stitch Binding
Step 1: Fold the paper in half one at a time.
Calculate how many pages you need, and fold each one in half. Folding it one sheet at a time creates a clean, sharp fold for your book.
Use a bone folder to lay each piece flat at the fold. A credit card or ruler can also work to give the folded paper a crisp edge.
Step 2: Open out the papers.
Using a sewing needle, prick some holes along the paper fold. Don’t poke willy-nilly – use a ruler to measure, create even spacing, and mark where the holes should be.
Each sheet should have the same number of holes and the same spacing between these holes. We recommend spacing them between half an inch and one inch.
As you create more and more books, you can change the placement of your binding threads as you like.
If you want to spice up the spine, you can add items to the threading as you bind your book. Make a stack of these papers, aligning the holes.
Step 3: Cut some thread double the book’s length.
Thread the sewing needle, tying the end into a knot. Starting at the far end of the paper, drive the sewing needle through the stack of paper.
Pull-on the thread till the knot reaches the other side of the hole. Pull it through the next hole, but opposite to the first.
Continue to thread in this alternating pattern. Do it until you reach the very last hole.
Step 4 : Thread toward the opposite side.
Using the same alternating pattern, thread through the holes again but, this time, do it in the opposite direction.
Once you’re done, tie another knot in the line. Finish off by cutting any excess thread.
Again, congrats! Now you know how to saddle-stitch a book. Life is good!
Book Binding Tutorials
Below are video tutorials for you to watch, which showcase the book binding process. Again, say it with me this time: EASY PEASY LEMON SQUEEZY!
I’ve included videos on spiral binding and saddle stitching . I hope they will make these processes more straightforward.
Best bookbinding books to look into.
It may seem a bit corny, but yes, there are books on how to create a book. Great self-promotion, too, if you ask me. Here is a list of all our faves and a link to get them at your fingertips.
- Making Handmade Books: 100+ Bindings, Structures & Forms
- Hand Bookbinding: A Manual of Instruction
- Little Book of Book Making: Timeless Techniques and Fresh Ideas for Beautiful Handmade Books
We would love to see how your binding projects turned out. Send us a pic in the comments section, and let us know how easy (or difficult) it was for you.
1 thought on “The Perfect Guide to Bookbinding for Beginners ”
I’ve written a story for my niece. Now, I have 75 individual sheets of paper that I need to bind together. How do I do that to make a long-lasting hard cover book?
For the cover, I removed the pages from a 100-page hard cover book. I plan to insert my pages into the spine.
Leave a Comment Cancel reply
Save my name, email, and website in this browser for the next time I comment.
Privacy Policy
Book Design Made Simple
You can do it yourself.
Book binding basics
July 12, 2021 By Glenna Collett 5 Comments

Book binderies can be separate entities but are usually integrated with a book printing company. And in some instances, printing and binding are done right inside the same machine.
Hard cover book binding (casebound books)
With offset and most digital book printing, the printing is done on large sheets and then folded into 4, 8, 12, 16, 24, or even 32 pages, depending on the machinery, the paper stock, and the trim size of the book. The end result is a booklet called a signature , with all the pages in order. It’s quite ingenious.

One sheet is printed on both sides, folded, and trimmed to become a signature (16 pages in this instance).

The little collation marks at the back edge of each signature should line up as shown here in red.
Your book might end up with a few or dozens of signatures, so in order to collate them properly, a small marker is printed on the back side of each one. (Even more ingenious.) The signatures are then lined up into a “book block” for binding, smashed together with a weight, and trimmed to achieve neat outer edges.
Basically, stitching a book binding is the traditional method and is very durable. It’s done in two different ways.
Smyth (pronounced like “smith” but with a long i sound) sewing involves stitching from the middle of each signature to the outside and then over to the center of the next signature in a kind of looping motion. This results in a nice, easily-opened book and a flexible spine. The signature block can be glued to the inside of the spine or not—no glue results in a book that will stay open on its own (a “layflat” book).

Smyth sewing (left) goes from the center of each signature to the center of the next, making a more flexible binding. The thread or staples in side (or McCain) stitching goes right down through all the signatures at once. This makes a sturdier binding.

Here’s how all the parts are put together in a casebound book.
Side (or McCain) stitching is often used for books that are destined to a hard life, such as library editions, children’s books, and textbooks. The signatures are gathered and then sewn or stapled from the side rather than through the folds (see above).
The endpapers are attached to the first and last pages of the book block with a thin vertical line of glue near the stitching, and then the back edge of the book block (plus endpapers) is wrapped with a cloth (the “backing material” in the illustration).
The wrap for the hard case can be cloth or a printable material. Wrapping the plain, foil stamped, or printed case is a separate operation. Once the wrapped case and the book block come together, the endpapers are glued to the inside of the case, leaving two free pages that are called the flyleaf. Sometimes a headband and tail band are added.

In the lower book, the backing material that wraps around the book block is glued to the spine. The upper book lays flat because the book block is free of the spine. Both books have headbands, though the black and white one is more noticeable.
A flexible hard cover can also be made with the same book binding equipment. Instead of a thick, stiff cardboard case, a thinner one is used. This results in a book that looks just like a hard cover one but that’s also bendable. This is called flex binding.
Soft cover book binding
Once you know how hard covers are put together, you’ll quickly catch on to the concept of paperback book binding. The method is called perfect binding; I’m not sure how it got this laudatory name, as paperbacks used to fall apart quite easily. Perfect binding has come a very long way, though, and actually is nearly perfect these days.

First the signatures are chopped at the back end, then glue is applied.
Basically, after the printing is done the signatures are gathered into a block just as for a casebound book. Then the signatures are smashed, the folds are simply chopped off, and the back edge is flooded with glue. After drying, this glued edge is usually adhered to the paper spine, but if not, then the result is a layflat paperback. After this, the entire book is trimmed to a nice smooth edge.
Two different kinds of glue can be used in the binding. EVA (ethylene vinyl acetate) and PUR (polyurethane reactive). The EVA is more traditional and costs less; the PUR is stronger and thus requires that less be used. This results in a book with a squarer spine that doesn’t crack when the book is opened. PUR may cost a little more.

A layflat perfect binding (top) and a more common type of perfect binding. You can clearly see where the first and last pages are adhered to the covers in both books.
Espresso Book Machine book binding

The Espresso Book Machine at Village Books in Bellingham, WA.
An Espresso Book Machine (EBM) combines printing and binding all in one place. Some libraries and book stores own one for customers to print their own copies of out-of-print books or books they’ve written themselves. It’s hard to believe, but yes, you can give the machine two PDF files (one for the cover and one for the pages), and a perfect-bound copy will come out in just a few minutes.
Some POD printers also use the EBM. But most these days also use a more elaborate digital printer that resembles an enormous copier. They bind the books separately.
Other types of binding
In Book Design Made Simple, and also in a previous blog post, we described other interesting book binding methods . Check them out; one of them might be perfect for your book.
We believe that all publishers should understand how their books will be put together. Knowledge is power!
Read more: Digital vs. offset printing » shows the pros and cons of each. Read more: How much does it cost to self-publish? » includes all the various expenses including printing and binding.
Book Design Made Simple. You can do it yourself.

November 9, 2021 at 11:07 am
I found it interesting when you talked about different types of book binding techniques. Recently, one of my cousins said she’s interested in learning how to bind a book or a daily planner. My cousin mentioned she’d like to learn how to make a book by hand and use a binding machine too, so I’ll be sure to share your tips with her. Thanks for the advice on how there are soft and hard covers for book binding.

November 9, 2021 at 1:03 pm
Hi Eli, Hand book binding is a popular craft these days, and if she can find a good class to take, she will discover a huge number of ways to go about it. The variety of book binding styles is pretty amazing. And yes, some of them do involve machines. Glenna
November 15, 2021 at 4:49 am
Hi again Eli, I meant to send your cousin to this article that Fiona wrote about handmade books: https://www.bookdesignmadesimple.com/book-arts-handmade-books/ She might find it inspiring. Glenna

July 13, 2021 at 12:35 pm
Thank you. Very interesting.
[…] you’re looking for a more durable and professional option, consider hardcover binding. Also known as case binding, this method involves attaching your book’s pages to a rigid […]
Leave a Reply Cancel reply
Your email address will not be published. Required fields are marked *
Join our book design community! Download chapters 1 to 9 of the book for free and receive book design updates via email.
Buy the book.

Buy the template

- PRO Courses Guides New Tech Help Pro Expert Videos About wikiHow Pro Upgrade Sign In
- EDIT Edit this Article
- EXPLORE Tech Help Pro About Us Random Article Quizzes Request a New Article Community Dashboard This Or That Game Popular Categories Arts and Entertainment Artwork Books Movies Computers and Electronics Computers Phone Skills Technology Hacks Health Men's Health Mental Health Women's Health Relationships Dating Love Relationship Issues Hobbies and Crafts Crafts Drawing Games Education & Communication Communication Skills Personal Development Studying Personal Care and Style Fashion Hair Care Personal Hygiene Youth Personal Care School Stuff Dating All Categories Arts and Entertainment Finance and Business Home and Garden Relationship Quizzes Cars & Other Vehicles Food and Entertaining Personal Care and Style Sports and Fitness Computers and Electronics Health Pets and Animals Travel Education & Communication Hobbies and Crafts Philosophy and Religion Work World Family Life Holidays and Traditions Relationships Youth
- Browse Articles
- Learn Something New
- Quizzes Hot
- This Or That Game
- Train Your Brain
- Explore More
- Support wikiHow
- About wikiHow
- Log in / Sign up
- Arts and Entertainment
- Book Crafts
- Making Books
Bind Your Own Book at Home: A Beginner's Guide
Last Updated: August 19, 2023 Fact Checked
Binding with Tape
Using ribbon, sewing the binding, single sheet binding, things you'll need.
This article was co-authored by wikiHow staff writer, Dev Murphy, MA . Dev Murphy is a wikiHow Staff Writer with experience working as a teacher, ghostwriter, copyeditor, and illustrator. She loves writing how-to articles because she loves learning new things and because she believes knowledge should be free and accessible to the world. Dev's creative writing and visual art have been featured in many venues online and in print. When she is not writing for wikiHow, she is drawing pictures, making perfume, or writing hybrid poems. Dev earned her MA in English Literature from Ohio University in 2017. She lives in Pittsburgh with her cat, Nick. There are 12 references cited in this article, which can be found at the bottom of the page. This article has been fact-checked, ensuring the accuracy of any cited facts and confirming the authority of its sources. This article has been viewed 1,209,184 times. Learn more...
Do you want to start a scrapbook, nature journal , or diary ? You can, of course, buy a suitable book at the store, but if you really want to make it your own, perhaps it's time to rediscover the not-quite-lost art of bookbinding. If you’re not sure where to begin, it’s easier than you think, and you can bind your own book today using materials that you likely already have around the house. Keep reading to learn different bookbinding methods, from the simple to the more complex.
Things You Should Know
- To bind your book with tape, first staple the pages along the crease, and then reinforce the staples with a strip of linen tape or cotton tape . For a thick book, use several layers of tape.
- If you want to bind with ribbon, punch holes every 1 ⁄ 4 inch (0.64 cm) along the edge of the pages. Thread a piece of ribbon in and out of each hole and secure it with a knot.
- Sew your book together by marking 5 equally spaced dots along the crease with a pencil, and then using a needle and thread to pierce the holes and sew the binding on.
- If you have too many pages to fold crisply, try creating packets of signatures. A signature is a group of 4 sheets folded down the center. [1] X Research source
- Most books are folded hamburger style (i.e., by folding the shorter ends of the paper together), but you can fold however you want.
- If you made signatures, staple each signature separately and then stack your stapled signatures. Leave the stack unstapled.

- If you’re binding a book of material printed from Microsoft Word, make sure your pages have a “gutter” margin of about 1 ⁄ 2 inch (1.3 cm) before you print them. The gutter margin is the inside margin, the margin that will be partially obscured when the book is bound. [4] X Research source
- Avoid using masking tape or clear tape. These tapes won't be strong enough to support your book.
- If your book is thick, leave a larger margin of tape so you have enough tape to cover the spine and still reach the other side.
- Use your fingers to press the tape around the book’s spine so that it covers both the bottom of the book, the spine, and the top of the book.
- If your book has many pages or several signatures, you might want to tape it more than once to reinforce it. Repeat the process of taping the book until the book’s binding feels secure.
- Avoid folding leftover tape over the book, as this may make your book harder to open. Trim any excess tape.

- If you want to bind a page that doesn’t have a margin, you could either paste the page into a larger page with an adequate margin, or “build” a wider margin by gluing or taping a strip of paper to the inner edge of the page.
- If you’re having trouble measuring and hole-punching at the same time, mark where the hole should be with a pencil before hole punching.
- You can also choose to draw a thick line with pen or permanent marker if you want the line to remain on the cover.
- Consider measuring and marking the spots with your pencil prior to punching the holes, for accuracy.
- To make sure your pages don't slip out of place while you punch your holes, clamp them together with binder clips or clothespins.
- Choose a simple black tape for a classic look, or go for a colorful design if you want something more personalized.
- If your ribbon isn’t long enough, remove it and cut a longer piece.
- Looping the ribbon a second time reinforces the binding. Depending on how many pages you have, loop it a third time for an even stronger binding.

- It’s common to fold your pages hamburger style—i.e., fold the 2 short ends together—but fold your book however you wish!

- For example, if you have a paper that’s 8.5 by 11 in (22 by 28 cm) printer paper, dividing that by 6 gives you 1.4 inches (3.6 cm), meaning you'd space your holes 1.4 inches (3.6 cm) apart.
- If you know your page measurements, you don’t have to measure. If you don’t know, or if you’re not using a standard page size, make sure you measure precisely.
- For example, if you have a paper that’s 8.5 by 11 inches (22 by 28 cm), your first dot will be 1.4 inches (3.6 cm) from the edge. Then, each progressive dot will be 1.4 inches (3.6 cm) up from the previous dot. Your fifth dot should be 1.4 inches (3.6 cm) away from the top of the page.

- If you don’t have an awl, you can use a large needle.
- You can use whatever color thread you like, but remember your thread will be visible!
- You can tie whatever knot you’d like as long as it firmly keeps the sewing in place.
- In single sheet binding, you don’t fold your pages like you do for other bookbinding methods, but this means that you run the risk of the stitching tearing out of your pages if they are not reinforced well enough.
- You can use thick cardstock or thick cardboard as your cover.
- Perform this same process on the front and back covers as well.

- Use this same process to pierce holes in your front and back covers.
- If you have 20 pages, and your area is 2.25 inches (5.7 cm) long, you will need 45 inches (110 cm) of thread for each thread.
- Once you’ve tied the knot, you can trim off the end and tuck it in for a cleaner look.
- When threading the needle under the first loop you made, make sure you go under both threads, not through the loop.

- If you want to give your book some whimsy, choose a different color thread for each binding hole, or keep all of the thread colors the same for a more uniform style.
- For a sturdier book, loop your needle and thread around the stitch below the page you’re currently working on, starting on the third page.
Community Q&A
- Linen tape or cotton tape
- Scissors or X-ACTO knife
- Hand-held hole-puncher
Mastering Single Sheet Binding
- 6 binding needles
- 2 hard boards (such as cardstock or cardboard)
You Might Also Like

- ↑ https://www.youtube.com/watch?v=xF3P8bI_MNM&feature=youtu.be&t=29
- ↑ http://www.readwritethink.org/files/resources/printouts/HowToBindBook.pdf
- ↑ https://www.firstwriter.com/layout/margins.shtml
- ↑ https://www.ibookbinding.com/blog/bookbinding-supplies-and-materials/
- ↑ https://www.youtube.com/watch?v=04vt8YfT7XM&feature=youtu.be&t=59
- ↑ https://www.youtube.com/watch?v=04vt8YfT7XM&feature=youtu.be&t=110
- ↑ https://www.youtube.com/watch?v=04vt8YfT7XM&feature=youtu.be&t=132
- ↑ https://www.youtube.com/watch?v=04vt8YfT7XM&feature=youtu.be&t=175
- ↑ https://www.youtube.com/watch?v=04vt8YfT7XM&feature=youtu.be&t=211
- ↑ https://www.youtube.com/watch?v=04vt8YfT7XM&feature=youtu.be&t=220
- ↑ https://www.youtube.com/watch?v=04vt8YfT7XM&feature=youtu.be&t=261
- ↑ https://www.youtube.com/watch?v=04vt8YfT7XM&t=338s
About This Article

To bind a book, start by folding your pages in half and stapling them together at the folded crease. Then, cut a piece of binding tape that's about 2 inches longer than your book and lay it sticky-side up on a flat surface. Next, line up the creased edge of your book with the center of the tape and press your book down into the tape. Finally, wrap the other half of the tape around your book's spine and then cut off any excess tape at the top and bottom. To learn how to bind a book using ribbon or thread, scroll down! Did this summary help you? Yes No
- Send fan mail to authors
Reader Success Stories
K. J. Saviano
Mar 9, 2017
Did this article help you?

Sep 13, 2016
Aug 31, 2021
Coral Lenstine
Oct 27, 2021
Oct 29, 2017

Featured Articles

Trending Articles

Watch Articles

- Terms of Use
- Privacy Policy
- Do Not Sell or Share My Info
- Not Selling Info
wikiHow Tech Help Pro:
Develop the tech skills you need for work and life

Bookbinding guides and tutorials

If you love handmade booklets or can’t get enough of beautiful leather-bound journals, you should definitely take up bookbinding.
And while it may seem intimidating at first, I can guarantee you that if I can do it, so can you!
In this short guide, you’ll find handy info for newbie bookbinders, including the basics around materials, techniques, and how to start learning without breaking the bank.
Table of Contents
What is bookbinding?
Bookbinding is the process of assembling a stack of paper sheets (whether individually or folded into sections) and binding them together to create booklets, art journals, scrapbooks, and more.
This process can be done with different techniques and styles, and finished with soft or hardcovers. Covers can be customized with a variety of materials, from fabric and cloth to paper and leather.
Bookbinding is a fun and rewarding creative hobby that allows you to put together one-of-a-kind handmade pieces from beginning to end.
What are the basic bookbinding techniques?

There are a lot of bookbinding techniques, but the most popular for beginners are Saddle Stitch, Coptic, Perfect, and Japanese binding.
Each technique entails a unique process and complexity level. However, many binding styles have variations, including more accessible, simpler versions.
On the other hand, if you’re after quick results and practicality to get the job done, a binding machine might be a better option for you!
Let’s look briefly into some of the main bookbinding techniques:
Saddle Stitch
This is one of the easiest, most low-cost bookbinding techniques because it involves binding pages with staples along the spine.
It’s best suited for smaller projects with fewer pages. Some use this method with thread instead, but it’s mostly about saving time and money with this one!
Perfect binding
Perfect binding is a very beginner-friendly technique. It involves directly attaching folded signatures to book spines with bookbinding glue. This not only makes it easy to do, but pretty cheap.
Coptic binding
This method requires sewing chain link stitches along book spines, exposing the horizontal stitches fully. This method enables books to lay completely flat when open.
Japanese stab binding
This technique requires sewing pages together through a pattern of holes created along the spine.
Thread remains visible (spines are not covered), creating very unique, aesthetic finishes. Like Coptic binding, this technique allows booklets to lay flat when open.
What are some beginner bookbinding projects?
There are a lot of fun and easy-to-learn bookbinding projects that beginners could do; all you need are basic guidelines and essential materials to get things rolling.
A convenient way to take on your first project is with one of these fantastic bookbinding kits . You’ll have everything you need and a variety of approaches to choose from.
Below, I’ve lined up several bookbinding projects to give you a few ideas of how you can get started.
- Art journals
- Mini notebooks/journals
- Mini leather books
- Hardbound portfolios
What supplies do I need to start bookbinding?

Bookbinding supplies can vary depending on the type of binding you want to do.
I’ve listed the most common supplies below to give you an idea of the essentials.
Most paper used for bookbinding is within a lightweight range, although you can go slightly heavier/thicker for larger projects.
Copy paper, construction paper, washi paper, mixed-media paper, and cardstock are popular picks. Heavier paperweights should be used for covers.
If you’re feeling crafty and want to personalize projects from beginner to end, we have a full article on the best paper making kits !
Cutting tools
Since bookbinding projects can be of all sizes and layouts, it’s important to have good cutting tools.
Craft knives, X-acto knives, and rotary cutters are reliable picks for this purpose — especially if you’re also incorporating heavyweight materials like leather.
These tools will help you scale your projects to desired sizes and trim imperfections with precision.
Bone folder
Bone folders are one of the most important tools in bookbinding.
Their primary purpose is to create crisp, precise folds in paper. Bone folders are also used to score folds and burnish surfaces, giving your projects polished finishes.
They’re also very handy in creating sharp edges and tight corners, making final results even neater.
Check out our guide to the best bone folders to know what to look for!
An awl is used in bookbinding to pierce holes into paper for sewing and binding.
These small holes serve as guides to thread sewing signatures, attach endpapers and/or decorative stitching on book covers.
Needle and thread
Bookbinding techniques that involve stitching will require using needle and thread.
The strongest and most enduring thread for this craft is linen, with cotton and waxed thread being common alternatives.
Bookbinding glue
Bookbinding glue isn’t always required but may be necessary when using a technique that does not involve stitching.
This doesn’t always apply, but some of the most beginner-friendly bookbinding methods use glue.
This adhesive is also crucial if you’re adding covers to your booklets or are working on repairs.
We have a complete list of the best bookbinding glues if you want to learn more about what’s out there.
Other supplies
Besides the supplies listed above, you’ll want to consider the following resources to complement your projects:
- Bookbinding tape
- Bookbinding press
- A metal ruler
- Materials for covers (leather, fabric, etc.)
- Corner rounders
How can I learn bookbinding?

A great way to learn bookbinding is through beginner online guides and tutorials.
YouTube is a convenient, free resource to find easy bookbinding projects and step-by-step tutorials. It’s also a great place to learn about the craft overall as well as the history of bookbinding.
I’ve listed a few Youtube channels I recommend below:
- DAS Bookbinding
- Nik the Booksmith
- bitter melon bindery
Where can I find inspiration for bookbinding?
At the end of the day, the best (and most accessible) place to find inspiration for bookbinding is online.
I suggest researching the works of professional bookbinders and home crafters alike; there’s always something you can learn from both perspectives.
TikTok, Instagram, YouTube, and Pinterest are all great places to look for inspiration.
Have a fellow bookbinder pal or family member? Discuss and share your processes and ideas; this more often than not leads to a few inspiring ah-ha moments!
Share this:
Privacy & Cookies: This site uses cookies. By continuing to use this website, you agree to their use. To find out more, including how to control cookies, see here: Cookie Policy .
- Complete Starter Tools Kit
- New Book Maker Guide
- Bookbinding Tools & Supplies Quick Start Guide
- Glossary of Terms
- Starter Tools Kit
- Bookbinding Methods
- Inspiration
Select Page
Are you interested in bookbinding? Here’s how to get started.
Getting Started

I’ve said it before and I’ll say it again – you don’t need formal training to be a bookbinder . All you need is a successful bookbinder who wants to teach you everything they know. That’s where I come in. If you want to learn bookbinding, here’s how to get started!
Before I jump into each topic below, I want to give you Answers to Some of the Most Common Paper Questions for New Bookbinders . This is perfect for anyone who has already made a book or two, but has more questions.
What is bookbinding?
At its very simplest, bookbinding is the physical assembly of the individual parts of a book into a single volume .
Putting a book together needs a few tools, skills and techniques, which you can pick up easily over time.
Binding a book can be simple or complex. No matter where you start, there is room for everyone.
What do I need to start making books?
You’ve probably found a ton of different posts about how to start making books. Everyone has an opinion and some of those people would make money if you bought their suggestions. I know, because I’ve been there. I wished someone would just tell it to me straight.
So, here it is. This is me giving it to you straight. To make your first book, you’ll need:
Yup, that’s it. Since books are just an “assembly of pages into a single volume”, you don’t need glue or any crazy tools to make one.
That said, I have a sneaky suspicion you want to create a book that looks like this:

These are “case bindings.” For this type, you’ll need a few more things, but it’s totally do-able.
Recommended Reading
Before you try to make a book, get familiar with a few of the basics.
- Getting to Know the Physical Parts of a Book
- Glossary of Common Bookbinding Terms
- The Most Important Rule in Bookbinding | Grain Direction
- How to Choose the Right Size Bookbinding Thread
- Understanding Different Types of Bookbinding Glue
- How to Choose the Right Bookbinding Needle
- A Useful Guide to Different Types of Bookbinding Awls
- Know the Difference | Text and Writing Weight Papers
- Know the Difference | Book Board
Starter Bookbinding Tools & Materials
If you haven’t already, grab my Bookbinding Tools & Supplies Quick Start Guide to learn about the tools I’ll talk about below and where to find them.
🔖 SHOPPING LIST
✨ I’ve curated a Complete Starter Bookbinding Tools Set to include all of the must-have items on this list to make life easier.
🌟 I’ve also created some all-in-one book materials kits so you can just get on with making a book already 😂
Materials & supplies
- Paper . One 9×12 spiral bound book of drawing paper, 60 lb/90 gsm, will work great. Think brands like Strathmore, Artist’s Choice, etc.
- Glue . A bottle of Elmer’s Glue or an Elmer’s Craft Glue Stick will do the trick. They’re not acid-free, but that’s ok for your first book
- Linen thread . I explain how to choose the right linen thread if you’re curious about it
- A couple sheets of size 12″ x 12″ card stock paper . These make great softcovers. Choose any design(s) you like. They’re usually sold individually at Joanne’s or Michael’s craft stores, but you can also get them in paper packs. I recommend 12×12 because it will give you more options in terms of book sizing
Tools & equipment
- Sewing needle . read up on how to choose the right bookbinding needle to learn more
- Utility knife . Get one with a retractable blade and safety lock
- 12-18″ ruler . Avoid anything cork-backed if you can
- Something heavy (2-5lbs) to press the book down while it dries (I’ve used an unopened 20 ounce can of tomatoes wrapped in an up-cycled Amazon gift bag, so nothing is out of the question here)
If you’re already at the store and want to make your life easier, here are a few more tools I recommend:
- 1″ foam brush or decent quality art brush to apply glue. I like a wooden handled brush around 1/2″ to 3/4″ wide
- Awl or thick needle to pierce the paper. I wrote A Useful Guide to Different Types of Bookbinding Awls for all things poke-y
- Bone folder . If you’re vegan, you can also use Teflon or ABS plastic bone folders. They work just as good!
Now that you’ve got some tools, it’s time to use them.
Starter Bookbinding Methods
I always recommend the following bookbinding methods for anyone new to the craft. These methods require very few tools or materials and are quick to complete and easy for all ages (even kids).
- Pamphlet Binding Method
- French Link Stitch Binding Method
- Japanese Stab Binding Method

Starter Bookbinding Tutorials
It’s important to understand how paper and thread work together to create a book. These tutorials will guide you through the process of threading the needle, punching holes in paper and sewing it all together.
- Simple book using the 3-hole pamphlet binding method
- Wrapped pamphlet using handmade paper
- Softcover French Link Stitch book or journal
- Japanese stab binding notebook using loose leaf paper

Remember to Have Fun
Bookbinding is an ancient trade handed down over thousands of years, but that doesn’t mean it’s “off limits” or for “trained professionals only.” No matter what you’ve heard or read, you don’t need formal training to make a book . Seriously.
In the beginning, feel free to choose the paper and materials that mean something to you . Don’t worry too much about the design, whether the page edges are rough or smooth, etc. None of that matters until you start working on intermediate bindings (like the Coptic Binding Method or Case Binding Method ).
No matter what you do, have fun with it. Making a book isn’t as essential today as it was hundreds of years ago, so you have room to play, learn and create. That’s what it’s all about!
Thanks for letting me help you and for taking me along on your bookbinding journey.
ALL my best,
About The Author

I created papercraftpanda to be an outlet for my bookbinding obsession and technical point of view. I designed the site to be a judgment-free zone where aspiring book makers of all levels can find helpful info, ask questions, share and inspire one another. Whether you're making books for yourself, for others or even for sale, you'll find support here. In this community, there are no silly questions!
Related Posts

Understanding the Difference Between Text and Writing Weight Papers in Bookbinding
April 20, 2021

You Don’t Need Formal Training to Make Books
March 9, 2021

Two Easy Ways to Find Grain Direction in Paper
April 1, 2021

Excited to Learn at the American Academy of Bookbinding
June 2, 2022

love what you're reading?
Popular posts.

- Free & Premium KDP Cover, interiors, Templates
- Download Guide
- Terms of use
- Privacy Policy
- Search for:
No products in the cart.
- Activity Books
- Educational Workbooks
- Business and Finance
- Health & Medical
- Journals & Notebooks
- KDP Planners
- Editable Canva
- KDP Bundles
- Coloring Books
- Kids Activities
Amazon KDP guide
Types of book binding: a comprehensive guide & techniques.

In the world of literature, where stories come alive and knowledge finds its home, Types of Book Binding is a topic that captures the essence of how we preserve and present these treasures.
The art of bookbinding stands as a cornerstone of preservation and presentation. From the earliest manuscripts to modern-day hardcovers, it has woven together the pages of human history.
Welcome to our comprehensive guide on the types of Book Binding, where we delve into the intricate techniques that have shaped the way we cherish and share information.
Table of Contents
What is Bookbinding?
So, what is bookbinding?
It is the art of assembling and securing the pages of a book, has a rich history that spans centuries.
From its humble origins to its modern manifestations, it has played an essential role in preserving and sharing knowledge.
Let’s take a journey through time to explore how bookbinding techniques have evolved, adapting to the changing needs and technologies of each era:
Ancient Origins
The roots of bookbinding can be traced back to ancient civilizations.
In cultures such as Egypt, Greece, and Rome, scrolls made from papyrus or parchment were the primary medium for recording texts. These were rolled and tied with cords, serving as rudimentary forms of binding.
The intricate art of calligraphy often adorned the pages, demonstrating an early appreciation for both content and presentation.
Medieval Craftsmanship
During the Middle Ages, as the demand for books increased, so did the need for more sophisticated binding techniques.
Early bindings consisted of wooden boards covered in leather, protecting the valuable parchment within.
Monasteries became centers of book production, and skilled craftsmen adorned bindings with metal clasps and intricate hand-tooling.
The Renaissance Revival
The Renaissance marked a period of significant advancement in bookbinding.
With the invention of the printing press, books became more accessible, and binding techniques evolved accordingly.
Binders started using decorative papers and experimenting with various styles, creating bindings that were both functional and aesthetically pleasing.
The introduction of sewing techniques further improved the durability of books.
Industrial Revolution and Beyond
The Industrial Revolution brought about mechanization, transforming book binding options into a more streamlined process.
Cloth and paper covers gained popularity, and case binding—a technique involving the attachment of a book’s pages to a hardcover—became prevalent.
This marked a shift from traditional handcrafted bindings to more standardized methods.
Contemporary Methods
In today’s digital age, while the demand for physical books persists, bookbinding has evolved to cater to modern sensibilities.
Traditional techniques coexist with innovative approaches. Adhesive binding, where pages are glued to the spine, has become a common method for paperback books.
Meanwhile, hand-bound artisanal books continue to thrive, appreciated for their craftsmanship and uniqueness.
10 Common Types of Book Binding
In the world of books, binding isn’t just about holding pages together – it’s an art that enhances the reading experience and preserves the content’s essence.
The array of book-binding techniques available is a testament to the craft’s intricacy and versatility.
Each method brings a unique touch to the book, ensuring that its form matches its content.
Let’s dive now into the most common Types of Book Binding .
1. Saddle Stitch Binding

Saddle stitch binding, known as staple binding, involves folding sheets of paper and fastening them together using staples along the spine.
This technique is perfect for booklets, magazines, and thin catalogs. It’s ideal for publications with fewer pages, like brochures or event programs, where cost-effectiveness and a simple presentation are desired.
This is quick and cost-effective, suitable for short print runs, and lays flat when open. However, it’s not suitable for thick volumes, staples may rust over time, and it offers limited durability.
2. PUR Binding

PUR (Polyurethane Reactive) binding is among the well-known Types of Book Binding, it uses a strong adhesive that works well with various paper types. It creates a durable, flexible spine.
This method is commonly used for softcover and paperback books, especially when durability is essential.
The pros include excellent adhesive strength, allowing for a wide range of paper types, and providing a durable and flexible spine.
However, the cons involve a higher production cost and being limited to certain paper weights.
3. Hardcover or Case Binding

Hardcover or case binding is a classic method involving sewing together gathered pages, which are then attached to a cardboard cover, usually wrapped in a protective cloth or paper.
This technique is preferred for high-end and lasting books like novels, reference books, and special editions.
The advantages include durability, visual appeal, and the protection it offers to pages. The downside is that it’s relatively expensive and not suitable for short print runs.
4. Singer Sewn Binding

Singer-sewn binding involves sewing sections of folded pages together through the fold.
It’s often chosen for high-quality, medium to large-sized books.
This type allows for a lay-flat reading experience and offers durability and flexibility. However, it’s more time-consuming and may not be cost-effective for short runs.
5. Section Sewn Binding

Section sewing involves sewing folded sections of pages together before being attached to the cover.
It’s ideal for books requiring durability and flexibility, and it’s commonly used for hardcovers.
The benefits include accommodating larger page counts, offering durability, and being aesthetically pleasing.
However, it’s relatively time-consuming and might be expensive for short print runs.
6. Coptic Stitch Binding

Coptic stitch binding is a hand-sewn technique where pages are sewn together through a chain stitch pattern, creating an exposed spine.
It’s often chosen for art books, journals, and unique projects.
It is visually striking, and allows the book to lay completely flat, and offers creative possibilities.
However, it’s time-consuming and not suitable for large quantities.
7. Wiro, Comb, or Spiral Binding

Wiro, comb, or spiral binding involves threading a continuous wire, plastic comb, or spiral through holes punched along the spine.
It’s frequently used for notebooks, presentations, and manuals, where pages need to lie flat or fold back.
This method offers excellent lay-flat functionality and is suitable for various page counts.
However, it’s prone to wear and tear over time and may not be as visually refined as other methods.
8. Interscrew Binding

Interscrew binding, also known as Chicago screws, involves using screw posts to bind pages together.
It’s often used for portfolios, photo albums, and other projects that may require pages to be rearranged.
The advantage lies in the fact that pages can be easily added or removed, and the binding is durable.
However, screw heads may scratch surfaces, and it’s not as common as other binding methods.
9. Japanese Binding

Japanese binding involves sewing through the folded pages and attaching them to an exterior cover.
It’s chosen for artistic and handmade books, offering a unique and elegant appearance.
This technique is visually distinctive and allows for creative cover designs. However, it requires handwork and is not suitable for mass production.
10. Solander Boxes and Slipcases

Solander boxes and slipcases are not binding techniques in the traditional sense, but protective enclosures that safeguard books and add elegance.
They are hinged, while slipcases slide on and off. They are often used for rare books, limited editions, and valuable collections.
These enclosures protect books from light, dust, and damage, enhancing their presentation. Nonetheless, they add to the overall cost and require additional storage space.
DIY Book Binding: Step-by-Step Book Binding Tutorial
Book binding, an age-old craft, allows you to transform loose pages into beautiful, cohesive volumes.
With the right materials and a bit of patience, you can achieve professional-looking results right at home.
This step-by-step tutorial will guide you through the process of how to bind books, catering to beginners and enthusiasts alike:
Materials Needed
- Loose pages or printed sheets
- Bookbinding glue or adhesive
- Chipboard or cardboard for covers
- Paper cutter or ruler and craft knife
- Bone folder or flat tool
- Pencil and eraser
- Binder clips or clamps
- Decorative paper or cloth (optional)
- Awl or bookbinding needle
- Linen thread or bookbinding thread
Step 1: Preparing Your Pages
Start by trimming your loose pages to a consistent size using a paper cutter or ruler and craft knife.
Ensure all pages are neat and uniform.
Step 2: Creating the Covers
Cut your chipboard or cardboard to the desired cover size, ensuring it’s slightly larger than the pages.
If you prefer, cover it with decorative paper or cloth to add a personal touch.
Step 3: Folding the Pages
Fold your trimmed pages in half to create the book’s signature.
Use a bone folder or the flat edge of a tool to achieve crisp folds.
Step 4: Gluing the Spine
Apply a thin, even layer of bookbinding glue or adhesive to the folded edge of the pages.
Press them together, ensuring they’re aligned.
Then, clamp the signature with binder clips or clamps and allow the glue to dry thoroughly.
Step 5: Attaching the Signature to the Cover
Apply glue to the spine of the signature and attach it to the inside of the cover.
Press firmly and use a bone folder to smooth any air bubbles. Let it dry completely.
Step 6: Creating Holes for Binding
Using an awl or bookbinding needle, carefully create evenly spaced holes along the book’s spine.
These will be used for sewing the pages together.
Step 7: Sewing the Binding
Thread a needle with linen thread or bookbinding thread.
Start sewing from the inside of the book, passing the needle through the first hole and pulling the thread until a small tail is left inside.
Loop the thread around the spine and pass it through the next hole from the outside.
Continue this process until you reach the last hole.
Step 8: Securing the Binding
Tie a knot with the thread’s tail and the loose end.
Trim any excess thread. This creates a secure binding that holds the pages together.
Step 9: Finishing Touches
Use a bone folder to gently press the book’s spine, ensuring the pages are snug against the binding.
Your DIY-bound book is now complete!
Now, here are some tips for a smooth binding process:
- Practice on a few pages before binding a complete book to familiarize yourself with the process.
- Ensure the adhesive is applied evenly to prevent pages from coming loose.
- Use a ruler to ensure holes for sewing are uniformly spaced along the spine.
- Experiment with different decorative papers or fabrics for unique cover designs.
- Be patient and take your time, as precision is key to achieving a polished final product.
With this step-by-step tutorial, you’re well-equipped to embark on your publishing journey !
Whether you’re creating journals, sketchbooks, or personal keepsakes, mastering DIY bookbinding offers a satisfying and creative way to preserve and present your work.
Remember, practice makes perfect, so don’t hesitate to refine your skills and explore the many ways to bind a book as you become more confident in this art!
Choosing the Right Binding Method for Your Book
Selecting the right method from these different binding types is a critical decision that profoundly impacts its functionality, durability, and overall aesthetics.
Here, we delve into the factors to consider when making this choice, along with recommendations tailored to different types of bookbinding.
Let’s start with what you must keep in mind:
The primary purpose of your book plays a significant role in determining the ideal binding method.
For instance, a novel may benefit from a flexible binding that allows easy reading, while a manual or reference book might require a sturdier binding to withstand frequent use.
2. Durability
Consider how durable your book needs to be. Will it be subjected to heavy handling, transportation, or environmental factors?
If so, a more robust binding method, such as case binding or spiral binding, might be preferable to ensure the longevity of the book.
3. Aesthetics
The visual appeal of your book is crucial, as it contributes to the reader’s first impression.
Hardcover bindings exude a sense of sophistication, making them suitable for formal publications.
On the other hand, softcover bindings might be chosen for a more approachable and casual feel.
So, take your time and choose carefully among the types of book binding that we already cover in this article.
Budget considerations are paramount. Different binding methods have varying costs associated with materials, labor, and equipment.
Finding a balance between quality and affordability is essential, especially for projects with limited financial resources.
Types of Book Binding Based on the Content You Wish to Publish
Finally, these are recommendations based on the types of notebook binding ideas to choose from depending on content:
1. Novels and Fiction
For novels and works of fiction, perfect binding is a popular choice. This combines durability with a sleek finish, making it suitable for paperback novels.
Its flexibility ensures comfortable reading, and the spine can be printed with titles and authors’ names, enhancing shelf visibility.
2. Photobooks and Coffee Table Books
Photobooks demand an exquisite presentation that showcases images effectively.
Lay-flat binding or saddle stitching are excellent choices: the first eliminates the gutter, allowing images to spread seamlessly across pages.
While the latter is ideal for slim photobooks and provides a clean, minimalist look.
3. Manuals and Reference Guides
Manuals and reference materials benefit from sturdy bindings that endure frequent use.
Spiral binding or wire-O binding allow pages to lie flat and enable easy flipping, making them practical for quick referencing.
Additionally, ring binding permits easy insertion and removal of pages, ensuring content updates without re-printing the entire manual.
4. Journals and Notebooks
Journals and notebooks often require durability while allowing personalization.
Case binding offers both strength and a polished appearance, making it suitable for custom journals.
Alternatively, coil binding, which utilizes plastic or metal spirals, is a flexible and budget-friendly option for creating customizable notebooks.
5. Children’s Books
Children’s books necessitate bindings that can withstand enthusiastic handling.
Board book binding, with its thick, durable pages, is an excellent choice for early readers.
It provides a tactile experience and can endure repeated use by young readers without damage.
Whether you’re crafting a novel, a photo book, a manual, or any other type of publication, the binding method you choose will significantly influence the final product’s functionality and appeal!
Delving into the diverse world of types of book binding offers a profound understanding of the craftsmanship that goes into creating the books we cherish.
Throughout this comprehensive guide, we’ve explored an array of binding techniques, each with its own unique characteristics and applications. By gaining insights into these methods, you’ve gained a deeper appreciation for the artistry and innovation that have shaped the way we experience literature and knowledge.
As you journey through the realms of literature, whether in personal exploration or professional pursuits, consider the possibilities that bookbinding techniques can offer.
Perhaps you’ll be inspired to create your own handcrafted volumes or engage with books in a whole new light.
Remember that every bookbinding style we’ve explored carries a legacy of tradition and innovation, contributing to the beautiful tapestry of literary history.
So, embrace the diversity of bookbinding, explore its techniques, and let your curiosity guide you!
DISCOVER OUR FREE BEST SELLING PRODUCTS

Editable Canva Lined Journal: Express Your Thoughts – KDP Template

Lined Pages Journal 120 pages Ready to Upload PDF Commercial Use KDP Template 6×9 8.5×11 5×8 for Notebooks, Diaries, Low Content

Cute Dogs Coloring Book for Kids | Activity Book | KDP Ready-To-Upload

Wolf Coloring KDP interior For Adults, Used as Low Content Book, PDF Template Ready To Upload COMMERCIAL Use 8.5×11"

Daily Planner Diary : Diary Planners for Everyday Productivity, 120 pages, 6×9 Size | Amazon KDP Interior

Coloring Animals Head Book for Kids, Perfect for ages 2-4, 4-8 | 8.5×11 PDF

Printable Blank Comic Book Pages PDF : Create Your Own Comics – 3 Available Sizes

Black Lined Journal: 120 Pages of Black Lined Paper Perfect for Journaling, KDP Notebook Template – 6×9

Student Planner Journal 120 pages Ready to Upload PDF Commercial Use KDP Template 6×9" 8.5×11" for Low Content book

Notes KDP interior Ready To Upload, Sizes 8.5×11 6×9 5×8 inch PDF FILE Used as Amazon KDP Paperback Low Content Book, journal, Notebook, Planner, COMMERCIAL Use

Recipe Journal Template – Editable Recipe Book Template, 120 Pages – Amazon KDP Interior
Leave a Reply Cancel reply
You must be logged in to post a comment.
Sorry for the inconvenience but we’re performing some maintenance at the moment.
Username or email address *
Password *
Remember me Log in
Lost your password?
Email address *
A link to set a new password will be sent to your email address.
Your personal data will be used to support your experience throughout this website, to manage access to your account, and for other purposes described in our privacy policy .

How to Bind Your Own Hardback Book

Introduction: How to Bind Your Own Hardback Book

The art of book binding is an ancient craft, but actually it is not very difficult to do and with almost no practice you can get really awesome results. If you are on the lookout for fun craft projects or quick ways of making nice presents and gifts, then this could be the project for you. I know that there are other Instructables on the art of book binding but this project is meant to be a simple quick project that will give a very acceptable finish, and a book that looks like it has been professionally made, yet without the need for any special equipment. All you will need is: Some paper Minimum really is about 32 A4 or US Letter sized sheets, to make a half A4 (half US Letter sized book), although smaller books can be made as can ones with more pages. You can use tracing paper, thick or thin paper and of course colored or even preprinted or written on paper. Some glue You will need PVA (Elmer's White glue) or a rubber fabric adhesive (in the UK that is called Copydex, perhaps someone could tell me what it's called in the US), (a glue gun if you have it, would help with one of the stages, but is not mandatory). Some stiff cardboard or corrugated (fluted) cardboard Some fabric or leather Any old stuff will do for the cover. I have used the fabric from some old pairs of trousers that were being thrown out (actually nothing gets thrown out in my house, just put to one side for later use). But you could use a bit of leather, some old curtains, cushion covers...etc etc, I'm sure you get the idea.
Step 1: Stack Your Paper Neatly in (at Least 4) Piles of 8 Sheets

You are going to be binding your paper in eight sheet folios. Of course you could do more or less. I have found eight sheets to be a good number. because you are folding it in half each sheet is going to make four pages of your book, so this eight sheet stack is going to make 32 pages. Your book should have at least four of these eight sheet folios which will therefore make 128 pages. (Apologies to all the maths wizards out there). You can use just plain paper or paper upon which you have already printed a header and footer (remember to get this the right way round and remember that there will be 4 headers and four footers per sheet of paper. If you want to mix in different papers then remember that they will appear further into the book as well. (don't worry, this all becomes obvious as we go through the project).
Step 2: Fold Each Stack in Half

As neatly as possible and keeping the paper as lined up as possible, fold each pile of eight sheets in half cross-wise.
Step 3: Unfold the Paper and Turn Over

Making sure you keep the paper nice and straight, unfold each stack of eight sheets, and turn over.
Step 4: Staple the Pages Together

I have a long arm stapler ("bully for you", I hear you say), but if you don't have one of those, then no worries, just do the following: Open out your stapler Place the upturned paper stack on top of an eraser (positioned where you want to staple - which will be about two inches (5 cm) from the edge of the page exactly on the crease) and slowly but firmly push down on the stapler until you have stapled through the pages. Turn the pages over, pull off the eraser and then fold over the staple ends with the blunt end of a dinner knife or your thumb nail, being careful not to break it / stab yourself. Repeat at the other end of the crease so that each page has just two staples in it. If you, like me, have a long arm stapler, simply staple the eight sheet stack in two places... I knew there was a good reason for borrowing that thing from work.
Step 5: Glue the Binding Onto the Folios

You are now going to make the heart of the book. You have made at least four of the eight sheet / 32 page folios and they need to be stuck together. Firstly , cut a piece of thin fabric to the same length as the page height and about five times the thickness of all the folios held together. Hold the folios tightly together and all lined up. Either get a friend to help or clip the folios together using giant paper clips or bull dog clips (or even a rubber band I guess). When they are all nicely aligned apply glue to just the spines of the folios. You can use white glue for this (this was what white glue was originally made for BTW) but you must be careful not to let it drip down in to the gaps between the folios (maybe painting the fabric would be better.) Alternatively you can use hot melt for this part. Again, hot melt is used in industry for book binding, so it is perfect for the job. Before it has a chance to set, quickly turn over the wad of folios and glue them to the piece of fabric so that some fabric sticks out each side (i.e. so that not all of the fabric is glued to the pages)
Step 6: Trim the Bound Folios

As Fugazzi has pointed out, you may be able to get your bound pages trimmed by a proper guillotine at your local one stop print or copy shop. Failing that read on... If you want (and you don't have to) you can trim the folios a tiny bit. Beware that the first time you do this you might end up making more of a mess of the edge of the paper than if you just left it. It takes a bit of practice and a sharp craft knife or scalpel (definitely NOT something for children to do on their own). If you want to trim, then the most important edge to trim is the edge opposite the binding, because when the paper is folded over all the pages get to be slightly different lengths depending on where they are in the folio stack. The trick is to hold the rule very steady and take many repeated cuts being careful to cut in the same groove and try to make sure that at each cut the paper on at least one layer is cut from edge to edge. (BTW I know that the drawing I have done to illustrate this step does not show this method of trimming multiple sheets, but it is meant to be a bit figurative anyway). If you have access to a proper guillotine that can cut through paper stacks (i.e. at work or at school) then this is the time to use that, it will give you the most awesome finish). Trimming is by no means necessary. Trimming or not, you have now finished the paper part of the book and it's time to move on to the cover...
Step 7: Mark and Cut Out the Cover Boards

Place the bound folios on a piece of stiff card so that the bound edge lines up with one straight edge and then draw round the paper allowing about a quarter of an inch / 5 mm border on the three other edges. Cut the card out and then cut a duplicate. Corrugated card is fine as the cover, as is thin foam core (foamboard), but the best kind of card is the stiff card that is used as the backing for drawing and sketching pads.
Step 8: Make the Book Spine

Loosely assemble the bound paper and the covers. Pressing them together, measure their combined thickness and mark off on a piece of scrap card. Cut the spine so that it is the thickness of the covers and the paper together and the same length as the height of the book covers.
Step 9: Mark and Cut the Material

Position the book covers and the spine on the reverse of your chosen fabric or leather and mark out so that there is a border of about one inch (25 mm) all round. Cut out the material. As already mentioned, you can use any material you want really, although very thick material will be difficult to fold and glue (but hey, who knows how patient and skilled you are?). Actually, I used material from a pair of my ex-wife's linen (Toast) trousers, thought I might give her the book as a Christmas present in an ironic sort of way... don't worry only joking and she had thrown them out anyway...
Step 10: Glue the Cover Board and Spine in Place

Using white glue or rubber solution glue, smear an even coating over the boards and place face down on the wrong side of the material (i.e. the side of the material that you don't normally see, which has the pattern the wrong way round etc. etc). Make sure you stick them neatly in a row so that they are aligned with each other and straight and that there is a gap of about one or two thicknesses of the card you are using between the spine and each of the cover boards.
Step 11: Finish the Edges of the Cover

Smear an even layer of white or rubber glue round the edge of the boards and fold the material over the board to cover the edge. Work on one edge at a time. Do opposite ends first and then fold the other sides over on top so that all the folds go the same way. Make a neat job of the corners. If you are using thick material, you may well have to cut away some of the material that is going to be hidden under the fold-over to stop the corners getting too bulky.
Step 12: Glue the Paper Into the Covers

Things are starting to shape up now. Smear some white glue (or rubber solution glue) in two stripes down the middle edges of the cover boards being careful not to get any glue on the spine board. Then place the bound paper wad so that it is centrally resting on the spine board and ONLY the thin cotton "wings" are glued to the cover boards. The spine should NOT be glued to the cotton-covered bound paper wad, although you should make sure that it IS properly glued to the cover boards right up to their edges, because this is the join that makes the book strong and stops the page block falling out of the cover. It is best if you wait for this part to dry before moving on to the next step. It is probably a good idea to leave the book lying on its back with the paper was supported by to food cans while it dries, because, if you leave it to dry closed, bits of it might stick together that you don't want sticking together.
Step 13: Cut Out Your Lining Paper

Your book is nearly finished. Functionally it is already a hard back book, however the next step will make it look like a real book and cover up all the bits of folded over material. For the lining paper you can use almost any type of paper. Traditionally marbled paper was used. Now you can make this yourself (hey, I feel another Instructable coming on already) or buy it in sheet form from most good craft shops, or download a sheet of marbled paper from my site (where you'll see loads of other projects just like this). Or alternatively you can use a bit of old gift wrapping paper, or even just plain old brown packing paper. Be as creative as you can. The lining paper is like the lining of an expensive suit... hidden until it is revealed by someone opening it... Ideally, you want the lining paper to be a fraction smaller than the paper wad's height so that you can line it up neatly and twice as long as the paper wad's width so that it covers the inside of the hard cover. (See next step).
Step 14: Glue the Lining in Place

Fold the lining paper sheet in half crosswise. Smear the inside of the cover and the first page with white glue or rubber solution glue. Carefully place one half of the folded lining paper on the glued first page so that it lines up neatly with the edge of the paper. Then making sure that it goes in to the corner of the join between the paper and the cover, fold the liner out and glue it to the inside of the cover so that it covers up all the folded over material and the inside of the cardboard covers. Repeat for the back of the book. That's it... you're done! If the first paper goes a bit wrinkly as it dries out, wait for at least a day for it to dry really thoroughly and then iron over the page using a medium hot iron. It won't get all the wrinkles out but it will make the page a whole lot flatter and just try to use a bit less glue for the next book.
Step 15: Experiment and Make Loads of Different Books
Make books as presents, make them for school, make them for friends. Keep a pictorial journal, you never know, one day you might be famous, then think, how cool would it be when they unearth your journal, which is not only full of angst and perceptive youthful insights into the unfairness of it all, but is also embodied in a book that you yourself made and not some cheap (or expensive) notebook or diary that you bought from the store like millions of other people. I have made a couple more so far. I made the jeans one with a pocket after my niece, Josie suggested that I use the pockets from the trousers for pens and stuff... neat I thought, and it seems to work rather well. See what you can come up with and if you make something you like, why not post the images here or email them to me and I will put them up on line on dadcando
Participated in the The Instructables Book Contest

Recommendations

Pets and Animals Contest

Remake It - Autodesk Design & Make - Student Contest

Engineering in the Kitchen - Autodesk Design & Make - Student Contest

- School Supplies
- Animal Backpacks
- Clear Backpacks
- Mesh Backpacks
- Messenger Bags
- Sequins Backpacks
- Galaxy Backpacks
- Backpack Brands
- Other Supplies
- Types of School Backpacks
- Types Of Rulers
- Types Of Pencils
- Types of Book Binding
Shopping cart
- Privacy Policy
- Affiliate Disclosure
18 Types of Book Binding Explained (All kinds of Book Bindings)
- March 20, 2021
- Posted by admin
- Leave a comment
Nowadays there are different binding techniques, each of them has its advantages and disadvantages. Therefore, depending on the written material and its purpose, some techniques should be used or others. But, which are these and which aspects should be taken into consideration?
Despite the innovative era that technology brings with it, society still prefers books in physics. Feeling with the fingertips, the passage of the leaves, and controlling the percentage of reading done at a glance, are some of the pleasant experiences that electronic formats have not yet managed to match.
That is why, to this day, the printing and physical binding of books and magazines is still a valid resource. The dilemma arises when it is time to decide on one of the many possible binding techniques. At this point, one must think about the purpose and audience for which the written material is intended.
Thanks to my many years of experience in printing and binding all kinds of written documents. The quality, costs, advantages, and disadvantages vary greatly depending on the interests of the authors. The main requirements to be taken into consideration, before specifying the different parameters to be executed in a printing house, are the estimated binding time, the number of sheets that can be placed, and the binding time.
At present, the most popular binding techniques are:
18 Types of Book Binding
1. case binding or sewn binding.

When sewing, the printed sheets are connected with thread. Printed products bound with thread are very durable, but their production is complex, expensive, and, for example, used for very high-quality works. Typical products of this type of binding are books, such as encyclopedias, bibles, art books, fiction literature, and catalogs
When sewing, the printed sheets are first folded. They are then joined and sewn together. This produces the booklet, which is glued to the spine and cut out on three sides. The sewn and glued booklets can have different covers; that is, they are “matched” to each other. Sewing makes it possible to use a variety of different covers (such as hardcover). The rest of the processing depends on the type of cover sheet.
The price ranges from $7 to $12 per book. From 50 units, the cost varies according to the number of books.
Advantages:
- Very stable and durable
- Gives a high-quality appearance
- Many content pages can be worked on without problems
- Many possible variants
Disadvantages:
- It’s not easy to incorporate loose pages
- The folded sheets must consist of four, eight, or sixteen pages
- if there are images that stand out, they tend to be partially lost in the joint
2. Perfect Binding or Glue Binding

The name of this type of binding gives it away: the pages are glued together to produce a durable print. Gluing is perfect for sales catalogs, magazines, large brochures, paperbacks, brochures, and advertising magazines
In the glued binding process, the sheets are placed one after the other, individually folded (joined). This is how the inside of your print is formed. The spine is milled, sanded, and the paper dust removed so that the glue can penetrate deeply into the paper fibers. Only then is the glue applied with rollers or nozzles to the outside of the spine. The cover is then pressed onto the still fresh glue. Afterward, the cut-out on three sides follows, and now the glued print is ready. In this process, PUR and Hotmelt adhesives are used.
Hotmelt is the economical variant with limited durability, making this type of binding very suitable for simple products with a short shelf life. Binding with PUR adhesives is a little more expensive, but also more durable; therefore it is ideal for more durable and high-quality prints and large quantities of pages.
A minimum spine thickness of a few millimeters is required for glue binding. Therefore, small quantities of low-weight pages are technically difficult to produce. However, individual sheets can be processed on the inside, as well as different types of paper.
Depending on the material and finish, the price can range from $5 to $8 per book, and $1.50 per batch.
- Fast and relatively cheap
- Products are easy to stack
- Very good durability with PUR adhesives
- Supports single sheets and various papers on the inside
- Various formats and variations possible
- Part of the print disappears into the joint
- Limited opening
- The minimum binding thickness depends on the number of pages and the weight
- 72 hours drying time for PUR adhesives
3. Saddle Stitch Binding

Stapling is a true classic among binding procedures. It is also known by other names, such as stapling, stapled, or hooked binding. This type of binding is particularly common in the following printed products: magazines, printed advertisements of all kinds, brochures, and catalogs
In the stapling process, the sheets that are inserted one into the other are joined at the back of the fold by wire staples; all in one working step. In doing so, in most cases, the wire pierces the fold at two points and is bent on the inside. After the binding process comes the last working step: the trimming on three sides.
A fast and economical production are the advantages of this binding. Also, it stands out for its relatively long durability and the fact that it can be opened well. The printed motifs can be seen right up to the fold (the middle of the print when open).
The pages of stapled prints must always be a multiple of four, therefore individual pages are not possible. The only exception is additional removable pages, also called inserts, on the inside pages or covers.
Stapling with omega staples for easy archiving. The greater the weight of the paper, the fewer the pages. For example, for a magazine, we usually accept up to 40 pages of 250 g/m² coated paper, while 90 g/m² coated paper can hold up to 128 pages. The wire used for stapling is usually available in various coatings and colors. An interesting variant is omega stapling, with outwardly curved eyelets, which simplifies fixing the binding and subsequent filing without the need for perforations.
It costs about $0.05 for a maximum of 100 sheets.
- Fast and cheap
- Ecological thanks to the low consumption of materials
- Various formats and variations are possible and the print is well appreciated up to the fold
- If it is with omega staples it is easy to fix and file
- A limited number of pages
- Does not give a high-quality appearance
- In the fold, it moves
- Not easy to stack because of the thickening
4. Pamphlet Binding

The economical rubberized fold holds simple advertising products that do not need to be circulated for a long time. The number of pages is limited and a cover cannot be included. Typical products with gummed folds are: brochures with a small number of pages, advertising mailings, mailings, inserts, and newspaper supplements
In this type of binding, glue is applied to the planned folding lines. The sheets are then glued together, folded, and cut. Depending on the type of folding, eight-, twelve-, and sixteen-page products can be printed in sheet-fed offset printing. In rotary offset printing, even larger quantities are achieved. The paperweight should be between 80 and a maximum of 135 g/m². In addition to sheetfed printing, this binding technique is also used in rotary offset printing to produce cost-efficient print runs from around 50,000 copies, usually with inline processing (all steps of the manufacturing process take place within the same machine).
Its cost ranges from $0.50 to $1.20 per brochure. And from 50 brochures, the cost is calculated on a unit basis.
- Opens relatively well
- Various formats and roles possible
- A low number of pages
- Only for perishable products
- Without cover
- Limited weight selection
- A wide variety of papers is not possible
5. Comb Binding (Cerlox or Surelox Binding)

Plastic comb binding is widely used in the arts and is a quick solution for collecting sheets in blocks very economically due to the low cost of consumables. The disadvantages they have from a practical point of view and concerning the metallic spiral systems are diverse, among them that the sheets have a limited turn. Bead binding does not allow for 360-degree angle openings, which prevents the passage of the sheets in a fast and agile manner. When you want to see the material it must be on a surface and with its adjoining pages facing each other.
Another factor to take into account is that for intensive use the sheets suffer more deterioration with the comb binding system than with the spiral since comb binding is not intended for professional use or for runs that do not go beyond a few units. Everything depends on the function of the book, that is why it is one of the most economical binding methods used by students and teachers in guides, practices, pre-projects, etc.
Its price is from 0.30$ depending on the size of the booklet and the number of pages, reaching a maximum of 0.50$ per book approximately.
- It has an economical and easy to use system.
- It can also be unbundled and updated when needed and supports up to 500 sheets.
- The leaves cannot be rotated 360 degrees.
- Not for intensive use
- Sheets deteriorate easily
6. Spiral Binding

The spiral binding consists of perforating the sheets using a specific technique and with specific machinery. Once the punching is done, the next phase is carried out. In this phase, the spiral is placed through the perforation of the sheets.
Finally, the spiral is closed on itself. In this way, we achieve greater security and ensure that the binding is not damaged when the sheets are turned. Among all the techniques, the spiral binding joins all the ingredients that define a quality work: care in the conservation, presentation, and handling of the bound document. In this way, if what you are looking for is a flexible, simple, economic, and durable product, spiral binding will be a preferential option.
Its cost ranges from $2.00 to $3.00 per unit. And from 50 units of books, the cost is calculated based on the quantity.
- Speed: With the development of technology, the spiral binding industry now has advanced punching machines, which even allow data to be entered such as the number of sheets, the type of ringing, or the shape of the hole. In this way, this machinery makes the holes quickly and automatically and can reach a high rate of execution that will allow, in a few days, to place the ring to a large number of documents.
- Functionality: As pointed out at the beginning, comfort and functionality for the user must be an essential element when assessing the type of binding to be done. In this sense, the spiral binding technique enjoys some characteristics that make it the favorite option. The possibility of having the sheets cover 360 degrees of the circumference, its durability or the fluidity in the passage of the pages stand out as attractive features that make spiral binding the preferred option in many cases.
- Economy: Given the advanced technology in the making of the holes and the placement of the ring, as well as the low price of the materials to be used (plastic or wire), the price range for this kind of service is very low. The investment to be made will not be high in any case and, with the speed and durability of the banding offered in this online binding work, it can be considered that spiral binding is a highly economic process.
- Its use is not widespread in books and literary works, this form of binding is used more in notebooks, notebooks, and academic works.
7. Cased-in Wiro Binding

The spiral binding is also called Wire-O, double ring, or curly binding. In this binding technique, a wire or “comb” of wire is inserted through a row of holes that have been previously drilled in the booklet. Spiral binding is versatile and is often used for the following products: calendars, recipe and notebooks, books and text materials, notebooks, sales literature, and magazines
For the spiral binding, a row of holes is punched in the booklet and, if necessary, in the cover. A wire spiral is then turned through the round holes. A modification of the wire ends ensures that the sheets do not fall out.
Open notebook with Wire-O binding. No other binding method allows the bound material to open so perfectly. The pages lie flat and can be flipped through without any problems. The maximum number of pages depends on the diameter of the spirals and the weight of the paper. With a very large spiral diameter and low grammage, several hundred sheets are no problem. A variety of print media and individual sheets can be incorporated into the booklet. The spirals are available in various materials and colors. When opening there is a displacement: the motifs that reach the junction do not close flush.
Their cost ranges from $2.00 to $3.00 per unit. And from 50 units of books, the cost is calculated based on the quantity.
- Opens beautifully
- The leaves can be browsed completely
- Allows for large numbers of pages
- Material combinations are not complicated
- It is possible to incorporate individual sheets
- The motifs that reach the joint do not close flush (displacement)
- Between the open pages, there is a separation
- Protruding spirals make stacking difficult
- The surface of the pages is reduced by the row of holes
8. Wire-o Binding

The metal binding spiral is manufactured with a wire thread that is wound on itself forming a geometric figure with a helical shape. It starts at one end, goes around its center, and ends at the opposite end without any interruption of the wire.
To bind the documents, the spiral is inserted, turning it through the perforated sheets. Although it may seem somewhat complicated, it is not at all. As soon as the first coils of the spiral make their way through, the sheets no longer move and from then on it is much easier to insert the worm, which is somewhat laborious.
This type of binding is the best for documents of 16 to 275 pages, its cost varies between $3.00 and $4.00 and is widely used by students, thanks to its low cost.
- It is impossible to lose a sheet, the only way it can happen is by tearing it out.
- Easy to tear out the sheets without damaging the assembly.
- Allows the document to be rotated 360º.
- The presentation is not very luxurious.
9. Thermal Binding or Tape Binding

The thermal binding consists of binding the pages of the book or document in question by melting a certain amount of glue.
In this way, the pages are held firmly together and also on the back of the cover. We will now try to investigate further the process that this modern binding technique entails and specify the advantages, characteristics, and most suitable uses.
Its cost ranges from $2.50 to $3.50 per unit. And once you pass the 50 units, the cost varies according to the number of books.
- Thermal binding stands out as one of the fastest and most economical options for binding a book or any type of document with few pages. However, this can vary according to the weight of the paper.
- Likewise, it allows for an open choice between using a rigid or flexible cover, as the designer prefers. Undoubtedly, this versatility is one of the unquestionable attractions of this modern binding technique.
- Finally, two other great advantages of thermal binding are that it is a generally very economical process.
- It offers a very professional look
- It is fast, usually taking about a minute or less
- No need to punch the paper
- It is possible to bind more than one book at the same time
- A thermal binder can be a high initial cost
- It is not easy (although it is possible) to add and remove pages
- Pages cannot be opened at a 360-degree angle
10. Coptic Binding or Section-sewn Binding
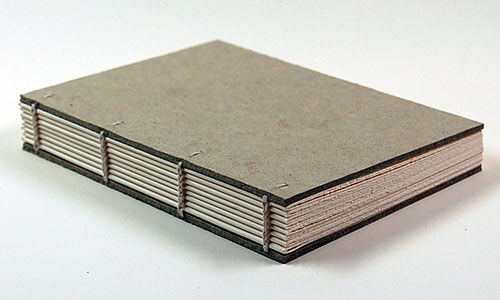
Coptic bookbinding is characterized by the union of the elements using sewing, generally of a chain knot. The elements that are part of this type of binding are
- Set of sheets folded by the center as a blog.
- Generally made of cardboard or wood. Optionally they are lined with fabric or wallpaper.
- Cord or thread. It is introduced through the holes previously made in the covers and the leaf notebooks.
For lovers of handmade or traditional binding, this type of binding is still one of the most attractive thanks to its simple realization. It offers many possibilities, finishes… and can be used for photo albums, scrapbooks, notebooks… Depending on the material and finish its price can range from $5 to $8 per book.
- The flat opening of the book is very comfortable for handwriting or sketching.
- Among the most interesting features is the sewing of loose sheets and therefore the use of various materials such as plastic, acrylic, wood, cardboard, metal, etc.
- The union of the covers through holes generated greater wear in the hinges that, besides, had to support the weight of the covers that used to be made of wood.
- Since there was no firm spine containing the entire structure, the body of the booklets tended to curve inward.
11. Japanese Bookbinding

To define a binding, it is best to identify the materials that will be used during the elaboration process. For example, in the case of Japanese binding, the use of thick cardboard covers and back covers is indispensable. And, secondly, that of a needle and a sewing thread.
This type of binding is based on a technique known as “Japanese stitching”. Japanese stitching consists of sewing the pages, cover, and back cover together. Therefore, for the bound object to acquire a minimum consistency, it is necessary to have hard front and back covers and a strong thread.
The use of seams to bind the elements of a book is very common in different types of binding. What makes it so different from Japanese bookbinding is that these seams are not hidden behind the spine. On the contrary, they are visible as an ornamental part that enriches the aesthetics of the binding.
This is the main reason why the thread, besides being resistant, must be thick. Thus, it will stand out as an important element visible on the spine, the front, and the back cover.
Its cost varies between 0.50$ per book.
- The simplicity of this stitching gives us something that most do not because if necessary we could undo it after the notebook is already done and add or remove leaves, the notebook is like new. For artist’s books, this is an advantage since new works are always being added.
- Concerning the materials and space needed to make it, it requires little space and few materials.
- This type of notebook does not have booklets and can be less easy to handle, the stitching even subtracts a minimum of space on the sheet, but allows us to give other different uses such as artist books, photo albums, catalog, etc.
12. Metal or Plastic Screw Post

Screw posts, also known as Chicago or bookbinding posts, are extremely versatile folders that allow loose documents of virtually any shape or size to be securely attached. They range in cost from $0.20 to $2.00 per book.
Their two-piece construction allows for easy upgrades, making them an ideal choice for applications that require frequent updates. They are commonly used to link photo albums, scrapbooks, samples, and many other items.
The precision metal and plastic company can perform the following styles: nickel steel, solid brass (lead-free), nickel-brass, or anodized aluminum. All our binding screw posts have a different standard and can also be customized.
- Variable coarse binders are used
- The screws are reusable
- The screws are low cost
- They can be modified frequently without general damage to the content
- They do not give a premium finish
- It is uncomfortable to open the book completely on a table
- When done incorrectly, leaves often fall off
13. Screw-post Binding

Screw binding is an economical solution for the production of various documents. It is preferably used when creating albums, but it can also be used to make books. It has several unique features that distinguish it from other bindings. To know them is to delve into a world so little known, but useful, as is the world of bindings.
Its cost varies between $1.00 and $2.00 per book.
- The most important advantage of screw binding is that it allows for flexible documents, which can be expanded in the future. The screws have extensions of different sizes that allow this capacity. Besides, it is a type of binding that can be modified, since it is possible to change the order sheets at any time and even place different covers over time.
- As far as applications are concerned, this is the scrapbook binding par excellence. Since a scrapbook is binding like this one, it allows all kinds of changes to be made. Along with this, photo albums are another of the most widespread applications and for similar reasons to the aforementioned format.
14. Eyelet Binding

There are buttonholes of different colors, dimensions, and thicknesses. Buttonhole-bound books are permanently bound; the sheets cannot be added or removed. Buttonholes come in a wide range of colors. The most common colors by a wide margin are copper, silver, white, and black. Other colors may sometimes require a longer lead time.
The cost ranges from $8.00 to $15.00 per book. From 50 units, the cost varies according to the number of books.
- Very durable
- Unusual, distinctive, and memorable
- The colors of the buttonholes can be coordinated with the printed copy
- Sometimes you can insert booklets with eyelets into ring binders
- Eyelet-bound books are more expensive than flat-seam or spine-bound styles and perfect binding
- The maximum thickness is 3/8 “.
- Certain diameters, thicknesses, and colors are always readily available
15. Velo Binding

It is a type of bookbinding often offered in photocopy stores and printers. Veil binding consists of a series of holes in the edge of the book. A plastic strip with rigid spikes is inserted into the holes from the top of the book, and a strip with corresponding holes is placed on the back with the spikes sticking out.
The book is then placed in a machine that holds the book firmly while the excess length of the tines is cut off and the tines are fused to seal the binding. The term “Vil Bind” is a trademark of General Binding Corporation, but is commonly used generically to refer to this process, although strip binding is also sometimes used.
It costs between 1.00 and 2.00 per book. From 50 units upwards, the cost varies according to the number of books.
- Veil binding is designed to be permanent.
- Economical for ultra-low quantities, but has a perfect binding feel.
- Ideal for high volume projects. Can bind books up to 250 pages
- It is feasible to use different articles within the same book.
- Great longevity
- The union is rigid due to the lateral union.
- Not compatible with thick papers inside the book.
- The “Cross Overs” are not ideal. Cross Overs are images/text that go from the page of the book to the right page.
- It is not flat at all.
- No minimum thickness. The maximum thickness is 2 inches.
- The plastic edge is not ideal for a premium finish.
16. Board Book Binding

Cardboard binding, also known as hardcover binding, is a type of binding in which the book is lined with a rigid cardboard cover. This is its main difference from a sewn paperback: the hardness of its cover.
This cardboard is covered with a paper, fabric, or Graflex cover. The title and design of the cover are printed on this lining if the paper is used, or it is decorated with gold or silver engravings if fabric or Graflex is used.
Its cost varies between $15.00 and $20.00 per unit. From 50 units, the cost varies according to the number of books.
- It is the strongest and most durable type of binding
- The cover is not only a thicker paper but it is also made of various elements: rigid cardboard, lining, and guards
Disadvantage:
- The cardboard has a high cost for its manufacture and its covers
- The production time is slightly longer than expected.
17. 3-hole Punch Binding

Push down on the punching arm to make three equal holes in the pages. For a book with many pages, you may only need to punch 10 pages at a time to avoid jamming the punch.
Pass the ribbon through the bottom hole at the front of the book, pulling the ribbon out from the back. Replace the ribbon in the center hole at the back of the book and pull it toward the front of the book. Tie the two ends of the ribbon into a loop.
Then take the quote and pass it over the top of the book, bringing the quote to the back. Again, pass the ribbon through the middle hole at the back of the book, pulling it toward the front of the book. Tie the two ends of the ribbon into a loop. Cut off the ends of the excess tape. Brush a coat of seam sealant to prevent the tape from fraying. Find seam sealant at any fabric and craft store.
It costs quite a bit, ranging from $0.80 to $1.20 per unit of the book.
- Binding your book with thread is a fairly simple process that does not require many tools.
- Choosing the tape you want to bind with, make sure it is strong and soft. Thick and very stiff tapes can cause damage to the pages.
18. Otabind Book Binding (Layflat Book Binding)

The purpose of this is that the text block is not pasted directly onto the cover page, as it is in the examples above. A small amount of cold glue is applied to the text block and left to dry overnight. The pocket cover is attached to the final pages, and the scores allow the text block to be separated from the cover.
The cost varies from $8 to $13 per book. From 50 units, the cost varies according to the number of books.
- The cold glue ensures that the pages are very difficult to loosen.
- The spine, because it is not attached to the text block, never wrinkles or breaks.
- Pages always lie flat; there is never a loss of margin.
- Careful consideration must be given to determining stock and designs when designing flat books.
Final Thoughts
If you are just starting in the bookbinding world, and you don’t know which of the 18 types would be ideal for YOU. I recommend you, based on this article, not to make a hasty decision… take your time.
You must choose the type of binding that best suits the needs of your project, but how do you know that? Making a brief study, where you will analyze first, the following criteria with their corresponding expressions: cost, durability, number of pages, how it opens, and value/aesthetics of your project.
But this is not all, there are other criteria that in my opinion are secondary, but necessary to make a correct decision of binding, such as stackability, variety of papers, binding, that it is possible to remove individual sheets, and that it is possible to work individual sheets.
Once you have decided on the most important factors for you, here you can deduce the most suitable types of binding. When selecting them you should define the product requirements as precisely as possible, to achieve the desired result.
Related Posts
12 types of pencils and their uses – with examples.
- September 5, 2021
17 Types Of Rulers & Uses With Examples
Leave a reply cancel reply.
Your email address will not be published. Required fields are marked *
Save my name, email, and website in this browser for the next time I comment.

Book Binding Services
Full-service book binding operations.
If you’re self-publishing a book, choosing a book binding method is one decision you’ll need to make. Different types of book binding offer different benefits. You’ll want to understand them, so you can choose the right one for your book.
At 48 Hour Books, we have in-house bindery operations where we produce four different book binding types:
Case Bound (hardcover)
Perfect Bound (softcover)
Spiral Coil Bound
Saddle Stitched
When self-publishing a book , you want to consider your options for a book binding service. 48 Hour Books offers a variety of book binding techniques, from hardcover, case bound to perfect bound, softcover versions, as well as spiral binding and saddle stitched.
Book Binding Operations
We do all of our binding in-house. This way, we control the quality, and it allows us to print quicker than those who send out for binding.
We print and bind your book exactly the way you want it, in the quantity you prefer.
Our staff is skilled at book binding, using the latest technology in book binding equipment. Our capabilities include:
- Several high-capacity perfect binders for softcover books
- State-of-the-art case binding equipment for hardcover books
- Several high-speed punches for spiral coil binding
Book Binding Options
Different types of binding offer different benefits. The one you choose for your book can depend on a variety of factors.
Case Bound (Hardcover)
Case bound books , also called hardcover books , are beautiful and classic. They’re perfect for:
- coffee table books
- family history books
- photo or art books
- reference books or encylopedias
- children's books
Hardcover books are produced by using adhesive to hold the pages to heavy, wrap-resistant board. At 48 Hour Books, we use PUR adhesive, the strongest available for book binding. Our team handles some of the hardcover bindery process by hand, such as adding cloth head and tail bands and hand wiping each book to ensure a flawless finish.
We print our standard hardcover books in full-color and laminate them for protection. We also offer book covers in cloth, leather and leatherette options. Hardcover books can be paired with a dust jacket to protect the cover and add visual interest. Both hardcovers and dust jackets can be printed with our Diamond 3D cover options, such as foil, clear gloss or texture.
Perfect Bound (Softcover)
Perfect binding is the most popular book binding method. Softcover, or paperback , books are easy to transport and more cost-effective to print than hardcover books. They're a common binding type for many book types, including:
- general fiction books
- biographies
- poetry books
- travel books
At 48 Hour Books, we use PUR adhesive on the spine to hold the pages together. Our binders and bindery team ensure your books will be durable and attractive. The ability to add our Diamond 3D enhancements makes your book stand out.
Spiral Bound
Spiral coil binding provides a flexible, portable book at an economical price. Spiral Binding is ideal for:
- daily planners
At 48 Hour Books, our durable plastic spiral binding is available in a variety of vibrant color options to match your book cover design. Our spiral binding book covers are softcover or leatherette and can be enhanced with any of our Diamond 3D cover effects.
Saddle Stitch
Saddle-stitching is a cost-effective method for books with low page counts. Saddle-stitching uses staples on the spine of the book. It’s easy to carry, which can be the perfect choice for:
- short children’s books
At 48 Hour Books, our saddle-stitched books can be printed with our Diamond 3D covers . You’ll have an attractive eye-catching book at a lower cost than other printing methods.
Check out the helpful video below to see our different binding types.
Interested in book printing and binding services, we’re moving to a new location.
Orders may be delayed while we finish settling in. Click here for more info. Thank you for your patience!
- Office Products
- Office & School Supplies
- Binders & Binding Systems
- Binder Accessories
- Binding Covers
Enjoy fast, free delivery, exclusive deals, and award-winning movies & TV shows with Prime Try Prime and start saving today with fast, free delivery
Amazon Prime includes:
Fast, FREE Delivery is available to Prime members. To join, select "Try Amazon Prime and start saving today with Fast, FREE Delivery" below the Add to Cart button.
- Cardmembers earn 5% Back at Amazon.com with a Prime Credit Card.
- Unlimited Free Two-Day Delivery
- Streaming of thousands of movies and TV shows with limited ads on Prime Video.
- A Kindle book to borrow for free each month - with no due dates
- Listen to over 2 million songs and hundreds of playlists
- Unlimited photo storage with anywhere access
Important: Your credit card will NOT be charged when you start your free trial or if you cancel during the trial period. If you're happy with Amazon Prime, do nothing. At the end of the free trial, your membership will automatically upgrade to a monthly membership.
One-time purchase: #buybox .a-accordion .a-accordion-active .a-price[data-a-size=l].reinventPriceAccordionT2 .a-price-whole { font-size: 28px !important; } #buybox .a-accordion .a-accordion-active .a-price[data-a-size=l].reinventPriceAccordionT2 .a-price-fraction, #buybox .a-accordion .a-accordion-active .a-price[data-a-size=l].reinventPriceAccordionT2 .a-price-symbol { top: -0.75em; font-size: 13px; } $7.99 $ 7 . 99 FREE delivery Thursday, May 30 on orders shipped by Amazon over $35 Ships from: Amazon Sold by: JENNIY
Return this item for free.
Free returns are available for the shipping address you chose. You can return the item for any reason in new and unused condition: no shipping charges
- Go to your orders and start the return
- Select the return method
This item has been tested to certify it can ship safely in its original box or bag to avoid unnecessary packaging. Since 2015, we have reduced the weight of outbound packaging per shipment by 41% on average, that’s over 2 million tons of packaging material.
Choose how often it's delivered
Skip or cancel any time, unlock 5% savings, added to cart.

Image Unavailable

- To view this video download Flash Player
5-in-1 Book Cover Guide, Metal Bookbinding Tools DIY Book Binding Materials for Creating Book Album Scrapbook Cover
Purchase options and add-ons.
- Package Contents: You will receive a book cover guide, measuring 7.76x4.06in/19.7x10.3cm, the perfect size can help you solve the size problem of your cover or card, making the cover you make more beautiful.
- Premium Material: Our book binding set is made of quality iron, which is reliable and sturdy, has a smooth surface, is not easy to deform and fade, and can serve you for a long time.
- 5-in-1 Tool: Our book binding material is perfect for book board placement, creating consistent gaps, allowing you to trim corners at just the right angle, mark elastic closing points, and round corners.
- Useful Tool: Whether you're creating a book from scratch, restoring an old one, or even adding a personal touch to a notebook or photo album, this 5-in-1 tool can help make it easier.
- Wide Application: The book ruler is versatile and can be used to create notebooks, beautify scrapbook layouts, make party favors, decorations, handmade cards, and more. You can unleash your creativity with the versatile tool.
Frequently bought together

Top rated similar items

Compare with similar items
Product description.
book cover guide
Product information
Technical details, additional information, warranty & support, looking for specific info, customer reviews.
Customer Reviews, including Product Star Ratings help customers to learn more about the product and decide whether it is the right product for them.
To calculate the overall star rating and percentage breakdown by star, we don’t use a simple average. Instead, our system considers things like how recent a review is and if the reviewer bought the item on Amazon. It also analyzed reviews to verify trustworthiness.
- Sort reviews by Top reviews Most recent Top reviews
Top reviews from the United States
Top reviews from other countries.

- Amazon Newsletter
- About Amazon
- Accessibility
- Sustainability
- Press Center
- Investor Relations
- Amazon Devices
- Amazon Science
- Sell on Amazon
- Sell apps on Amazon
- Supply to Amazon
- Protect & Build Your Brand
- Become an Affiliate
- Become a Delivery Driver
- Start a Package Delivery Business
- Advertise Your Products
- Self-Publish with Us
- Become an Amazon Hub Partner
- › See More Ways to Make Money
- Amazon Visa
- Amazon Store Card
- Amazon Secured Card
- Amazon Business Card
- Shop with Points
- Credit Card Marketplace
- Reload Your Balance
- Amazon Currency Converter
- Your Account
- Your Orders
- Shipping Rates & Policies
- Amazon Prime
- Returns & Replacements
- Manage Your Content and Devices
- Recalls and Product Safety Alerts
- Conditions of Use
- Privacy Notice
- Consumer Health Data Privacy Disclosure
- Your Ads Privacy Choices
- Our Services
- The Process
Chemical Communications
Cell viability imaging in tumor spheroids via dna binding of a ruthenium(ii) light-switch complex.
The famous ‘‘light-switch’’ ruthenium complex [Ru(bpy)2(dppz)](PF6)2 (1) has been long known for its DNA binding properties in vitro. However, the biological utility of this compound has been hampered by its poor cellular uptake in living cells. Here we report a bioimaging application of 1 as cell viability probe in both 2D cells monolayer and 3D multi-cellular tumor spheroids of the various cell lines (U87, HepG2, A549). When compared to propidium iodide, a routinely used cell viability probe, 1 was found to enhance the staining of dead cells in particular in tumor spheroids. 1 has high photostability, longer Stokes shift and displays lower cytotoxicity compared to propidium iodide, which is a known carcinogenic. Finally, 1 was also found to displace the classical DNA binding dye Hoechst in dead cells, which makes it a promising dye for time dependent imaging dead cells in cell cultures, including multi cellular tumor spheroids.
Supplementary files
- Supplementary information PDF (1216K)
- Supplementary movie AVI (25172K)
Article information
Download citation, permissions.
V. Ramu, L. S. Wijaya, N. Beztsinna, C. Van de Griend, B. van de Water, S. Bonnet and S. Le Dévédec, Chem. Commun. , 2024, Accepted Manuscript , DOI: 10.1039/D4CC01425A
To request permission to reproduce material from this article, please go to the Copyright Clearance Center request page .
If you are an author contributing to an RSC publication, you do not need to request permission provided correct acknowledgement is given.
If you are the author of this article, you do not need to request permission to reproduce figures and diagrams provided correct acknowledgement is given. If you want to reproduce the whole article in a third-party publication (excluding your thesis/dissertation for which permission is not required) please go to the Copyright Clearance Center request page .
Read more about how to correctly acknowledge RSC content .
Social activity
Search articles by author.
This article has not yet been cited.
Advertisements
IMAGES
VIDEO
COMMENTS
Congratulations! You've spiral-bound your first book. Saddle-Stitch Binding. Step 1: Fold the paper in half one at a time. Calculate how many pages you need, and fold each one in half. Folding it one sheet at a time creates a clean, sharp fold for your book. Use a bone folder to lay each piece flat at the fold.
Hi everyone! In this short series I will be presenting some of the foundational skills and knowledge I've learned while on my own bookbinding journey. In thi...
The core of bookbinding involves assembling paper sheets, whether in folded sections or individually, and binding them together along one edge. Depending on each style and technique, different binding elements are applied. The most popular include bookbinding glue, needle and thread, and staples.
Hard cover book binding (casebound books) With offset and most digital book printing, the printing is done on large sheets and then folded into 4, 8, 12, 16, 24, or even 32 pages, depending on the machinery, the paper stock, and the trim size of the book.
Cut a piece of binding tape about 2 inches (5.1 cm) longer than your book. Make sure your tape is strong enough to hold the book together—linen tape or cotton tape will give your book the support it needs. Your tape can be colorful or simple: it won't be seen once the book is finished. Avoid using masking tape or clear tape.
Bookbinding is the process of assembling a stack of paper sheets (whether individually or folded into sections) and binding them together to create booklets, art journals, scrapbooks, and more. This process can be done with different techniques and styles, and finished with soft or hardcovers. Covers can be customized with a variety of ...
As we all know, Rajiv Surendra is a man of many skills and talents, and one of those skills is bookbinding. Today, he gives us a detailed tutorial on the pro...
This video demonstrates the process of perfect binding, also known as Lumbeck binding or double-fan binding. The video is intended for complete beginners and...
Step 1: Gather Your Supplies. 5 to 10 sheets of paper of your preferred size (all should be uniform). Note that one will be used as a guide page. 1 sheet of thicker, decorative paper for your book cover. Bednar says to aim for 0.5" longer on the top and bottom of the page, and about 1" longer on each horizontal side of the page.
Mark 1/2" in from the top edge and 3/4" in from the bottom edge. Then measure the space in between and divide by the number of binding strips you'll use. In general, three suffices. If the book will be thick, use four, or five if you're really worried. Mark them across the spine. (ie, for the number five, at 5, 10, 15 and 20).
Starter Bookbinding Tutorials. It's important to understand how paper and thread work together to create a book. These tutorials will guide you through the process of threading the needle, punching holes in paper and sewing it all together. Simple book using the 3-hole pamphlet binding method.
Bookbinding is the process of building a book, usually in codex format, from an ordered stack of paper sheets with one's hands and tools, or in modern publishing, by a series of automated processes. Firstly, one binds the sheets of papers along an edge with a thick needle and strong thread. One can also use loose-leaf rings, binding posts, twin ...
The array of book-binding techniques available is a testament to the craft's intricacy and versatility. Each method brings a unique touch to the book, ensuring that its form matches its content. Let's dive now into the most common Types of Book Binding. 1. Saddle Stitch Binding
Step 14: Glue the Lining in Place. Fold the lining paper sheet in half crosswise. Smear the inside of the cover and the first page with white glue or rubber solution glue. Carefully place one half of the folded lining paper on the glued first page so that it lines up neatly with the edge of the paper.
18 Types of Book Binding. 1. Case Binding or Sewn Binding. When sewing, the printed sheets are connected with thread. Printed products bound with thread are very durable, but their production is complex, expensive, and, for example, used for very high-quality works.
Hardcover books are produced by using adhesive to hold the pages to heavy, wrap-resistant board. At 48 Hour Books, we use PUR adhesive, the strongest available for book binding. Our team handles some of the hardcover bindery process by hand, such as adding cloth head and tail bands and hand wiping each book to ensure a flawless finish.
Here are the tools and materials I use to make a book! There is no correct or one way to make a book, but I hope this video can be a launching point to figur...
Buy: Hand Bookbinding: A Manual of Instruction $14.84. Buy it. 2. The Thames and Hudson Manual of Book Binding. This book is perfect for experienced bookbinders who want to learn the intricacies ...
Friendship, first love, rising fame, horrifying secrets, and pain all fuel together in Binding 13. Hearts are binding and lives are entwining in Binding 13. Binding 13 is the explosive first installment of a brand-new series from Chloe Walsh. Based in Ireland, the Boys Of Tommen series is bound to captivate and lure you into the world of rugby ...
Bella Becho Book Bindery is a full service boutique book bindery. We have received awards and recognition for excellence in custom books, decorative Bible covers, corporate marketing, graphic design, photo albums and other bookbinding services. We specialize in all types of book binding, including book repair, book restoration, Bible rebinding ...
#nikthebooksmith #bookbinding #beginnerbookbinding*Favorite Supplies List: https://www.amazon.com/shop/nikthebooksmithDiagram for stitching: https://www.fl...
Book Cover Guide, 5-in-1 Bookbinding Kit, Stainless Book Binding Kits for Journal, Album, Planner, Calendar - Pastel Blue. dummy. Miseyo 5-in-1 Book Cover Guide Stainless Steel Bookbinding Kit Scrapbooking Tool for Making Book Cover,Journal, Planner,Calender Covers Out of Chipboard.
Crafting Beautiful Books Since 1960. We have a great selection of bookbinding cloth and fine imported leathers. We can help you with color, size and materials. We can help you find the best binding method for your needs. Every book is an original collaboration. All work is completed with the most modern tools available. Each project is handled ...
The famous ''light-switch'' ruthenium complex [Ru(bpy)2(dppz)](PF6)2 (1) has been long known for its DNA binding properties in vitro. However, the biological utility of this compound has been hampered by its poor cellular uptake in living cells. Here we report a bioimaging application of 1 as cell viability