- PRO Courses Guides New Tech Help Pro Expert Videos About wikiHow Pro Upgrade Sign In
- EDIT Edit this Article
- EXPLORE Tech Help Pro About Us Random Article Quizzes Request a New Article Community Dashboard This Or That Game Popular Categories Arts and Entertainment Artwork Books Movies Computers and Electronics Computers Phone Skills Technology Hacks Health Men's Health Mental Health Women's Health Relationships Dating Love Relationship Issues Hobbies and Crafts Crafts Drawing Games Education & Communication Communication Skills Personal Development Studying Personal Care and Style Fashion Hair Care Personal Hygiene Youth Personal Care School Stuff Dating All Categories Arts and Entertainment Finance and Business Home and Garden Relationship Quizzes Cars & Other Vehicles Food and Entertaining Personal Care and Style Sports and Fitness Computers and Electronics Health Pets and Animals Travel Education & Communication Hobbies and Crafts Philosophy and Religion Work World Family Life Holidays and Traditions Relationships Youth
- Browse Articles
- Learn Something New
- Quizzes Hot
- This Or That Game
- Train Your Brain
- Explore More
- Support wikiHow
- About wikiHow
- Log in / Sign up
- Arts and Entertainment
- Book Crafts
- Making Books

Bind Your Own Book at Home: A Beginner's Guide
Last Updated: August 19, 2023 Fact Checked
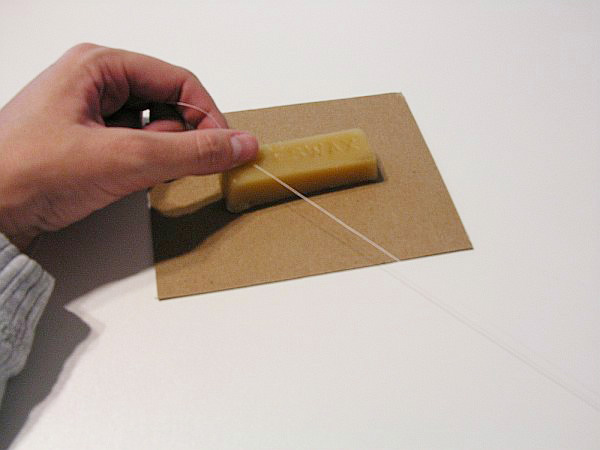
Binding with Tape
Using ribbon, sewing the binding, single sheet binding, things you'll need.
This article was co-authored by wikiHow staff writer, Dev Murphy, MA . Dev Murphy is a wikiHow Staff Writer with experience working as a teacher, ghostwriter, copyeditor, and illustrator. She loves writing how-to articles because she loves learning new things and because she believes knowledge should be free and accessible to the world. Dev's creative writing and visual art have been featured in many venues online and in print. When she is not writing for wikiHow, she is drawing pictures, making perfume, or writing hybrid poems. Dev earned her MA in English Literature from Ohio University in 2017. She lives in Pittsburgh with her cat, Nick. There are 12 references cited in this article, which can be found at the bottom of the page. This article has been fact-checked, ensuring the accuracy of any cited facts and confirming the authority of its sources. This article has been viewed 1,225,929 times. Learn more...
Do you want to start a scrapbook, nature journal , or diary ? You can, of course, buy a suitable book at the store, but if you really want to make it your own, perhaps it's time to rediscover the not-quite-lost art of bookbinding. If you’re not sure where to begin, it’s easier than you think, and you can bind your own book today using materials that you likely already have around the house. Keep reading to learn different bookbinding methods, from the simple to the more complex.
Things You Should Know
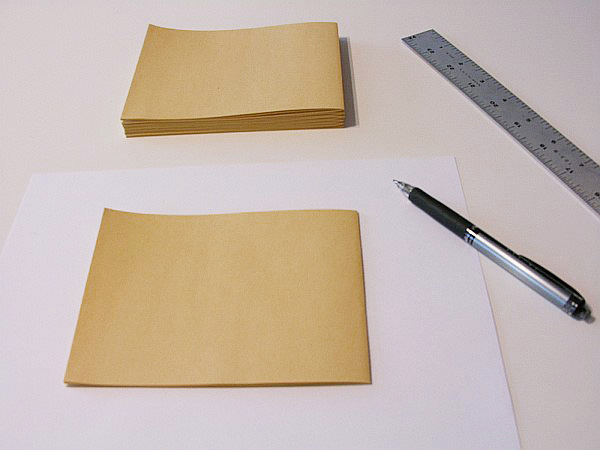
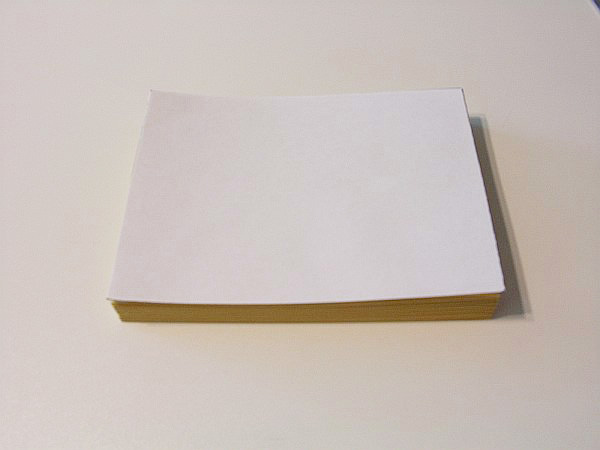
- To bind your book with tape, first staple the pages along the crease, and then reinforce the staples with a strip of linen tape or cotton tape . For a thick book, use several layers of tape.
- If you want to bind with ribbon, punch holes every 1 ⁄ 4 inch (0.64 cm) along the edge of the pages. Thread a piece of ribbon in and out of each hole and secure it with a knot.
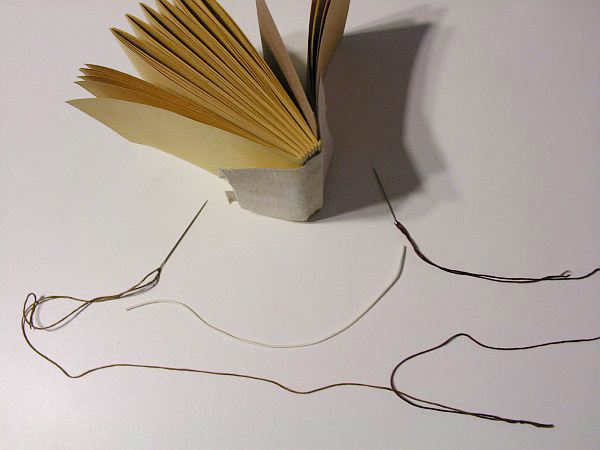
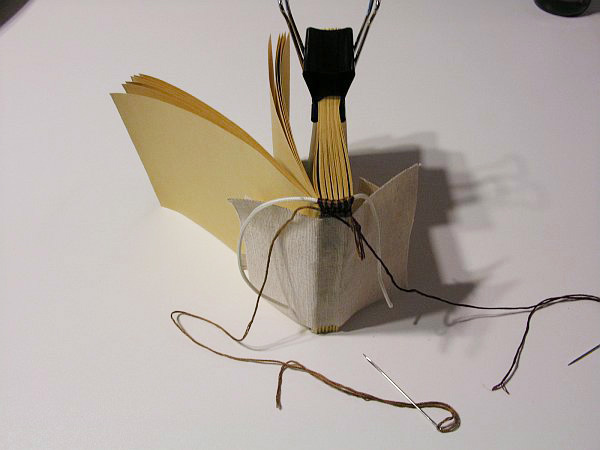
- Sew your book together by marking 5 equally spaced dots along the crease with a pencil, and then using a needle and thread to pierce the holes and sew the binding on.
- If you have too many pages to fold crisply, try creating packets of signatures. A signature is a group of 4 sheets folded down the center. [1] X Research source
- Most books are folded hamburger style (i.e., by folding the shorter ends of the paper together), but you can fold however you want.
- If you made signatures, staple each signature separately and then stack your stapled signatures. Leave the stack unstapled.

- If you’re binding a book of material printed from Microsoft Word, make sure your pages have a “gutter” margin of about 1 ⁄ 2 inch (1.3 cm) before you print them. The gutter margin is the inside margin, the margin that will be partially obscured when the book is bound. [4] X Research source
- Avoid using masking tape or clear tape. These tapes won't be strong enough to support your book.
- If your book is thick, leave a larger margin of tape so you have enough tape to cover the spine and still reach the other side.
- Use your fingers to press the tape around the book’s spine so that it covers both the bottom of the book, the spine, and the top of the book.
- If your book has many pages or several signatures, you might want to tape it more than once to reinforce it. Repeat the process of taping the book until the book’s binding feels secure.
- Avoid folding leftover tape over the book, as this may make your book harder to open. Trim any excess tape.

- If you want to bind a page that doesn’t have a margin, you could either paste the page into a larger page with an adequate margin, or “build” a wider margin by gluing or taping a strip of paper to the inner edge of the page.
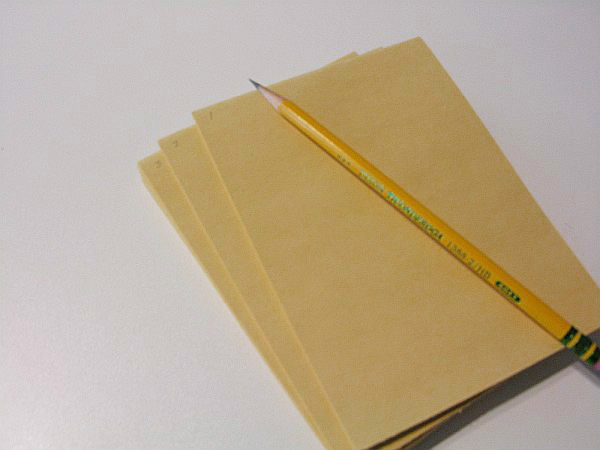
- If you’re having trouble measuring and hole-punching at the same time, mark where the hole should be with a pencil before hole punching.
- You can also choose to draw a thick line with pen or permanent marker if you want the line to remain on the cover.
- Consider measuring and marking the spots with your pencil prior to punching the holes, for accuracy.
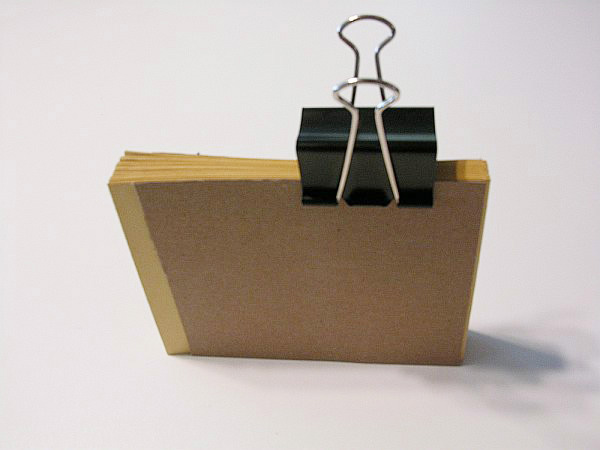
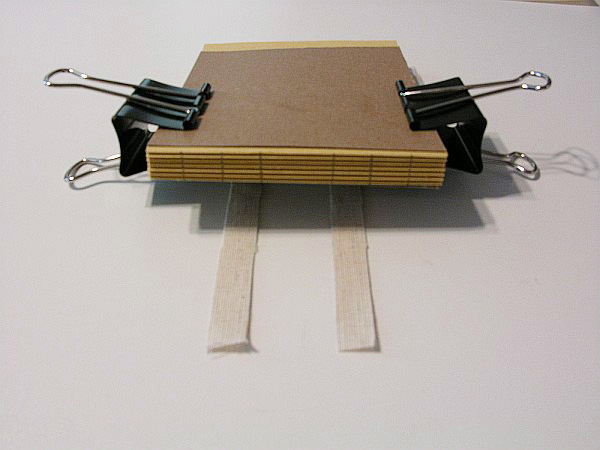
- To make sure your pages don't slip out of place while you punch your holes, clamp them together with binder clips or clothespins.
- Choose a simple black tape for a classic look, or go for a colorful design if you want something more personalized.
- If your ribbon isn’t long enough, remove it and cut a longer piece.
- Looping the ribbon a second time reinforces the binding. Depending on how many pages you have, loop it a third time for an even stronger binding.

- It’s common to fold your pages hamburger style—i.e., fold the 2 short ends together—but fold your book however you wish!

- For example, if you have a paper that’s 8.5 by 11 in (22 by 28 cm) printer paper, dividing that by 6 gives you 1.4 inches (3.6 cm), meaning you'd space your holes 1.4 inches (3.6 cm) apart.
- If you know your page measurements, you don’t have to measure. If you don’t know, or if you’re not using a standard page size, make sure you measure precisely.
- For example, if you have a paper that’s 8.5 by 11 inches (22 by 28 cm), your first dot will be 1.4 inches (3.6 cm) from the edge. Then, each progressive dot will be 1.4 inches (3.6 cm) up from the previous dot. Your fifth dot should be 1.4 inches (3.6 cm) away from the top of the page.

- If you don’t have an awl, you can use a large needle.
- You can use whatever color thread you like, but remember your thread will be visible!
- You can tie whatever knot you’d like as long as it firmly keeps the sewing in place.
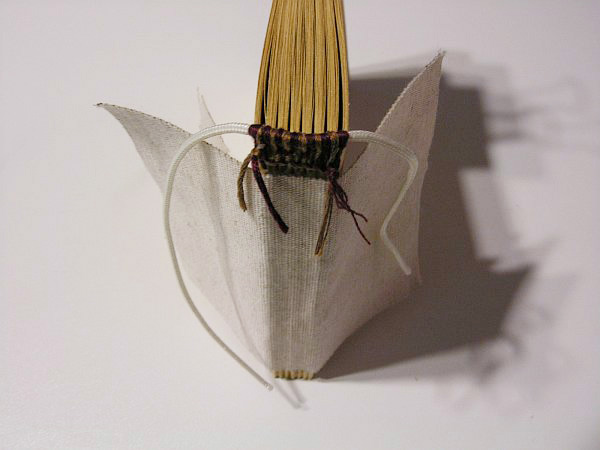
- In single sheet binding, you don’t fold your pages like you do for other bookbinding methods, but this means that you run the risk of the stitching tearing out of your pages if they are not reinforced well enough.
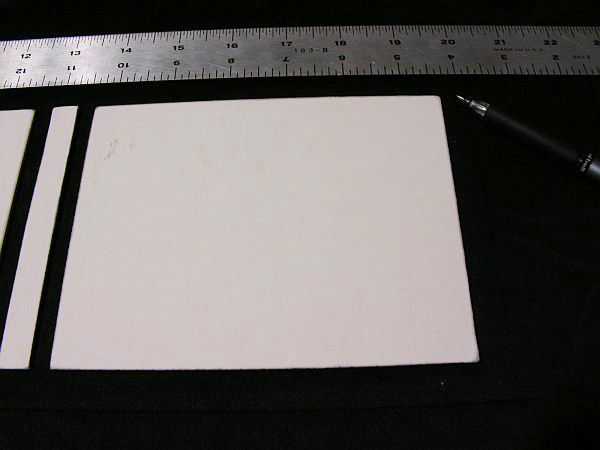
- You can use thick cardstock or thick cardboard as your cover.
- Perform this same process on the front and back covers as well.

- Use this same process to pierce holes in your front and back covers.
- If you have 20 pages, and your area is 2.25 inches (5.7 cm) long, you will need 45 inches (110 cm) of thread for each thread.
- Once you’ve tied the knot, you can trim off the end and tuck it in for a cleaner look.
- When threading the needle under the first loop you made, make sure you go under both threads, not through the loop.

- If you want to give your book some whimsy, choose a different color thread for each binding hole, or keep all of the thread colors the same for a more uniform style.
- For a sturdier book, loop your needle and thread around the stitch below the page you’re currently working on, starting on the third page.
Community Q&A
- Linen tape or cotton tape
- Scissors or X-ACTO knife
- Hand-held hole-puncher
Mastering Single Sheet Binding
- 6 binding needles
- 2 hard boards (such as cardstock or cardboard)
You Might Also Like

- ↑ https://www.youtube.com/watch?v=xF3P8bI_MNM&feature=youtu.be&t=29
- ↑ http://www.readwritethink.org/files/resources/printouts/HowToBindBook.pdf
- ↑ https://www.firstwriter.com/layout/margins.shtml
- ↑ https://www.ibookbinding.com/blog/bookbinding-supplies-and-materials/
- ↑ https://www.youtube.com/watch?v=04vt8YfT7XM&feature=youtu.be&t=59
- ↑ https://www.youtube.com/watch?v=04vt8YfT7XM&feature=youtu.be&t=110
- ↑ https://www.youtube.com/watch?v=04vt8YfT7XM&feature=youtu.be&t=132
- ↑ https://www.youtube.com/watch?v=04vt8YfT7XM&feature=youtu.be&t=175
- ↑ https://www.youtube.com/watch?v=04vt8YfT7XM&feature=youtu.be&t=211
- ↑ https://www.youtube.com/watch?v=04vt8YfT7XM&feature=youtu.be&t=220
- ↑ https://www.youtube.com/watch?v=04vt8YfT7XM&feature=youtu.be&t=261
- ↑ https://www.youtube.com/watch?v=04vt8YfT7XM&t=338s
About This Article

To bind a book, start by folding your pages in half and stapling them together at the folded crease. Then, cut a piece of binding tape that's about 2 inches longer than your book and lay it sticky-side up on a flat surface. Next, line up the creased edge of your book with the center of the tape and press your book down into the tape. Finally, wrap the other half of the tape around your book's spine and then cut off any excess tape at the top and bottom. To learn how to bind a book using ribbon or thread, scroll down! Did this summary help you? Yes No
- Send fan mail to authors
Reader Success Stories
K. J. Saviano
Mar 9, 2017
Did this article help you?
Sep 13, 2016
Aug 31, 2021
Coral Lenstine
Oct 27, 2021
Oct 29, 2017

Featured Articles

Trending Articles

Watch Articles

- Terms of Use
- Privacy Policy
- Do Not Sell or Share My Info
- Not Selling Info
wikiHow Tech Help Pro:
Develop the tech skills you need for work and life

Bookbinding guides and tutorials

If you love handmade booklets or can’t get enough of beautiful leather-bound journals, you should definitely take up bookbinding.
And while it may seem intimidating at first, I can guarantee you that if I can do it, so can you!
In this short guide, you’ll find handy info for newbie bookbinders, including the basics around materials, techniques, and how to start learning without breaking the bank.
Table of Contents
What is bookbinding?
Bookbinding is the process of assembling a stack of paper sheets (whether individually or folded into sections) and binding them together to create booklets, art journals, scrapbooks, and more.
This process can be done with different techniques and styles, and finished with soft or hardcovers. Covers can be customized with a variety of materials, from fabric and cloth to paper and leather.
Bookbinding is a fun and rewarding creative hobby that allows you to put together one-of-a-kind handmade pieces from beginning to end.
What are the basic bookbinding techniques?

There are a lot of bookbinding techniques, but the most popular for beginners are Saddle Stitch, Coptic, Perfect, and Japanese binding.
Each technique entails a unique process and complexity level. However, many binding styles have variations, including more accessible, simpler versions.
On the other hand, if you’re after quick results and practicality to get the job done, a binding machine might be a better option for you!
Let’s look briefly into some of the main bookbinding techniques:
Saddle Stitch
This is one of the easiest, most low-cost bookbinding techniques because it involves binding pages with staples along the spine.
It’s best suited for smaller projects with fewer pages. Some use this method with thread instead, but it’s mostly about saving time and money with this one!
Perfect binding
Perfect binding is a very beginner-friendly technique. It involves directly attaching folded signatures to book spines with bookbinding glue. This not only makes it easy to do, but pretty cheap.
Coptic binding
This method requires sewing chain link stitches along book spines, exposing the horizontal stitches fully. This method enables books to lay completely flat when open.
Japanese stab binding
This technique requires sewing pages together through a pattern of holes created along the spine.
Thread remains visible (spines are not covered), creating very unique, aesthetic finishes. Like Coptic binding, this technique allows booklets to lay flat when open.
What are some beginner bookbinding projects?
There are a lot of fun and easy-to-learn bookbinding projects that beginners could do; all you need are basic guidelines and essential materials to get things rolling.
A convenient way to take on your first project is with one of these fantastic bookbinding kits . You’ll have everything you need and a variety of approaches to choose from.
Below, I’ve lined up several bookbinding projects to give you a few ideas of how you can get started.
- Art journals
- Mini notebooks/journals
- Mini leather books
- Hardbound portfolios
What supplies do I need to start bookbinding?

Bookbinding supplies can vary depending on the type of binding you want to do.
I’ve listed the most common supplies below to give you an idea of the essentials.
Most paper used for bookbinding is within a lightweight range, although you can go slightly heavier/thicker for larger projects.
Copy paper, construction paper, washi paper, mixed-media paper, and cardstock are popular picks. Heavier paperweights should be used for covers.
If you’re feeling crafty and want to personalize projects from beginner to end, we have a full article on the best paper making kits !
Cutting tools
Since bookbinding projects can be of all sizes and layouts, it’s important to have good cutting tools.
Craft knives, X-acto knives, and rotary cutters are reliable picks for this purpose — especially if you’re also incorporating heavyweight materials like leather.
These tools will help you scale your projects to desired sizes and trim imperfections with precision.
Bone folder
Bone folders are one of the most important tools in bookbinding.
Their primary purpose is to create crisp, precise folds in paper. Bone folders are also used to score folds and burnish surfaces, giving your projects polished finishes.
They’re also very handy in creating sharp edges and tight corners, making final results even neater.
Check out our guide to the best bone folders to know what to look for!
An awl is used in bookbinding to pierce holes into paper for sewing and binding.
These small holes serve as guides to thread sewing signatures, attach endpapers and/or decorative stitching on book covers.
Needle and thread
Bookbinding techniques that involve stitching will require using needle and thread.
The strongest and most enduring thread for this craft is linen, with cotton and waxed thread being common alternatives.
Bookbinding glue
Bookbinding glue isn’t always required but may be necessary when using a technique that does not involve stitching.
This doesn’t always apply, but some of the most beginner-friendly bookbinding methods use glue.
This adhesive is also crucial if you’re adding covers to your booklets or are working on repairs.
We have a complete list of the best bookbinding glues if you want to learn more about what’s out there.
Other supplies
Besides the supplies listed above, you’ll want to consider the following resources to complement your projects:
- Bookbinding tape
- Bookbinding press
- A metal ruler
- Materials for covers (leather, fabric, etc.)
- Corner rounders
How can I learn bookbinding?

A great way to learn bookbinding is through beginner online guides and tutorials.
YouTube is a convenient, free resource to find easy bookbinding projects and step-by-step tutorials. It’s also a great place to learn about the craft overall as well as the history of bookbinding.
I’ve listed a few Youtube channels I recommend below:
- DAS Bookbinding
- Nik the Booksmith
- bitter melon bindery
Where can I find inspiration for bookbinding?
At the end of the day, the best (and most accessible) place to find inspiration for bookbinding is online.
I suggest researching the works of professional bookbinders and home crafters alike; there’s always something you can learn from both perspectives.
TikTok, Instagram, YouTube, and Pinterest are all great places to look for inspiration.
Have a fellow bookbinder pal or family member? Discuss and share your processes and ideas; this more often than not leads to a few inspiring ah-ha moments!
Share this:
Privacy & Cookies: This site uses cookies. By continuing to use this website, you agree to their use. To find out more, including how to control cookies, see here: Cookie Policy .
- Jamie Butler
The Basic Binding of Books: A Tutorial
This bookbinding tutorial was originally written by myself as a contribution to a LiveJournal bookbinding group, circa 2004. That group is no more, so the tutorial lives on here. Apologies for the poor quality of photos!
Do you want to learn about binding books? Here is everything basic that you need to know in one bookbinding tutorial. Anyone can follow these easy steps.
Preparation
In addition to your book-making materials you will need:
- A large working area (if you don’t have a large area, you will need to clean up well after each stage)
- Both large and small binder clips (I use them gratuitously)
- A waste paper basket close by
- A stack of clean scrap paper
- Pre-cut sheets of wax paper
- A wet cloth (for wiping glue from fingers)
- A dry cloth
Signature block

Start by deciding how many pages and what dimensions you wish your book to be. It is helpful to fold pages with a bone folder. This saves your fingertips and gives you a good crease. Fold on the paper grain (the grain should run parallel with the spine). Here I fold seven signatures with six sheets per signature.

Clamping the spine end with large binder clips (here I use cardboard to protect the pages) and allowing to compress overnight helps with having flatter signatures for sewing.
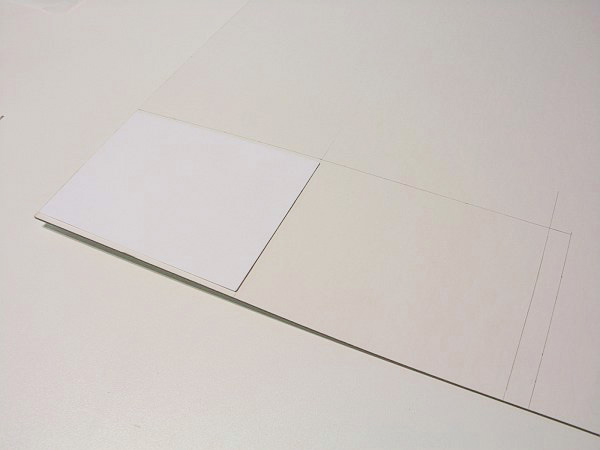
It helps to make a pattern of your page for later use in measuring and cutting board, endpages, etc.
Lay one of your signatures on a blank page and trace, then cut.
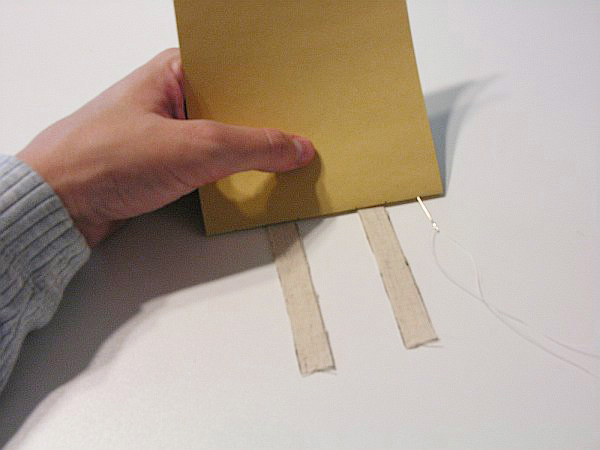
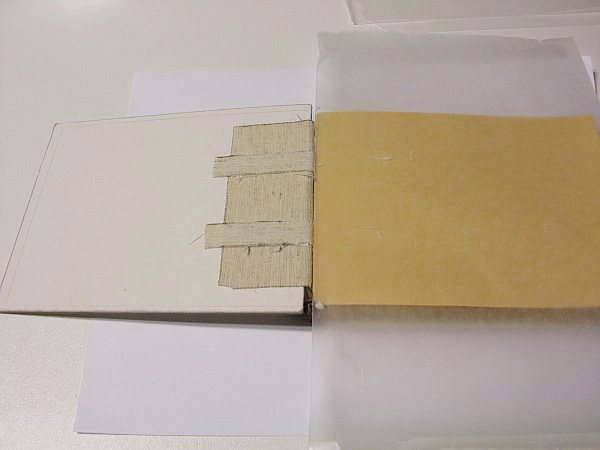
Measure and cut linen tape and mull cloth for the backbone. I use a 50/50 cotton/linen blend for both my tapes and mull. For a large book, you will want 3 strips of tape. For this small book, I will use two at a 1/2-inch width. Cut the mull cloth about a half inch shorter at the top and bottom than the length of the spine, and 2 inches wider on either side of the spine.
Number your signatures at the bottom of the page near the spine. This is especially important if your pages have printed material on them. This ensures that everything stays in the correct order. Also, squaring up will be done on the top edge of the book for a clean, straight edge. The numbers work as a place marker as to which end is up and which end is down.
Next, we mark the spine to show where to punch holes for sewing. I square up the pages and then clamp them with binder clips to hold everything tidy.
Mark 1/2 an inch from each end, and then evenly space marks on either side of where your tapes will lie across the backbone, allowing just a little extra room on either side so that the stitching doesn’t pinch your tapes. Make sure your lines are even and straight.
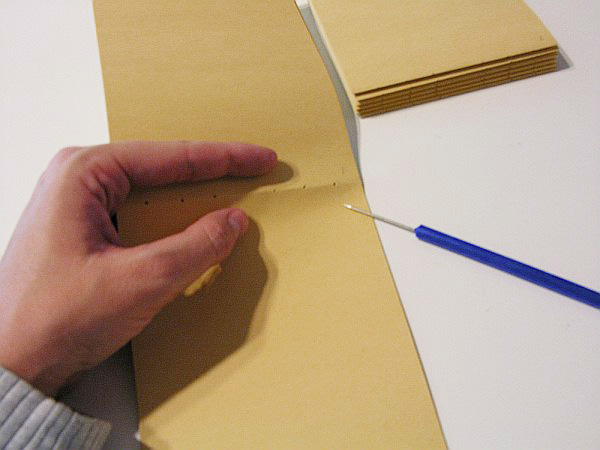
Time to punch holes at your marks with an awl or needle. Use a very narrow needle so your holes are not unnecessarily large. Unfold your signature, paying careful attention to keep everything aligned, and gently push the awl through from the outside just enough to make a hole.
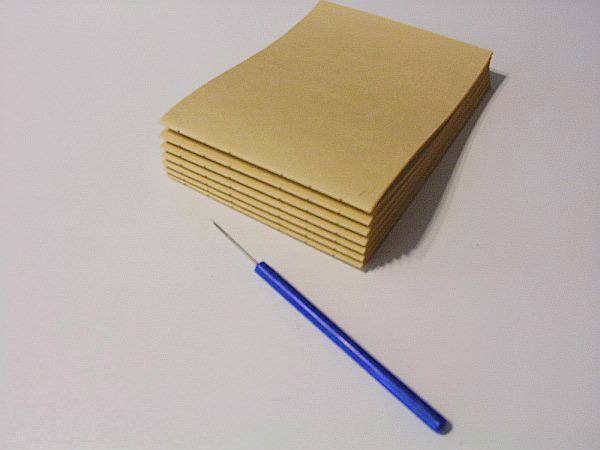
All holes have been punched.
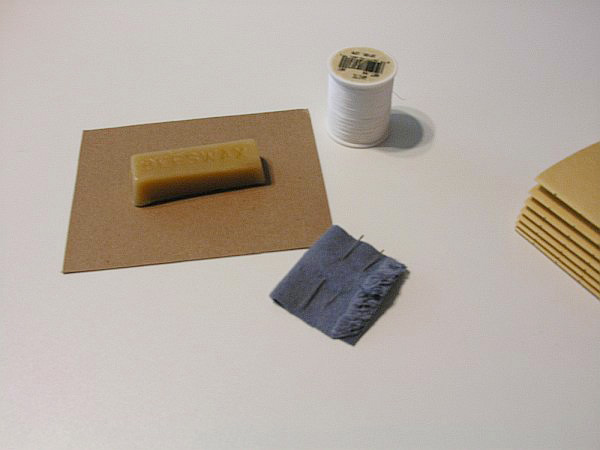
Clear off your workspace and assemble your materials for sewing. Choose a sturdy thread (unbleached linen thread is good) and an appropriately sized needle.
Draw a length of thread, 20 or 30 inches in length, across a beeswax block two or three times to coat. This helps your thread to stay tangle-free and helps prevent tears in your paper while sewing. Thread can be rough on paper, so coat it well. (Fabric stores often sell little kits for waxing your thread.)
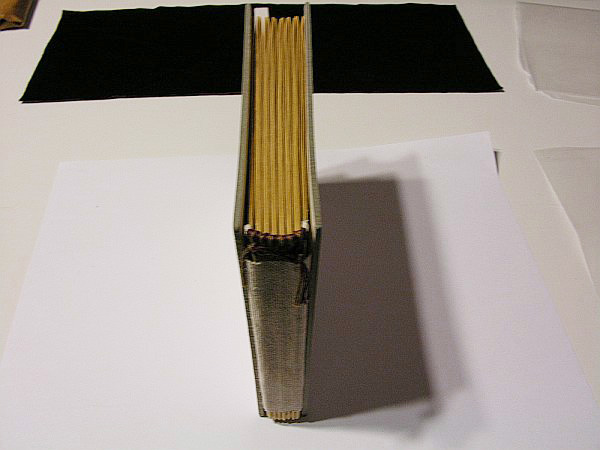
To begin sewing, start with your last signature and work forward. This is where a sewing frame would come in handy, but I don’t find it to be necessary for smaller books. Your tapes will be held into place as you sew over them. Knot your thread and push the needle into the end hole at the right to start.
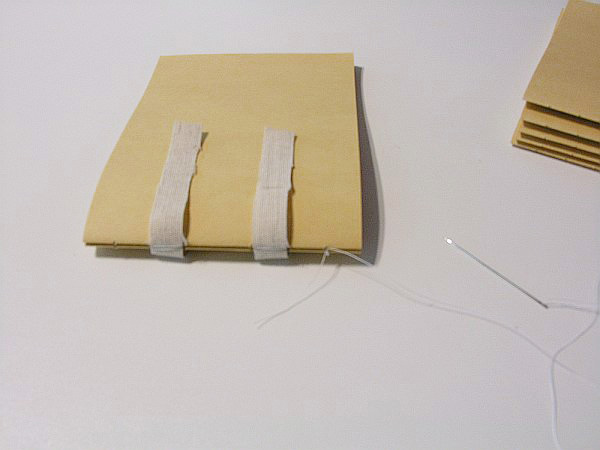
From inside the signature push the needle back out the second hole, cross over the tape, and down into the third hole. Continue in this fashion until you’ve completed the first signature and your needle is out the end hole. For the first signature simply sew back down into the end hole on the next signature. Continue sewing back across the second signature until you come out the end hole on the right. Tug to make sure everything is snug, but don’t pull hard enough to tear the paper. Then tie your thread around and below the original knot.
Continue adding signatures (taking care to keep them in order!) and sewing them together in the same fashion. At the end of each row loop your thread under the thread of the previous signature, and then again through the loop that you just made. Pull snug. This keeps everything secure.
When you’ve sewn together all signatures, loop and tie off your thread.
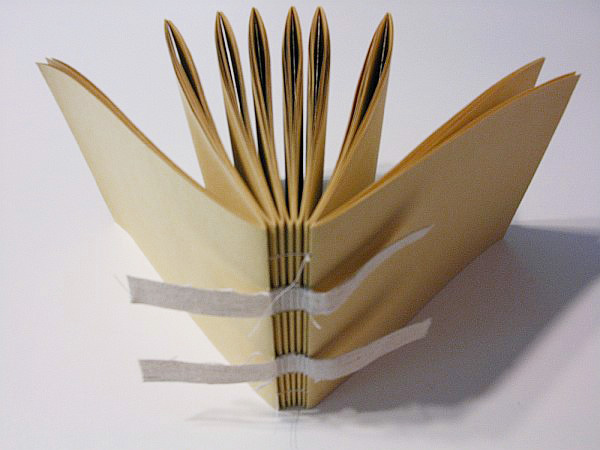
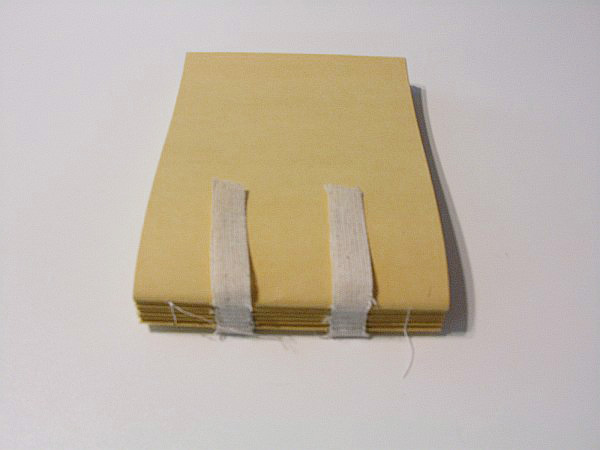
Tug tapes to remove any wrinkles that may have built up during sewing and adjust so that there is the same amount of excess on either side of the spine. Good.
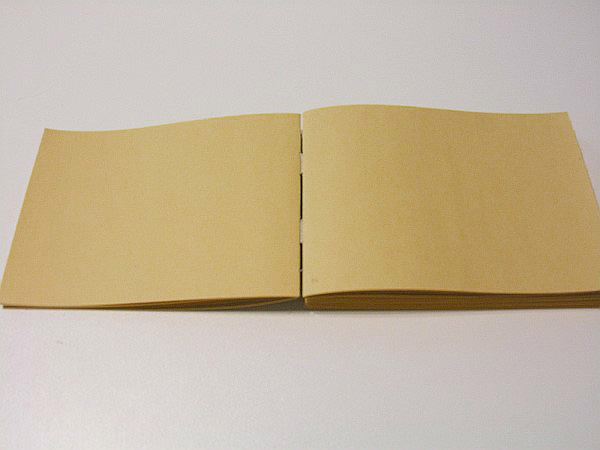
You will notice first thing that between your signatures there is a pretty obvious gap, even if you sewed snugly. This is normal when binding books.
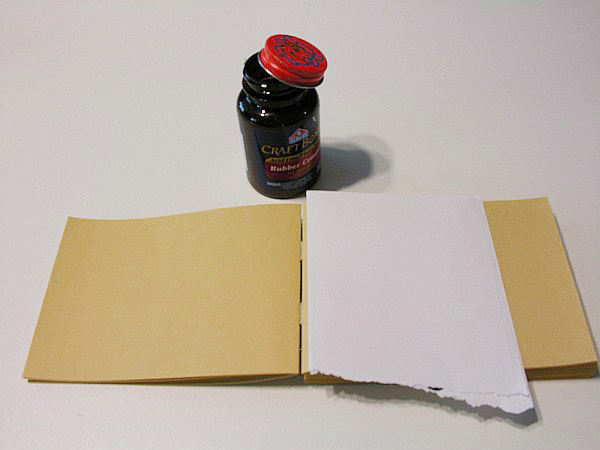
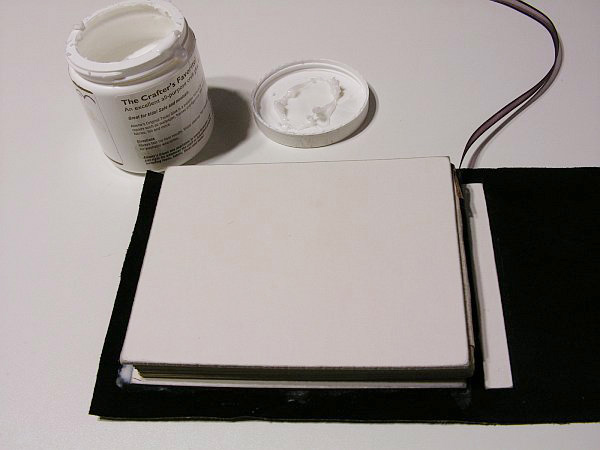
Take a piece of folded scrap paper and lay it 1/8 of an inch away from the gap between the first and second signature. Pressing the scrap paper down, spread a thin layer of glue (I’m using an Acid Free/Photo Safe rubber cement because it dries quickly and won’t wrinkle the paper) down near the gap. Remove the scrap paper, close the book, and press down firmly for 10 seconds. Carefully flip the book and do the same to the last signature.
Continue flipping the book and gluing the gaps between signatures until you reach the center of the book. When you’ve finished, put the pages in clamps and allow them to set. This process forms a temporary bond to hold the signatures in place until the backs are glued.

It is time to glue the mull onto the backbone of the book. A press would be useful here to hold your book spine end up.
Lay your mull across the backbone of the book and center it. There should be a two-inch overlap on either side. Take a pencil and rub the side of the tip gently across the edges of the spine to make a mark on the mull. This will give us a guide to know where to spread the glue. I am using PVA glue that stays flexible when dry. Coat the center of the mull with glue between where we have marked with pencil lines.
Work the glue down into the weave of the fabric. (I like to use my fingers for all gluing. I’ve found I can work it in better, get a nice even spread, I can feel what I am doing better, and clean up is easier. Regardless of whether you use a brush or your fingers, keep a damp cloth and a dry cloth nearby for quick cleanup.) Spread glue across the backbone of the book, working it down in between the signatures and into the weave of the tapes. When this is done, center and press the mull down onto the spine.
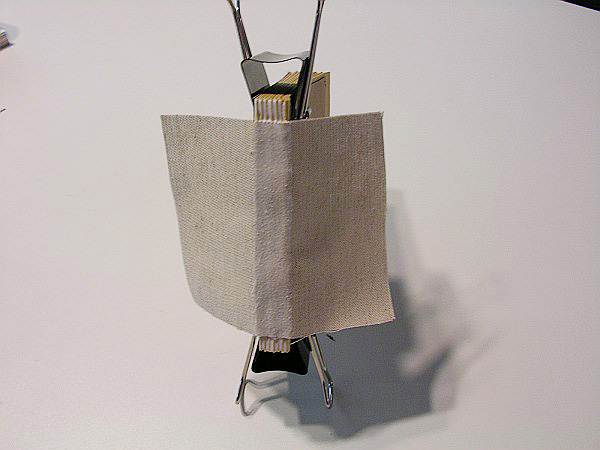
There should be about 1/2 an inch at the top and bottom of the spine that is not covered by mull. Spread more glue across the top of the mull and work it into the weave. Keep the book in clamps or press for a couple of hours or overnight to dry.
Prepare cover materials
In the meantime you can start preparing the cover boards and, in my case, make many last-minute changes as to what materials you plan to use.
Using your pattern as a guide, measure out your cover boards. (Here I am using pressed illustration board.) You will want the width to be the same as your book page pattern (this will be staggered a bit to cause an overhang) and with 1/8 of an inch additional at the top and bottom. The spine board should be approximately the thickness of your book PLUS the thickness of your cover boards. Do yourself a favor and double-check your measurements! (I speak this from experience. Ahem.) Using the pattern against your measurements is a good way to eyeball indicate if you are off.
When you are sure everything is accurate cut your boards with either a bandsaw, a jigsaw, or if your board of choice permits it, an exacto knife or box cutter against a straight edge.

Your edges may look rough. Take a roll of sandpaper and slough off any gnarly bits, at the same time softening the hard edges and corners. If you rub with your sandpaper in a circular motion, moving back and forth across the edge of the board you should get a good, even edge. Otherwise, parts may sand down more than others and you will end up with a lumpy edge, which is not good.
Debate a bit more over your materials.
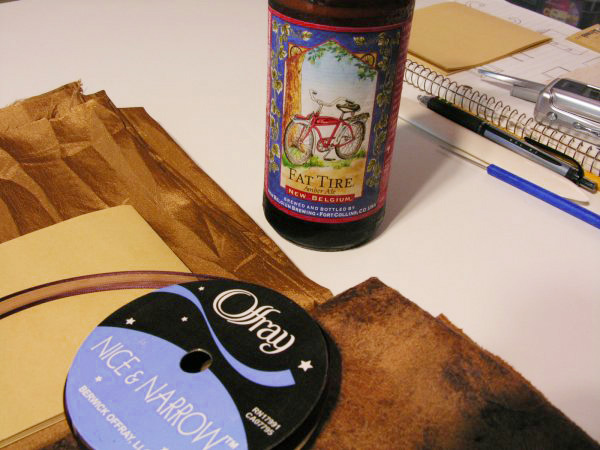
A Fat Tire often helps during this deliberation process.
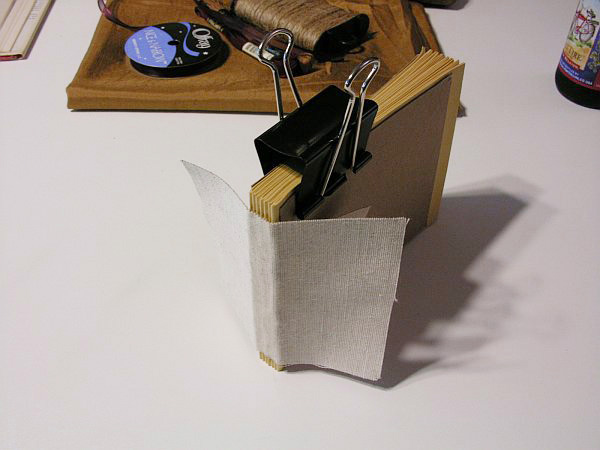
Our mull is dry! There may be a bit of tightening / shrinking as the glue dries, but this is okay.
Headbanding

I want to do headbanding on this book, so we need to punch more holes. Measure and mark where your holes will be, just above the top of the mull, using the same method as before. To punch holes, hold each signature open and punch through from the outside, paying careful attention that the needle comes through in the center of the crease on the inside of the signature. (A piece of cardboard is useful like a bookmark.)
For headbanding you need a length of cord to loop around and (for two-toned headbands) two lengths of embroidery thread in different colors tied together at the end. Wax all of these with your beeswax block.
I keep completed signatures clipped with a binder clip to keep them out of the way and keep myself more organized.
All done. Cut off excess embroidery thread. Also, trim cord to within 1/8 inch on either side. This can be trimmed more precisely later with a razor blade. Touch a bit of glue on the ends to keep the embroidery thread from unraveling.
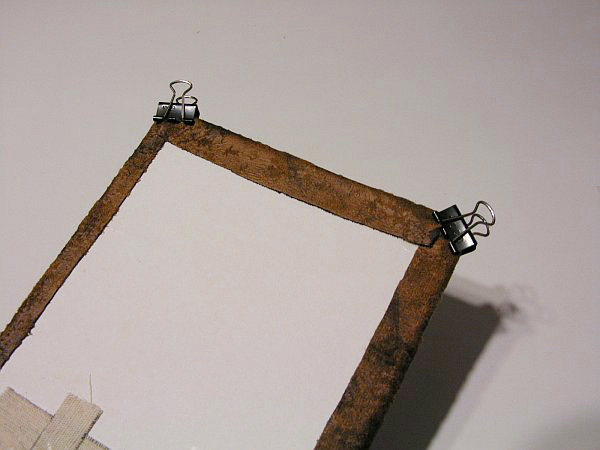
Commit to a cover material, either fabric or paper and lay face down. Place your cover boards across the back of your material and trace. You want the gap between the spine and cover boards to be approximately the thickness of two boards. Then, using your cover boards as a pattern, measure and mark 1/2 inch around each side. This will give us enough excess for turnover. Cut out your material.
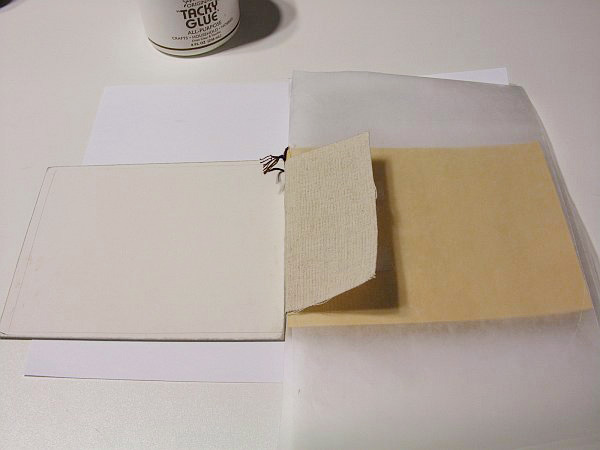
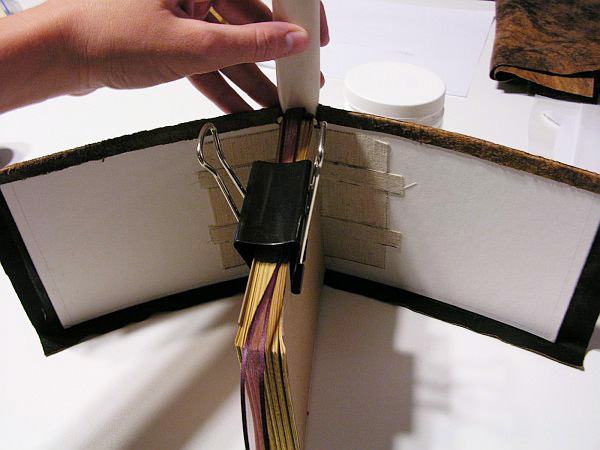
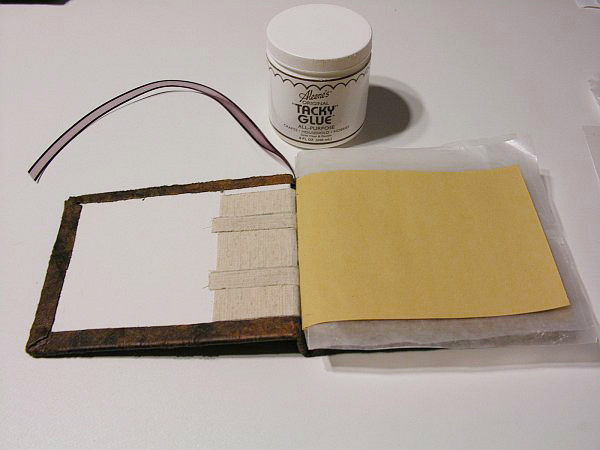
Now we attach our signatures to the cover boards. At this stage, it will begin to resemble a *real* book! From this point forward we will use a lot of wax paper. It is easier to cut a whole stack of sheets to size, slightly larger than your cover, and have those within easy reach. With your book pages face up in front of you, place two sheets of wax paper beneath the mull but above the tapes. Spread glue across the mull, working it well down into the weave. Remove the top sheet of wax paper and discard.
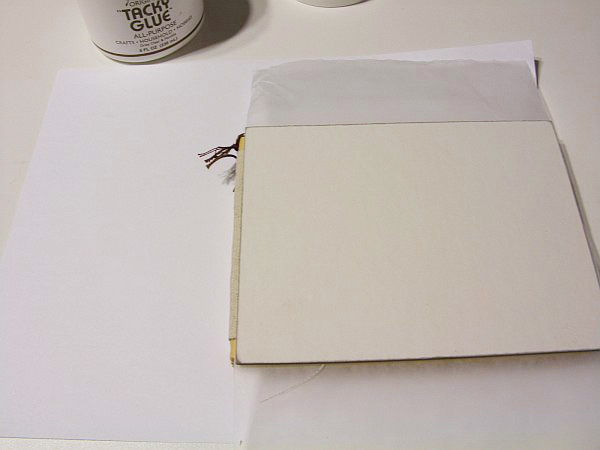
Carefully align and press the cover board onto the mull. Stagger the cover boards about 1/8 inch from the spine. This allows our book to open and close freely without scraping against the spine board. It also gives us an overhang along the right-hand edge to match the overhang along the top and bottom.
Open the book cover to check if the mull is in place. Use a rubbing cloth to stick the mull firmly down and work out any wrinkles or air bubbles. Leave the second sheet of wax paper in place to keep glue from sticking to your pages. Flip the book over and attach the back board in the same way. Place under weights for about 1/2 an hour.
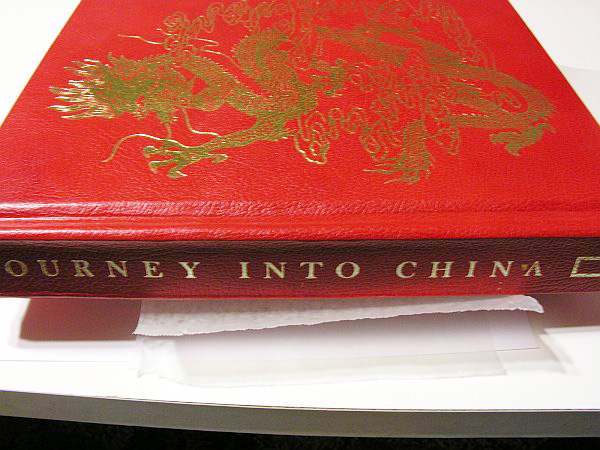
Here I use a handy dandy gigantic book on China, which is very heavy.
Using the same method as above, spread glue and attach the tapes to the cover board. (You can trim your tapes to be flush with the mull if you want.) Flip and do the same for the back cover.
If you’ve paid careful attention to alignment your book should stand on its end with no slanting or unevenness. Place the book under weights for an hour.
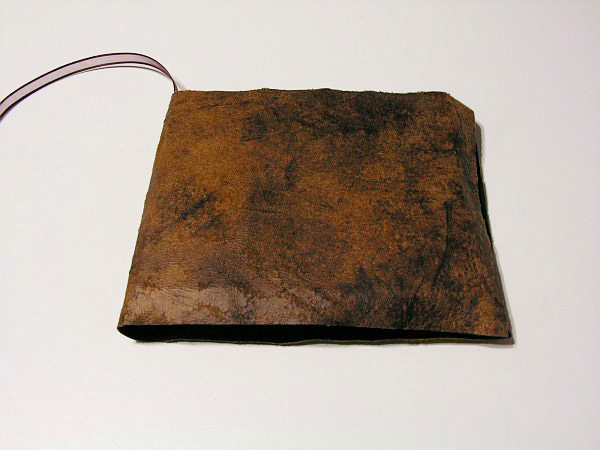
Cover material
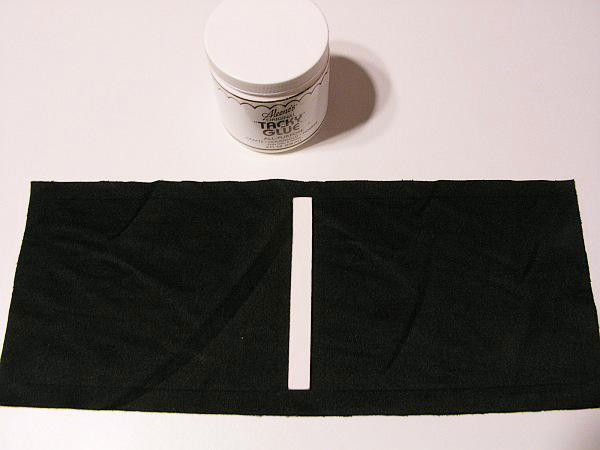
While waiting you can attach the spine board to your cover material. With the material face down, rub glue into the spine area (which should be marked with pen or pencil. In this case you can’t see the lines because my material backing is black, but they are there.) Center and press your spine board into place. Flip the material over and use a rubbing cloth on wax paper to work out any wrinkles or air bubbles, and then flip back over. Place under weights and allow to dry.
Ribbon bookmark
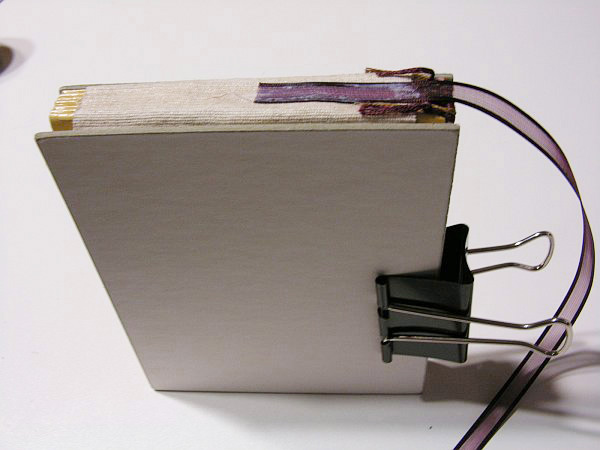
I’m attaching a ribbon bookmark, so when the mull and tapes have sufficiently dried the book is turned onto its side and I position my ribbon across the mull on the spine. Using my fingers I glue it down and saturate the back of the ribbon also with glue. Cover with wax paper and place this under weight for about 1/2 an hour to dry. (Note: if you are using glued-on headbands you may attach the ribbon beneath the headband, rather than on the outside.)
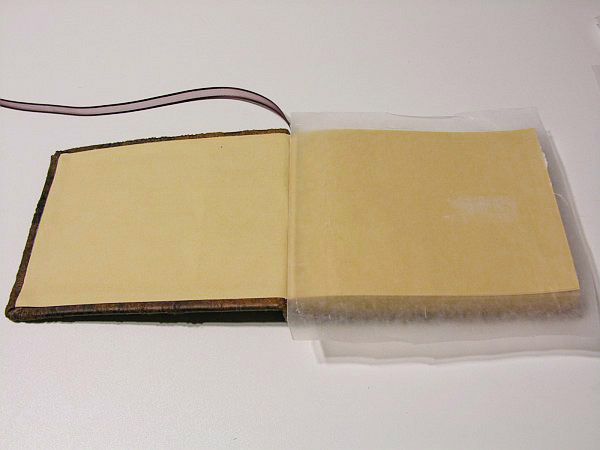
Now it’s time to attach our cover boards to the cloth or paper cover. Using the guidelines that we marked on the back of the material previously, spread glue all over the inner area of the front cover material, allowing a bit to go outside the lines. Carefully align and press the front cover onto the glued area, making adjustments as needed to keep it centered. When aligned properly, flip the book over and use a rubbing cloth over wax paper to work out any bubbles or wrinkles. Press the material down into the crack between the cover board and the spine board.
Do the same for the back cover, then place beneath weights for an hour.
The next step is to miter the corners. I would like to do a more in-depth tutorial on this later if there is interest. ??
Now it is time to glue the turnover. We glue tops and bottoms first. Lay your project over a piece of wax or scrap paper and spread glue all the way across the top edge of the turnover. Turn the book on its end and start turning the material in at the spine. Bend it down behind the backs of the signatures. You can use your bone folder if necessary to work it down and press it flat. Then work your way along the top edge to the left and right and fold over the turnover with your fingers, working out any wrinkles as you go. Flip the book over and do the same with the bottom edge.
Again, a more detailed tutorial is necessary for folding corners. There are different ways of doing this, and with thicker materials (as I am using here) it can be tricky. After gluing down corners and side edges I use small binder clips to hold bulky areas down while the glue dries. Place the entire book under weights for 1/2 an hour.
To finish up our book we need to glue down the first and last pages to the cover boards. This will hide the unattractive mull and tapes. Place two pieces of wax paper beneath the first page and spread glue, first near the spine, then working outward to the edge of the page. You will have to work quickly because the paper will suck up the glue and start to wrinkle. Discard the top sheet of wax paper, then lift carefully the bottom sheet of wax paper. Using the flat side of your hand, press the paper into the cover board. Work up from near the spine until the whole page is attached. If the alignment is crooked, gently unstick and re-align.
When everything is in place, use a rubbing cloth to work out any wrinkles or bubbles. Place an extra sheet or two of scrap paper beneath the wax paper and close the book firmly. The extra paper keeps moisture from the glue from being absorbed into the other pages of your book, which will wrinkle them.
Flip your book over and attach the last page in the same fashion.
When completed, place the entire book under weights overnight. A good, long dry under pressure is necessary so that your book doesn’t warp. Afterward, you can attach decorative endpapers if you wish, using the same method.
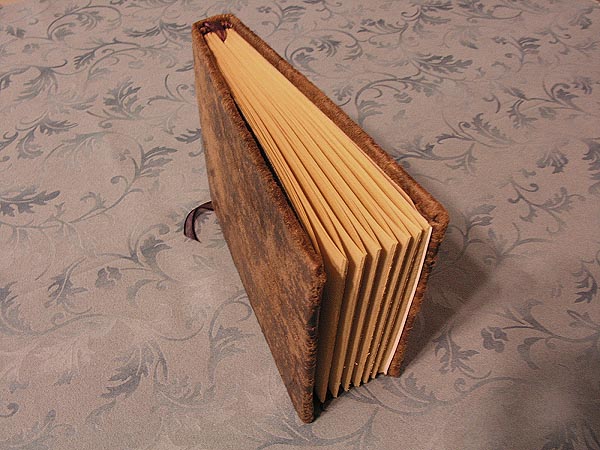
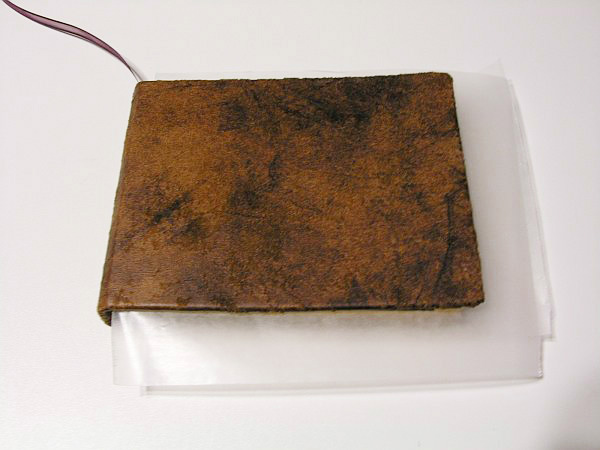
The end result.
If you enjoyed this bookbinding tutorial and all that went into creating it, say thanks by buying me a coffee ! ☕️
Recent Posts
- Eat All the Tacos
- Bikepacking New Mexico
- The World at 10 MPH
- Eating and Pooping
- Old West Time Capsule
Recent Comments
- November 2023
- September 2023
- August 2022
- February 2022
- January 2022
- October 2021
- February 2021
- January 2021
- December 2020
- February 2020
- January 2020
- December 2019
- November 2019
- October 2019
- September 2019
- August 2019
- February 2019
- September 2018
- August 2018
- January 2018
- Aquascaping
- Bikepacking
- Bus Conversion
- Exploration
- Rockhounding
- Trip Report
- Uncategorized
Step-by-Step DIY Book Binding: How to Bind a Book at Home
May 23, 2024 • 8 min read

If you’re a self-published author and you dream of seeing your own work in print, you need to learn about DIY book binding. Creating a book through the art of book binding takes fragmented pages and ideas and turns them into a single object that can be easily distributed and used to drive your brand forward and attract a fan base.
In this guide, we’re going over everything to know about DIY book binding, including various book binding techniques and how to get started. Ready to get started? Let’s dive into how to bind books!
Looking to order the perfectly bound book? Print Bind Ship offers professional book binding and printing services to ensure you get the perfect copy. Get in touch for a free quote!
What Is DIY Book Binding?
DIY book binding is the process of creating a bound book yourself, without relying on a professional printing or book binding service . It can be a rewarding and creative way to produce your own customized books. Whether you want to craft a unique journal, cookbook, booklet, or photo album, DIY book binding lets you tailor your book to your specific needs and style.
3 Steps for DIY Book Binding
There are many different methods for making books, some of which can be accomplished with just a few special tools and a few hours of your time. However, if you want to scale your bookmaking, it’s best to work with a company that has the team and tools to create hardcover, softcover, or spiral-bound books.
Step 1. Decide on a DIY Book Binding Method
There are a few different book binding methods out there and the one you choose may depend on the size, content, and purpose of your book. For the most part, the three most common DIY book binding methods are saddle stitch, perfect binding, and saddle binding. Each technique produces a different type of book spine. Take a look.
1. Saddle Stitch
Saddle stitch binding involves folding a stack of pages in half and sewing them together along the fold. It is a cost-effective and popular technique that works best for thinner books or booklets.
Saddle-stitched books are cost-effective and quick to make, though they don’t last as long as other book types. The finished product is lightweight and can stay flat when opened, which is suitable for cookbooks, calendars, catalogs, and even comic books.
2. Perfect Binding
You’re likely quite familiar with the look of perfect binding, which is another way of describing softcover or paperback books. Perfect-bound books are also relatively inexpensive and offer an attractive way to display your work. However, the spine and cover of perfect-bound books can be damaged.
This method works best for thick books with a higher page count, such as paperback novels, coffee table books, or instructional manuals. The finished product has a professional look and can lay flat, making it easy to read.
3. Spiral Binding
Spiral binding or wire binding, uses a wire or plastic coil that is threaded through a series of punched holes along the spine of a book. This bookbinding method is easy and low-cost to print, even in small amounts. This technique works well for notebooks, sketchbooks, journals, and manuals as it allows for easy page-turning and folding. Saddle binding also provides a durable, long-lasting binding that can withstand frequent use.
Step 2: Gather Your DIY Book Binding Supplies
When you’re setting out to DIY book binding by hand, there are a few standard instruments you’ll need to have around. You may consider purchasing a book binding kit or looking into each tool on its own. Either way, these items tend to be easy to find, and some book binding tools may even be available on Amazon Prime !
- Glue — Glue could be used to attach the cover of your book to the spine or create the cover itself. Many opt for pva glue along with a glue brush.
- Ruler — Look at any book you own, and you’ll be hard-pressed to find any part of it that isn’t precisely measured and cut. You can make sure your own homemade book looks just as precise by having a quality ruler that’s sturdy enough and long enough for your book project.
- Paper Cutter — An awl, and bone folder are helpful tools for achieving clean and precise finished products. An X-Acto knife is another tool that can allows you to get accurate cuts.
- Cutting Mat — To save your tables and counters from damage, you’ll also want to invest in a cutting mat that’s made to protect anything it’s lying on top of. Self-healing cutting mats are helpful as they’re specifically designed to withstand lots of use.
- Pencil — A pencil is great to have on hand to indicate where you need to cut or create holes.
- Paper — You can’t make a book without paper, so you’ll need to have a good amount of it. If you’re creating a blank notebook , you can use just about any paper, even patterned varieties. If you’re binding your own work, you’ll need to have it in a printed format.
Step 3: Methods for How to Bind a Book At Home
The process for DIY book binding can vary depending on the type of book binding technique you’ve chosen. To keep things simple, we’ve broken down how to bind a book according to 3 different methods.
Saddle Stitching
For a saddle-stitched book, you’ll need most of the common items reviewed above, plus an awl or another tool for cutting holes, a needle and thread, binding clips, and wax. With your materials gathered, here is the general process:
- Compile all the pages of your book into one bundle and top them with the cover.
- After making sure the stack is neat, secure all the pages with the clips.
- Next, mark the spine of the book right down the middle of the stack of paper.
- With your pencil, create five marks on the line you just created and use your tool of choice to puncture holes on each of these marks.
- Take thread that you’ve already waxed and insert it into your needle before sewing through the holes you created. You’ll use a saddle stitch for this step.
- Finally, fold your book in half along the spine you created and sewed. Cut off any excess paper on your book if desired.
View this full tutorial and learn how to do a saddle stitch on Bookbinding Workshops Singapore .
Perfect Binding
In addition to some of the common materials mentioned earlier, you may need some bookbinding clips and a bone scorer or bone folder, which is a tool that helps you fold paper.
- The first thing you’ll do is assemble all your pages by folding a larger piece of paper in half and cutting them to make individual pages. This step is where you’ll use the bone scorer.
- Once you have all your pages, you’ll secure them together with your clips.
- Next, apply glue all over the side of your book that will be the spine. Spread multiple layers as needed and let dry completely.
- You can create the cover as the glue is drying. For a stiffer cover, use cardstock or another heavier paper. You will need a back, a front, and a thin piece of material to cover the spine.
- You’ll use these pieces, along with more decorative paper and some blank endpapers, to make the whole cover.
- Once the cover is assembled, you’ll glue your book inside, placing it under something heavy as it dries.
Spiral Binding
Spiral-binding books is easier with a machine, but it can be done by hand, as this tutorial shows.
- First, make the cover out of cardboard cut to desired dimensions. Leave the cover bare or cover it with decorative paper.
- Next, assemble your inner pages, keeping the total number to around 40 pages maximum for the best quality.
- Using your ruler and pencil, indicate a line that you’ll use as a guide for punching holes.
- Use a hole-punching tool to create closely-spaced holes along this line on all of your sheets of paper and the front and back covers.
- Once your pages are all hole-punched, gather and align all the pieces and clip them firmly on all sides but the spine.
- Create a spiral of wire by coiling it around a pen or another long, thin implement.
- Lastly, weave your pages together with the wire and fold over the ends of the wire to secure it.
For more detailed instructions, view this tutorial on wikiHow .
How to Print and Bind Books with Print Bind Ship
When you’re ready to scale your book production beyond just a few handmade items, you can reach out to a company such as Print Bind Ship to explore printing and book binding services.
Print Bind Ship is an experienced third-party logistics provider (3PL) that offers businesses a range of services from printing and book binding to packaging solutions and global shipping.
For self-published authors, in particular, Print Bind Ship can help to boost your brand, improve customer loyalty, and increase sales opportunities through hardcover and softcover book printing, custom packaging, subscription boxes, and more.
Book Editing, Shipping, and More
With a company like Print Bind Ship, you can have a partner in the entire process of book creation, including formatting, printing, binding, and beyond .
The book creation starts with your completed, edited manuscript. While proper formatting is a best practice before you send your work to a printer, a company such as Print Bind Ship can assist with formatting and work with you to finalize the product before printing.
You’ll have multiple options for binding your book, including some of the methods we’ve discussed in this article, but the company you work with to bind your book should be able to advise you on the best strategy for your project. Print Bind Ship is here to do exactly that!
Plus, if you work with a company that only does bookbinding, you may need to handle the distribution yourself. When you work with a 3PL like Print Bind Ship, books can be printed on demand and shipped globally.
Custom Packaging and Subscription Boxes
Think of famous authors and the branding of their book series. You’d recognize the Harry Potter branding a mile away—and the same goes for many other popular authors. This is just one reason it’s crucial for you as an author to have a solid brand that extends beyond just the covers of your books.
Custom labels and packages that coordinate instead of clashing with your brand can make you stand out in a crowded marketplace. When people receive a package from you with custom printing on it, they’ll begin to associate your brand with an attractive design. Not only that, but your customer’s friends and neighbors will also notice and begin to recognize your branding.
Print Bind Ship: Your Expert Resource for Bookbinding
Taking yourself seriously as a self-publishing author is a big step. Ultimately, becoming a self-publishing author means investing in products and partnerships that will further your personal brand.
If you’re still wondering how to get started, Print Bind Ship has experts that can help. You can discuss your bookbinding, how to bind books, and your printing needs as well as other services that could promote your new project.
Take advantage of our free consultations and get in touch today. Happy publishing!
There are numerous types of paper you can use for DIY book binding. Regular copier paper, construction paper, gloss paper, matt paper, handmade paper, and more. The possibilities are endless and the choice is up to you!
It’s best to wait at least a couple of hours to ensure the glue is fully dry before moving on to the next step in the DIY book binding process.
You’ll need paper, a measuring tape or ruler, glue, x-acto knife, cutting matt, and pencil. You should be able to find all the materials you need for DIY book binding at your local arts and crafts store.
To bind a book at home, gather your pages, align them evenly, apply glue along the spine, and secure them tightly with clamps. Once dry, cover the spine with fabric or paper for a finished look.
Common book binding methods include saddle stitching for pamphlets, perfect binding for paperbacks, and Smyth sewing for durable hardcovers, each suited to different types of publications.
Get back to business, we got the rest
Request a meeting with a fulfillment expert
- Complete Starter Tools Kit
- New Book Maker Guide
- Bookbinding Tools & Supplies Quick Start Guide
- Glossary of Terms
- Starter Tools Kit
- Bookbinding Methods
- Inspiration
Select Page
A Complete Overview of the Perfect Binding Method
Bookbinding Methods , Perfect Binding , Techniques

The Perfect binding method is an extremely beginner-friendly technique that binds paper using a flexible adhesive at the spine. It was invented in 1895, but wasn’t used in book manufacturing until the 1930’s to enable the mass production of paperback (also known as softcover) books.
This method is well-known for several reasons:
- The simplicity is perfect for beginner-level bookbinders
- It’s a great option for binding single sheets of paper
- It doesn’t require a hardcover
- It’s still the #1 publishing method in the industry
As you can see, there is more to the Perfect binding than meets the eye. Now, let’s jump into the details.
What is a Perfect binding?
- Bookbinding Method or Technique : Perfect binding
- Minimum Skill Level: Beginner
- Characteristics: Flexible, softcovers, closed spine, will not lay flat, adhesive type is important
- Great for : Single sheet bindings, newer book makers, magazines, authors, notepads
- Bad for : hardcover books, scrapbooks, photo albums and any books that need to lay perfectly flat

Characteristics of a Perfect binding
Perfect bindings are noted for their flexibility, softcovers and rectangular spines. The book block is historically square at the spine, top and bottom edges and does not feature an overhang on the fore edge. If the book has folded sheets, the folds are removed before glue is applied.
As you may have guessed, adhesives play a very important role in the perfect binding. It should be strong, dry clear and remain flexible over time.
Are perfect bindings inferior to other binding methods?
I get this question a lot, and the short answer is this: No .
While perfect bindings do have some drawbacks, they’re stronger than you may think. Original edition comic books, music magazines (think Billboard and Cashbox) and dictionaries have held up for decades even though they’re bound using this method and handled frequently.
Perfect bindings also offer something no other binding style can: an option that isn’t necessarily intended to last a lifetime . This may sound counterintuitive, but hear me out.
Not all books are created to outlast us. Workbooks, notepads and even some notebooks are intended to serve, not last. When we need a quick, affordable option, the perfect binding is an obvious choice.
Basic steps for any Perfect binding
There are 3 basic steps for any Perfect binding:
- Creating the book block,
- Applying adhesive,
- Adding the cover

Step 1: Creating the book block
To create the book block, gather all pages flush at the spine and secure using a clamp. Cut the spine edge square using a guillotine or manual knife. The book block is now ready for adhesive.
Quick tip : Use a ream cutter or guillotine to square up book blocks with a thicker spine.

Step 2: Applying adhesive
PVA (polyvinyl acetate) is an adhesive in the bookbinding space known for its strength and durability while drying clear and flexible. PVA is the best option for DIY and hobby book makers, but if you don’t have PVA, it’s safe to use Elmer’s glue instead.
With the book block still clamped at the spine, begin applying adhesive using a paste brush. Move from the middle to each outer edge, using care to spread the glue evenly. After the first application, let it dry for 5-10 minutes. Apply at least 2-3 more coats for spine thicknesses up to 25mm (1 inch). Apply 4-5 additional coats for spines from 25mm to 50mm in thickness. If the spine of the book is wider than 50mm, consider using more layers and a stronger adhesive.
Remember, glue used at the spine requires us to respect grain direction . This is true for the perfect binding as well as many other methods (like the case binding , for example). If grain direction is not respected, the perfect binding will buckle at the spine and its lifetime will be greatly reduced.
Quick tips:
- Vice grips and metal clamps are great for holding the book block in place while applying adhesive
- Each layer of adhesive requires a longer dry time, so having a small fan nearby can be helpful
- Wood glue is another great option if PVA and/or Elmer’s glue are not available
- Thermal glue is often used in the commercial space, but can also be used at home

Step 3: Adding the cover
Once the final layer of glue has been applied, it’s time to add the cover. The perfect binding cover is usually made of heavier card stock or paper and can sometimes have a satin, glossy or textured finish on one side. Lines are scored on either side of the spine, making it easy to bend the covers into position.
To apply the cover, press the untreated spine of the card stock evenly against the still-wet glue of the book block. After 1-2 minutes, remove the clamps. Fold at the pre-scored lines to allow the front and back covers to fall in place.
With the cover in position, apply even pressure across the entire surface using weight or a book press. This will make sure the covers dry flat in position. If there isn’t enough pressure, the covers may flap open like bird wings.
- Choose a heavy paper between 80 and 100lb (Kraft stock is also an excellent option)
- Textured cover stocks (like linen) are nice to the touch and add character
- Add glossy UV or other laminate to your cover for strength and durability
- Use several books slightly larger than the one you’re making in place of a book press

More bookbinding goodness
✨ What tools do I need to get started bookbinding?
- Bookbinding Tools & Supplies Quick Start Guide – learn all about book making tools, which to buy first & where to go online
- Pick up my popular Complete Starter Bookbinding Tools Kit – all the bookbinding essentials in one spot
🌟 Looking for a simple way to start making books?
Try a Complete Book Materials Kit . Each one has everything you need (+ tutorials & videos) to make a beautiful book without all the fuss.
Thank you for taking me along on your book making journey!
About The Author

I created papercraftpanda to be an outlet for my bookbinding obsession and technical point of view. I designed the site to be a judgment-free zone where aspiring book makers of all levels can find helpful info, ask questions, share and inspire one another. Whether you're making books for yourself, for others or even for sale, you'll find support here. In this community, there are no silly questions!
Related Posts

Getting Started | What is the Best Thread for Coptic Bindings?
May 3, 2023

Two Easy Ways to Find Grain Direction in Paper
April 1, 2021

How to Make an Adorable Coupon Book for Couples
January 26, 2022

How to Create a Wrapped Pamphlet using Handmade Paper
November 16, 2021
Recent Posts

get early access
Popular posts.

Babble Dabble Do
How to Make Books with 5 Simple Book Binding Methods
August 1, 2023 by Ana Dziengel 1 Comment
Today we are going to make handmade books out of recycled materials AND learn 5 simple book binding methods . Handmade books and journals are a great recycled craft that uses up leftover paper and artwork. Or if you are a recycling fanatic, all that scrap paper you’ve been collecting…
Getting started with bookbinding:
I love making books! I have made numerous portfolios for myself over the years, notebooks with the kids, accordion style books , and simple stapled notepads and I’m excited to share some super easy tips for bookmaking here today. Bookbinding does not have to be complicated! The methods in this post are easy enough for kids to use too! They will be amazed that they can make their own books at home.
Before we talk about book binding methods I want to mention a few common terms you will find in the bookbinding world:
- Cover: The front and back of a book. The cover is usually made from a thicker, more durable material to protect the thinner pages inside. The materials you can use for a cover are endless! Consider cardboard, watercolor paper, plastic sheets, cereal boxes, chipboard, old artwork, postcards, greeting cards etc.
- Spine: The side of the book where the pages are held together. In a typical print book the title of the book is displayed on the spine so that when the book is on a shelf it can easily be identified. Most homemade books don’t have spines thick enough to include a title on the spine but it’s something to consider.
- Signatures: Stacks of pages bound together in small sections. To make a thicker book, signatures are stacked together and then bound.
What types of books can you make?
There are so many wonderful types of books kids can make using DIY bookbinding methods. Here are some ideas:
- Journals (that’s what we’ll be making)
- Homework Reminders
- Mini Cookbooks
- Booklets to showcase a topic
- Comic books
We will start by making a handmade journal. Make a bunch to have handy when you need them!
5 Simple Book Binding Methods
Part 1: assemble the inside pages.
For the book:
- Scrap paper: old notebooks, artwork, envelopes with clasps, chipboard inserts, and old plastic folders, for more ideas scroll down to the end of this post.
- Exacto/Straight edge OR Paper cutter OR scissors
For the binding:
- 3 hole punch
- Binder clips
- Rubber bands
Instructions
- Step One: Choose your cover and paper. Select the piece of artwork or the paper you would like to use as the cover. Assemble all the scrap paper you will be using in the book.
- Step Two: Figure out the size of your journal. If you are including envelopes, chose the one you would like to use and base the size of your journal off of it. Otherwise think about how you will be using the book and base the size off of that. Notepads can be long and thin, diaries should be thicker and the pages should have ample writing space, etc.
- Step Three : Cut everything down to the same size. The easiest way is to use a paper cutter/rotary cutter but please ask an adult to help since these are dangerous! If you don’t have a paper cutter, an Exacto knife and a straightedge may be used, also with adult help/supervision. The safest options is scissors but this method is time consuming and the edges won’t be completely straight.
- Step Four: Assemble your book. Depending on how you want the final book to look you can vary the paper types by shuffling them. Alternatively if you want to create sections of your book you may want to keep the same type of papers together. Get creative! If you include envelopes make sure to rotate them so that the bottom of the envelope is along the binding edge and you can open and close the envelope
- Step Five: Add covers. Place your selected and trimmed artwork on top as the front cover. Select heavyweight card stock or chipboard for the back. You can also cut out a piece of lightweight plastic from an old folder for the back cover. To make the cover open easily, lightly score the BACKSIDE of the cover about an inch from the binding edge to make it easy to bend back.
- Step Six: Punch holes. If you will be using a binding method involving holes through the pages, now is the time to punch holes using a hole punch. Always test the hole locations on a piece of scrap paper before making holes in all your sheets. You want them to be in a good location! If you are using a binding method that does not involved punched holes you can skip this step.
- Step Seven: Bind it There are so many simple binding options for homemade books. See 5 of our favorites below.
Part 2: Simple Book Binding Methods
The following are 5 simple ways to bind a book. When choosing the type of book binding to use consider the number of pages you have. The method you choose will depend on how thick the final book will be and how accessible each page needs to be, i.e. do the pages need to lay flat or not.
- Staple + Duct tape: This is a great option for books that are not to thick. If you have a heavy duty stapler, though, you can use this for thicker books. Staple the pages together along the binding edge about a half inch from the edge. Now cut a piece of duct tape about an inch longer than your book. Place half the tape on the front of the book, covering the staples, wrap the tape over the edge of the book and around to the back. Burnish it with your fingertips. Now trim off the excess tape with scissors.
- Hole Punch + Brads: If your book is a little thicker this is the way to go. Use a 3 hole punch to make holes along the edge of your book. Using a 3 hole punch allows you to align the holes as you punch through multiple pages and sets of paper. You may need to adjust the hole spacing to your book so always punch a few test sheets first! Add brads through each hole and bend them back.
- Binder Clips: These make a super simple and cool looking bound edge. Make sure to score the front cover so it can easily open. And depending on how long the binder clips are you may have to bend them back when you want to open the notebook.
- Book rings: These can be purchased in any office supply store and are good for thicker books with sturdy pages. All you need to do is punch a hole in one corner and place a book ring through the hole. Done! The binding is loose and removable should you need to take sheets out or reorganize. For this project we used some great free bookmarks from our visit to the space shuttle this summer.
- Rubber Band + Stick : I love this method for binding books because it is so easy but looks very neat and “designy” when done. All you need is a thick rubber band and some type of stick. You can use a stick from the garden, a wooden skewer, dowels, even pencils! Just make sure the stick you choose is the length of the edge you are binding or a little shorter. To bind a book using this method punch two holes through all the pages, one near the top of the binding edge and one near the bottom. Flip the book over, fold your rubber band, and thread one end of the rubber band through the top hole and one through the bottom hole. Flip the book to the front. Now place your stick through each end of the rubber band. You’re done! For this book I used some of our Marbled Milk Paper for the cover; if you want to make some of your own pop over here for the full tutorial .
If you want a more durable bookbinding method there are several inexpensive options available at most copy centers. Here are some types of book bindings you can expect to find at a copy center (these are all spiral-bound books):
- Coil Bind : The next time you are at Staples, FedEx Office or your local copy shop ask them to coil bind your book. The most common coil is made from black plastic.
- Wire Binding: Similar to coil biding but the coil is made from metal wire. This option looks very professional and if you are lucky there may even be different colors of wire available.
- Comb Binding : My dad used to have a comb binding machine and I loved to use it to make books! Comb binding is a thicker plastic binding that can be reopened even after a book is made. It’s a bit less durable than a spiral binding but you have more flexibility if you want to add or rearrange pages after you have bound the book.
More cool ideas for your homemade notebook:
- Perforate it! Note: Do this before you bind the book and don’t perforate the covers. If you know someone who sews, ask him or her to run the sheets of your book through a sewing machine without thread. Leave a half-inch seam allowance and a stitch setting of 2 or 3. Run only a few sheets at a time and use a heavy-duty needle. Viola! Now your paper can be easily torn out of your notebook!
- Sew it! Run your finished book through a sewing machine using colorful thread. Make sure to glue the trimmed end of the thread so your book doesn’t unravel. This is good for thin books and folded books, where you fold larger sheets in half to create signatures
- Get Creative with Paper! Don’t be confined by looking for paper, think of other materials that would make great covers for your journal. Here are some ideas: Cereal boxes or other food packaging boxes, leftover cardboard mailers, greeting cards, packing materials like corrugated chipboard, large paint chips, junk mail postcards, what else????
Inspired to make a book yet? I hope these 5 simple ideas for how to bind a book and the loads of options for what to include in a handmade journal inspire you to make some recycled books of your own! Next time you are about to toss a half used notebook or the gazillionzth piece of art you don’t now how to display, recycle it into a journal!
Check out some more DIY book ideas here on Babble Dabble Do:
- I Love You Books
- Day-Glo Books
- Instagram mini books
Are you passionate about raising creative kids?
Join over 22,179 parents and educators who want connect with kids and nurture their creative process through magical, easy projects you can do together..
Subscribe to our email list to receive project ideas as well as offers for some our creative products.
If you want to read our privacy policy before subscribing, hop over here.
pink camo wedding rings says
September 28, 2014 at 1:23 pm
Hello, I think your site might be having browser compatibility issues.
When I look at your website in Chrome, it looks fine but when opening in Internet Explorer, it has some overlapping. I just wanted to give you a quick heads up!
Other then that, amazing blog!
Leave a Reply Cancel reply
Your email address will not be published. Required fields are marked *
Save my name, email, and website in this browser for the next time I comment.
Pin It on Pinterest
DIY Bookbinding/Bookmaking

Introduction: DIY Bookbinding/Bookmaking

Step 1: Get Started

Step 2: Sewing

Step 3: Glueing

Step 4: Add Structure

Step 5: To Create a Cover...

Step 6: Put It All Together...

Step 7: You're Done!

Recommendations

Farm to Table Contest

Puzzles and Games Contest

Paper and Cardboard Contest

- Skip to main content
- Skip to header right navigation
- Skip to site footer

Incredibusy
Let us exist responsibly ~ consciously ~ sustainably
Easy Book binding – two book-binding ideas

Book Binding – A fun way to make something NEW, the old fashioned way!
How to make a book – two great book binding ideas – saddle stitch and Japanese Stab bookbinding – There are lots of different ways to make books – with or without a needle and thread, but this week the kids wanted to have a go at making these ‘notebooks’ using some old cardboard we’ve had for a while.

And we ALWAYS have reams of paper, A4 copier paper – the kids really love to draw and write and this is a really nice way of combining an ancient craft of book binding, with their own creativity within.
The oldest child is still mad keen on drawing, whilst 12yo is allegedly writing a book – so hopefully he’ll give up writing in his ‘notes’ on his iPhone, and revert back to good old pen and paper when we’ve finished making these books!
So, what you will need…
Cotton thread
Sharp pencil (for creating the holes in the card if you have no Brindle)
Needle Threader (non-essential, but believe me, this works on both ends of the spectrum – moody kids who struggle to thread a needle simply because they don’t have the patience, and aged parent eyes – believe me, threading a needle really DOESN’T get easier as your eyes get older!)
So – we experimented with two types of book binding:
A) Saddle Stitch Easy Book Binding (see the dark blue book in the photograph)
- For this book, you need four to six single sheets of paper, and one single sheet of card for the cover.
- Fold all of the paper in half, so if it’s an A4 sheet, fold down to make A5.
- Take your first sheet, and mark approximately in the middle of the sheet, on the fold, and then two marks on either side of the centre – equal distance from the centre.
- Push your bodkin (or sharp pencil) through these three holes.
- Use this sheet as a template, lay on top of the next sheet, and push through the holes so that all of your sheets have three holes, in the same place.
- Stitch by pushing your needle through the centre hole, to the back of the book, and back through the top hole, then through the centre hole and back through the lower hole, to the back of the book again.
- Tie of tightly and you’re finished!
B) Japanese Stab Easy Book Binding (the light blue book in the photograph)

- For this book, you need six to eight single sheets of paper, and two single sheets of card for the covers.
- Take a ruler and mark a 15mm margin, on the page. Mark 15mm from the top and bottom of this line. Then divide the distance between the two marks by three, and mark two additional points on the line…
- Using bodkin (or again, a sharp pencil) push holes through the four points. Take care when you line up your ‘pages’ – again use that top page as a template for the other pages.
- Hold the book securely as you thread your needle up through from the bottom, up through one of the centre holes. Hold on to the end of the thread.
- Sew around the spine, and back through the same hole again from the bottom, out and down through the other centre hole. Pull the thread tight.
- Around the spine again, down through the upper middle hole, and up through the top hole. Pull the thread tight.
- Around the spine again…
- Around the top of the spine and up through the top hole again. Pull the thread tight.
- Keep going, DOWN through the upper middle hole, back UP the next hole and down through the bottom hole. Pull the thread tight.
- Around the spine again!
- Then around the bottom of the spine and back through the bottom hole. Pull tight.
- To finish, pull tightly and double knot the end of the thread to the beginning of the thread, cut the remaining thread, however, leave at least 10mm or risk the knot coming loose…

So, if you are looking for more fun ideas to make and create, you may like to have a look at our air drying clay puppets that we made recently!
And if you are feeling handy with the needle and thread check out the incredibusy salvaged speed loom.
And if you’ve enjoyed this post, please follow me and say ‘hello’ over on instagram for more like this! I’m http://www.instagram.com/incredibusy

Reader Interactions
28/04/2017 at 6:39 pm
oh thank you so much! So glad you like it x
[…] 15- Sewn paper blank book from Incredibusy […]
[…] 6.Easy Bookbinding by Incredibusy: […]
[…] Binding books is not the first thing that comes to mind when I think of sewing, but it is a fabulous way to use your sewing skills! This is a great project for kids to create their own notebooks or journals. […]
[…] To make these Heart Notebooks I used the simplest form of Japanese bookbinding – saddle stitch. There are loads of tutorials out there showing you how, but I used this one. […]
[…] To make these Heart Notebooks I used the simplest form of Japanese bookbinding – saddle stitch. There are loads of tutorials out there showing you how, but I used this one. […]
symantec network access control software
Easy Book binding – two book-binding ideas ~ Incredibusy
[…] könntest auch eigene Tassen und Schälchen töpfern (hier oder hier ein bisschen Inspiration) oder kleine Notizbücher selber binden. Aus alter Kleidung kannst du schöne Haarbänder nähen. Du könntest deinen Lieben Kalender […]
[…] Zilla Leutenegger Buch Binden […]
Leave a Reply Cancel reply
Your email address will not be published. Required fields are marked *
On Instagram

IMAGES
VIDEO
COMMENTS
4. Stack the pages and hole-punch the book every 1⁄4 inch (0.64 cm) along the line. Using your top page as a guide, hole-punch the entire stack of pages. Each hole must be on the line. Use a ruler to make sure your holes are in the proper spots. You'll be threading the ribbon through these holes later on.
Step 1: Fold the paper in half one at a time. Calculate how many pages you need, and fold each one in half. Folding it one sheet at a time creates a clean, sharp fold for your book. Use a bone folder to lay each piece flat at the fold. A credit card or ruler can also work to give the folded paper a crisp edge.
Thank you for watching my video!0:00 Hi!0:13 Things you'll need0:39 Making end-papers2:06 *optional step: rounding the corners3:11 Gluing the sheets5:22...
Bookbinding is the art form of creating handmade books from scratch by applying aesthetic and functional techniques with the help of specialized tools and materials. The core of bookbinding involves assembling paper sheets, whether in folded sections or individually, and binding them together along one edge.
I hope this video will be helpful for anyone new to bookbinding, I have found this method to be very simple, but it also is strong and looks beautiful! I hop...
Its biggest perk is that you can adjust the spine at any time to edit, add, and remove pages quickly and easily in just a matter of seconds. 10. Accordion binding. Photo via Stephanie Bento (Tiny Workshops) Also known as concertina binding, folded page binding, zig-zag binding, and pleat binding. Pros.
Welcome to our quick and easy bookbinding tutorial! Follow our step-by-step guide to learn how to bind a book using just a stapler. Perfect for beginners cre...
Step 1: Gather Your Supplies. 5 to 10 sheets of paper of your preferred size (all should be uniform). Note that one will be used as a guide page. 1 sheet of thicker, decorative paper for your book cover. Bednar says to aim for 0.5" longer on the top and bottom of the page, and about 1" longer on each horizontal side of the page.
Cut the paper you are going to cover the cover with to: The cover width plus 1/2" or 1". The cover height plus 1/2" or 1". This allows it to wrap over the edges and inside enough. If you look at a bound book, there is about 1/4" of the cover paper on the edges of the inside before it gets covered by endpaper.
Starter Bookbinding Tutorials. It's important to understand how paper and thread work together to create a book. These tutorials will guide you through the process of threading the needle, punching holes in paper and sewing it all together. Simple book using the 3-hole pamphlet binding method.
Bookbinding is the process of assembling a stack of paper sheets (whether individually or folded into sections) and binding them together to create booklets, art journals, scrapbooks, and more. This process can be done with different techniques and styles, and finished with soft or hardcovers. Covers can be customized with a variety of ...
This bookbinding tutorial was originally written by myself as a contribution to a LiveJournal bookbinding group, circa 2004. ... It is easier to cut a whole stack of sheets to size, slightly larger than your cover, and have those within easy reach. With your book pages face up in front of you, place two sheets of wax paper beneath the mull but ...
This bookbinding method is easy and low-cost to print, even in small amounts. This technique works well for notebooks, sketchbooks, journals, and manuals as it allows for easy page-turning and folding. Saddle binding also provides a durable, long-lasting binding that can withstand frequent use.
Step 1: Creating the book block. To create the book block, gather all pages flush at the spine and secure using a clamp. Cut the spine edge square using a guillotine or manual knife. The book block is now ready for adhesive. Quick tip: Use a ream cutter or guillotine to square up book blocks with a thicker spine.
#nikthebooksmith #bookbinding #beginnerbookbinding*Favorite Supplies List: https://www.amazon.com/shop/nikthebooksmithDiagram for stitching: https://www.fl...
Step 1: Fold All Paper. Fold a plain or colored sheet of cardstock for the cover and 5 sheets of plain printer paper. If you are wanting to use our Max cover download the attached PDF and print it on cardstock paper. Fold it in half just like your other 5 sheets of plain printer paper.
Step 14: Glue the Lining in Place. Fold the lining paper sheet in half crosswise. Smear the inside of the cover and the first page with white glue or rubber solution glue. Carefully place one half of the folded lining paper on the glued first page so that it lines up neatly with the edge of the paper.
Part 2: Simple Book Binding Methods. The following are 5 simple ways to bind a book. When choosing the type of book binding to use consider the number of pages you have. The method you choose will depend on how thick the final book will be and how accessible each page needs to be, i.e. do the pages need to lay flat or not.
Use the 1/4" drill bit. After you drill the 1/4" holes, drill wider holes in the top board with the 5/16" bit to allow bolts to slide more easily as you guide the top down over the bolts. The bolts should slide up through the holes. Take the carriage bolts and slide them into the bottom board so that they face upward.
How to Make Books with 5 Simple Book Binding Methods. Use for kid's art, handmade journals & more! Step by step instructions here: https://babbledabbledo.com...
Stack of average-sized paper 2.) Needle and thread 3.) Glue 4.) Narrow piece of ribbon for bookmark 5.) Piece of canvas 6.) Chipboard 7.) Fabric for the cover 8.) Sheet of decorative paper or card stock the same size as your other paper. First, fold each of the sheets in half.
B) Japanese Stab Easy Book Binding (the light blue book in the photograph) For this book, you need six to eight single sheets of paper, and two single sheets of card for the covers. Take a ruler and mark a 15mm margin, on the page. Mark 15mm from the top and bottom of this line.
Here are the tools and materials I use to make a book! There is no correct or one way to make a book, but I hope this video can be a launching point to figur...