- PRO Courses Guides New Tech Help Pro Expert Videos About wikiHow Pro Upgrade Sign In
- EDIT Edit this Article
- EXPLORE Tech Help Pro About Us Random Article Quizzes Request a New Article Community Dashboard This Or That Game Popular Categories Arts and Entertainment Artwork Books Movies Computers and Electronics Computers Phone Skills Technology Hacks Health Men's Health Mental Health Women's Health Relationships Dating Love Relationship Issues Hobbies and Crafts Crafts Drawing Games Education & Communication Communication Skills Personal Development Studying Personal Care and Style Fashion Hair Care Personal Hygiene Youth Personal Care School Stuff Dating All Categories Arts and Entertainment Finance and Business Home and Garden Relationship Quizzes Cars & Other Vehicles Food and Entertaining Personal Care and Style Sports and Fitness Computers and Electronics Health Pets and Animals Travel Education & Communication Hobbies and Crafts Philosophy and Religion Work World Family Life Holidays and Traditions Relationships Youth
- Browse Articles
- Learn Something New
- Quizzes Hot
- This Or That Game
- Train Your Brain
- Explore More
- Support wikiHow
- About wikiHow
- Log in / Sign up
- Education and Communications
- Science Writing

How to Write up a Science Experiment
Last Updated: May 19, 2023 Fact Checked
This article was co-authored by Michael Simpson, PhD . Dr. Michael Simpson (Mike) is a Registered Professional Biologist in British Columbia, Canada. He has over 20 years of experience in ecology research and professional practice in Britain and North America, with an emphasis on plants and biological diversity. Mike also specializes in science communication and providing education and technical support for ecology projects. Mike received a BSc with honors in Ecology and an MA in Society, Science, and Nature from The University of Lancaster in England as well as a Ph.D. from the University of Alberta. He has worked in British, North American, and South American ecosystems, and with First Nations communities, non-profits, government, academia, and industry. This article has been fact-checked, ensuring the accuracy of any cited facts and confirming the authority of its sources. This article has been viewed 269,183 times.
Any time you have conducted a science experiment, you should write a lab report detailing why the experiment was performed, the results you expected, the process you used, the actual results, and a discussion of what the results mean. Lab reports often follow a very standard format starting with an abstract and introduction, followed by a materials and methods section, the results and discussion, and finally a conclusion. This format will allow the reader to find answers to common questions that are often asked: Why was the experiment performed? What were the expected results? How was the experiment conducted? What happened in the experiment? What do the results mean? This article explains the basic format of a lab report.
Lab Report Template

Writing an Abstract and Introduction

- The purpose of this short summary is to provide the reader with enough information on the experiment that they can see if they want or need to read the entire report. The abstract helps them determine if your research is relevant to them.
- Devote a sentence to describing the purpose of the project and its significance. Then, very briefly describe the materials and methods used. Follow up with a 1-2 sentence description of the results of the experiment. You might also provide a list of keywords listing subjects related to your research.

- The introduction will outline what the experiment is, why it was done, and why it is important. It must provide the reader with two key pieces of information: what is the question the experiment is supposed to answer and why is answering this question important.

- A research hypothesis should be a brief statement that pares down your problem that you described in your introduction into something that is testable and falsifiable.
- Scientists must create a hypothesis from which an experiment can reasonably be designed and carried out.
- A hypothesis is never proved in an experiment, only "verified" or "supported".

- For example, you might start with "Fertilizer affects how tall a plant will grow". You could expand this idea to a clear hypothesis: "Plants grow faster and taller when they are given fertilizer". To make it a testable hypothesis, you could add experimental details: "Plants which are given a solution with 1ml of fertilizer grow faster than plants without fertilizer because they are given more nutrients."
Explaining Your Research Procedure

- This section is extremely crucial documentation of your methods of analysis.

- For example, if you were testing how fertilizer affects plant growth, you would want to state what brand of fertilizer you used, what species of plant you used and what brand of seed.
- Make sure you include the quantity of all objects used in the experiment.

- Remember all experiments involve controls and variables. Describe these here.
- If you used a published laboratory method, be sure to provide a reference for the original method.
Reporting Results

- For example, if you are testing the effect of fertilizer on plant growth you would want a graph showing the average growth of plants given fertilizer vs. those without.
- You would also want to describe the result. For example "Plants which were given a concentration of 1ml of fertilizer grew an average of 4 cm taller than those that were not given fertilizer."
- As you go along, narrate your results. Tell the reader why a result is significant to the experiment or problem. This will allow the reader to follow your thinking process.
- Compare your results to your original hypothesis. State whether or not your hypothesis was supported or not by your experiment.
- Quantitative data is anything expressed in terms of numerical forms such as percentages or statistics. Qualitative data is derived from broad questions and is expressed in the form of word responses from study participants.

- In this section, the author can address other questions such as: "why did we get an unexpected result?" or "what would happen if one aspect of the procedure was altered?".
- If your results did not verify your hypothesis, explain your reasoning why.

- Be sure to link back to the introduction and whether or not the experiment addressed the goals of your analysis.

- You can use software such as EndNote to help you cite and build a properly referenced bibliography.
Expert Q&A

You Might Also Like

- ↑ Michael Simpson, PhD. Registered Professional Biologist. Expert Interview. 8 September 2021.
- ↑ https://www.matrix.edu.au/how-to-write-a-scientific-report/
- ↑ https://explorable.com/research-hypothesis
- ↑ https://www.monash.edu/learnhq/write-like-a-pro/annotated-assessment-samples/science/science-lab-report
About This Article

When you’re writing up a science experiment for a class, break it into sections for your introduction, procedure, findings, and conclusion. In the intro, explain the purpose of your experiment and what you predicted would happen, then give a brief overview of what you did. In the procedure section, describe all of the materials you used and give a step-by-step account of your method. In the findings section, give the results from your experiment, including any graphs or diagrams you made. Then, explain if your expectations were met and what further research you can do. Finish with a brief conclusion that summarizes your experiment and its results. For more tips from our Science co-author, including how to write an abstract for your science paper, read on! Did this summary help you? Yes No
- Send fan mail to authors
Reader Success Stories
Vamikha Shetty
Sep 29, 2020
Did this article help you?

Eleanor Enedby
Nov 4, 2021
Oct 23, 2019
Kyi Kyaw Sein
Feb 19, 2022
Nov 24, 2019

Featured Articles

Trending Articles

Watch Articles

- Terms of Use
- Privacy Policy
- Do Not Sell or Share My Info
- Not Selling Info
Don’t miss out! Sign up for
wikiHow’s newsletter
When you choose to publish with PLOS, your research makes an impact. Make your work accessible to all, without restrictions, and accelerate scientific discovery with options like preprints and published peer review that make your work more Open.
- PLOS Biology
- PLOS Climate
- PLOS Complex Systems
- PLOS Computational Biology
- PLOS Digital Health
- PLOS Genetics
- PLOS Global Public Health
- PLOS Medicine
- PLOS Mental Health
- PLOS Neglected Tropical Diseases
- PLOS Pathogens
- PLOS Sustainability and Transformation
- PLOS Collections
- How to Write Your Methods

Ensure understanding, reproducibility and replicability
What should you include in your methods section, and how much detail is appropriate?
Why Methods Matter
The methods section was once the most likely part of a paper to be unfairly abbreviated, overly summarized, or even relegated to hard-to-find sections of a publisher’s website. While some journals may responsibly include more detailed elements of methods in supplementary sections, the movement for increased reproducibility and rigor in science has reinstated the importance of the methods section. Methods are now viewed as a key element in establishing the credibility of the research being reported, alongside the open availability of data and results.
A clear methods section impacts editorial evaluation and readers’ understanding, and is also the backbone of transparency and replicability.
For example, the Reproducibility Project: Cancer Biology project set out in 2013 to replicate experiments from 50 high profile cancer papers, but revised their target to 18 papers once they understood how much methodological detail was not contained in the original papers.
What to include in your methods section
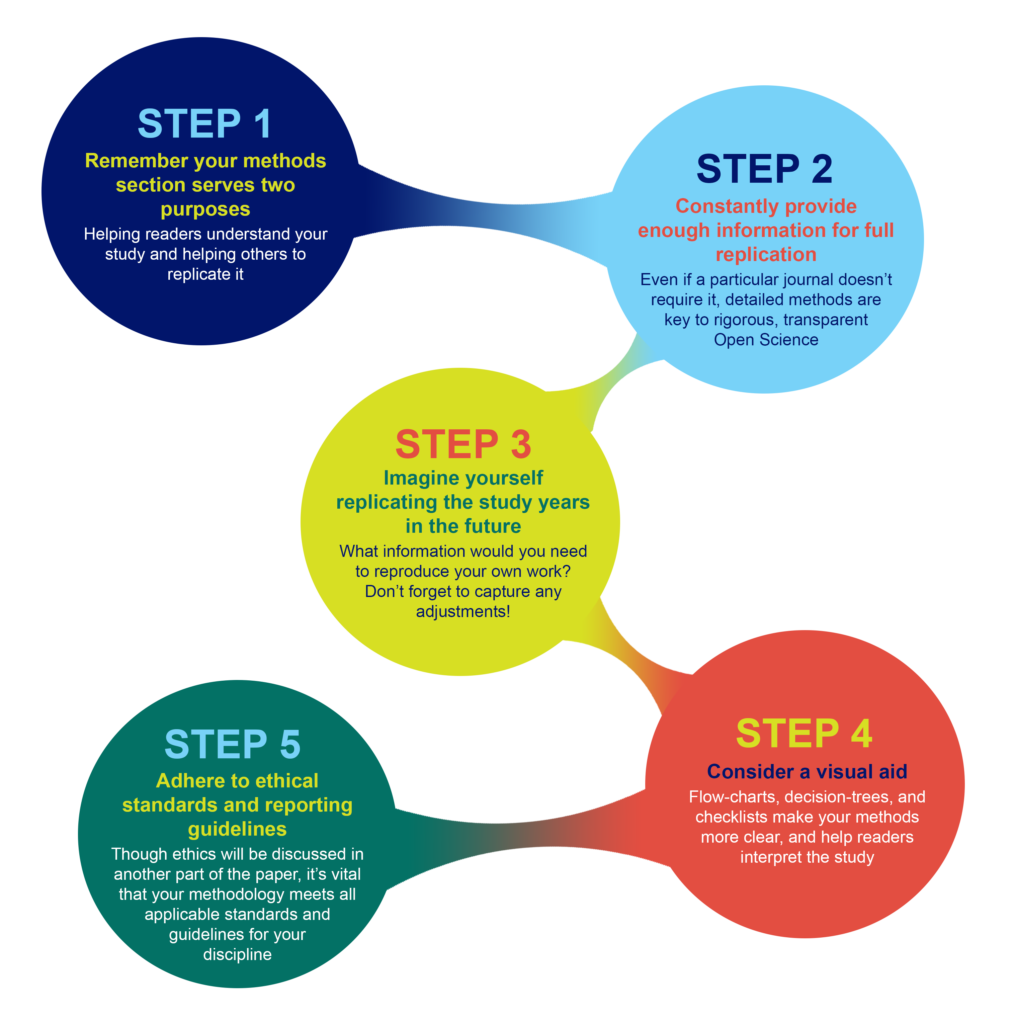
What you include in your methods sections depends on what field you are in and what experiments you are performing. However, the general principle in place at the majority of journals is summarized well by the guidelines at PLOS ONE : “The Materials and Methods section should provide enough detail to allow suitably skilled investigators to fully replicate your study. ” The emphases here are deliberate: the methods should enable readers to understand your paper, and replicate your study. However, there is no need to go into the level of detail that a lay-person would require—the focus is on the reader who is also trained in your field, with the suitable skills and knowledge to attempt a replication.
A constant principle of rigorous science
A methods section that enables other researchers to understand and replicate your results is a constant principle of rigorous, transparent, and Open Science. Aim to be thorough, even if a particular journal doesn’t require the same level of detail . Reproducibility is all of our responsibility. You cannot create any problems by exceeding a minimum standard of information. If a journal still has word-limits—either for the overall article or specific sections—and requires some methodological details to be in a supplemental section, that is OK as long as the extra details are searchable and findable .
Imagine replicating your own work, years in the future
As part of PLOS’ presentation on Reproducibility and Open Publishing (part of UCSF’s Reproducibility Series ) we recommend planning the level of detail in your methods section by imagining you are writing for your future self, replicating your own work. When you consider that you might be at a different institution, with different account logins, applications, resources, and access levels—you can help yourself imagine the level of specificity that you yourself would require to redo the exact experiment. Consider:
- Which details would you need to be reminded of?
- Which cell line, or antibody, or software, or reagent did you use, and does it have a Research Resource ID (RRID) that you can cite?
- Which version of a questionnaire did you use in your survey?
- Exactly which visual stimulus did you show participants, and is it publicly available?
- What participants did you decide to exclude?
- What process did you adjust, during your work?
Tip: Be sure to capture any changes to your protocols
You yourself would want to know about any adjustments, if you ever replicate the work, so you can surmise that anyone else would want to as well. Even if a necessary adjustment you made was not ideal, transparency is the key to ensuring this is not regarded as an issue in the future. It is far better to transparently convey any non-optimal methods, or methodological constraints, than to conceal them, which could result in reproducibility or ethical issues downstream.
Visual aids for methods help when reading the whole paper
Consider whether a visual representation of your methods could be appropriate or aid understanding your process. A visual reference readers can easily return to, like a flow-diagram, decision-tree, or checklist, can help readers to better understand the complete article, not just the methods section.
Ethical Considerations
In addition to describing what you did, it is just as important to assure readers that you also followed all relevant ethical guidelines when conducting your research. While ethical standards and reporting guidelines are often presented in a separate section of a paper, ensure that your methods and protocols actually follow these guidelines. Read more about ethics .
Existing standards, checklists, guidelines, partners
While the level of detail contained in a methods section should be guided by the universal principles of rigorous science outlined above, various disciplines, fields, and projects have worked hard to design and develop consistent standards, guidelines, and tools to help with reporting all types of experiment. Below, you’ll find some of the key initiatives. Ensure you read the submission guidelines for the specific journal you are submitting to, in order to discover any further journal- or field-specific policies to follow, or initiatives/tools to utilize.
Tip: Keep your paper moving forward by providing the proper paperwork up front
Be sure to check the journal guidelines and provide the necessary documents with your manuscript submission. Collecting the necessary documentation can greatly slow the first round of peer review, or cause delays when you submit your revision.
Randomized Controlled Trials – CONSORT The Consolidated Standards of Reporting Trials (CONSORT) project covers various initiatives intended to prevent the problems of inadequate reporting of randomized controlled trials. The primary initiative is an evidence-based minimum set of recommendations for reporting randomized trials known as the CONSORT Statement .
Systematic Reviews and Meta-Analyses – PRISMA The Preferred Reporting Items for Systematic Reviews and Meta-Analyses ( PRISMA ) is an evidence-based minimum set of items focusing on the reporting of reviews evaluating randomized trials and other types of research.
Research using Animals – ARRIVE The Animal Research: Reporting of In Vivo Experiments ( ARRIVE ) guidelines encourage maximizing the information reported in research using animals thereby minimizing unnecessary studies. (Original study and proposal , and updated guidelines , in PLOS Biology .)
Laboratory Protocols Protocols.io has developed a platform specifically for the sharing and updating of laboratory protocols , which are assigned their own DOI and can be linked from methods sections of papers to enhance reproducibility. Contextualize your protocol and improve discovery with an accompanying Lab Protocol article in PLOS ONE .
Consistent reporting of Materials, Design, and Analysis – the MDAR checklist A cross-publisher group of editors and experts have developed, tested, and rolled out a checklist to help establish and harmonize reporting standards in the Life Sciences . The checklist , which is available for use by authors to compile their methods, and editors/reviewers to check methods, establishes a minimum set of requirements in transparent reporting and is adaptable to any discipline within the Life Sciences, by covering a breadth of potentially relevant methodological items and considerations. If you are in the Life Sciences and writing up your methods section, try working through the MDAR checklist and see whether it helps you include all relevant details into your methods, and whether it reminded you of anything you might have missed otherwise.
Summary Writing tips
The main challenge you may find when writing your methods is keeping it readable AND covering all the details needed for reproducibility and replicability. While this is difficult, do not compromise on rigorous standards for credibility!

- Keep in mind future replicability, alongside understanding and readability.
- Follow checklists, and field- and journal-specific guidelines.
- Consider a commitment to rigorous and transparent science a personal responsibility, and not just adhering to journal guidelines.
- Establish whether there are persistent identifiers for any research resources you use that can be specifically cited in your methods section.
- Deposit your laboratory protocols in Protocols.io, establishing a permanent link to them. You can update your protocols later if you improve on them, as can future scientists who follow your protocols.
- Consider visual aids like flow-diagrams, lists, to help with reading other sections of the paper.
- Be specific about all decisions made during the experiments that someone reproducing your work would need to know.

Don’t
- Summarize or abbreviate methods without giving full details in a discoverable supplemental section.
- Presume you will always be able to remember how you performed the experiments, or have access to private or institutional notebooks and resources.
- Attempt to hide constraints or non-optimal decisions you had to make–transparency is the key to ensuring the credibility of your research.
- How to Write a Great Title
- How to Write an Abstract
- How to Report Statistics
- How to Write Discussions and Conclusions
- How to Edit Your Work
The contents of the Peer Review Center are also available as a live, interactive training session, complete with slides, talking points, and activities. …
The contents of the Writing Center are also available as a live, interactive training session, complete with slides, talking points, and activities. …
There’s a lot to consider when deciding where to submit your work. Learn how to choose a journal that will help your study reach its audience, while reflecting your values as a researcher…
Lab Report Format: Step-by-Step Guide & Examples
Saul Mcleod, PhD
Editor-in-Chief for Simply Psychology
BSc (Hons) Psychology, MRes, PhD, University of Manchester
Saul Mcleod, PhD., is a qualified psychology teacher with over 18 years of experience in further and higher education. He has been published in peer-reviewed journals, including the Journal of Clinical Psychology.
Learn about our Editorial Process
Olivia Guy-Evans, MSc
Associate Editor for Simply Psychology
BSc (Hons) Psychology, MSc Psychology of Education
Olivia Guy-Evans is a writer and associate editor for Simply Psychology. She has previously worked in healthcare and educational sectors.
On This Page:
In psychology, a lab report outlines a study’s objectives, methods, results, discussion, and conclusions, ensuring clarity and adherence to APA (or relevant) formatting guidelines.
A typical lab report would include the following sections: title, abstract, introduction, method, results, and discussion.
The title page, abstract, references, and appendices are started on separate pages (subsections from the main body of the report are not). Use double-line spacing of text, font size 12, and include page numbers.
The report should have a thread of arguments linking the prediction in the introduction to the content of the discussion.
This must indicate what the study is about. It must include the variables under investigation. It should not be written as a question.
Title pages should be formatted in APA style .
The abstract provides a concise and comprehensive summary of a research report. Your style should be brief but not use note form. Look at examples in journal articles . It should aim to explain very briefly (about 150 words) the following:
- Start with a one/two sentence summary, providing the aim and rationale for the study.
- Describe participants and setting: who, when, where, how many, and what groups?
- Describe the method: what design, what experimental treatment, what questionnaires, surveys, or tests were used.
- Describe the major findings, including a mention of the statistics used and the significance levels, or simply one sentence summing up the outcome.
- The final sentence(s) outline the study’s “contribution to knowledge” within the literature. What does it all mean? Mention the implications of your findings if appropriate.
The abstract comes at the beginning of your report but is written at the end (as it summarises information from all the other sections of the report).
Introduction
The purpose of the introduction is to explain where your hypothesis comes from (i.e., it should provide a rationale for your research study).
Ideally, the introduction should have a funnel structure: Start broad and then become more specific. The aims should not appear out of thin air; the preceding review of psychological literature should lead logically into the aims and hypotheses.

- Start with general theory, briefly introducing the topic. Define the important key terms.
- Explain the theoretical framework.
- Summarise and synthesize previous studies – What was the purpose? Who were the participants? What did they do? What did they find? What do these results mean? How do the results relate to the theoretical framework?
- Rationale: How does the current study address a gap in the literature? Perhaps it overcomes a limitation of previous research.
- Aims and hypothesis. Write a paragraph explaining what you plan to investigate and make a clear and concise prediction regarding the results you expect to find.
There should be a logical progression of ideas that aids the flow of the report. This means the studies outlined should lead logically to your aims and hypotheses.
Do be concise and selective, and avoid the temptation to include anything in case it is relevant (i.e., don’t write a shopping list of studies).
USE THE FOLLOWING SUBHEADINGS:
Participants
- How many participants were recruited?
- Say how you obtained your sample (e.g., opportunity sample).
- Give relevant demographic details (e.g., gender, ethnicity, age range, mean age, and standard deviation).
- State the experimental design .
- What were the independent and dependent variables ? Make sure the independent variable is labeled and name the different conditions/levels.
- For example, if gender is the independent variable label, then male and female are the levels/conditions/groups.
- How were the IV and DV operationalized?
- Identify any controls used, e.g., counterbalancing and control of extraneous variables.
- List all the materials and measures (e.g., what was the title of the questionnaire? Was it adapted from a study?).
- You do not need to include wholesale replication of materials – instead, include a ‘sensible’ (illustrate) level of detail. For example, give examples of questionnaire items.
- Include the reliability (e.g., alpha values) for the measure(s).
- Describe the precise procedure you followed when conducting your research, i.e., exactly what you did.
- Describe in sufficient detail to allow for replication of findings.
- Be concise in your description and omit extraneous/trivial details, e.g., you don’t need to include details regarding instructions, debrief, record sheets, etc.
- Assume the reader has no knowledge of what you did and ensure that he/she can replicate (i.e., copy) your study exactly by what you write in this section.
- Write in the past tense.
- Don’t justify or explain in the Method (e.g., why you chose a particular sampling method); just report what you did.
- Only give enough detail for someone to replicate the experiment – be concise in your writing.
- The results section of a paper usually presents descriptive statistics followed by inferential statistics.
- Report the means, standard deviations, and 95% confidence intervals (CIs) for each IV level. If you have four to 20 numbers to present, a well-presented table is best, APA style.
- Name the statistical test being used.
- Report appropriate statistics (e.g., t-scores, p values ).
- Report the magnitude (e.g., are the results significant or not?) as well as the direction of the results (e.g., which group performed better?).
- It is optional to report the effect size (this does not appear on the SPSS output).
- Avoid interpreting the results (save this for the discussion).
- Make sure the results are presented clearly and concisely. A table can be used to display descriptive statistics if this makes the data easier to understand.
- DO NOT include any raw data.
- Follow APA style.
Use APA Style
- Numbers reported to 2 d.p. (incl. 0 before the decimal if 1.00, e.g., “0.51”). The exceptions to this rule: Numbers which can never exceed 1.0 (e.g., p -values, r-values): report to 3 d.p. and do not include 0 before the decimal place, e.g., “.001”.
- Percentages and degrees of freedom: report as whole numbers.
- Statistical symbols that are not Greek letters should be italicized (e.g., M , SD , t , X 2 , F , p , d ).
- Include spaces on either side of the equals sign.
- When reporting 95%, CIs (confidence intervals), upper and lower limits are given inside square brackets, e.g., “95% CI [73.37, 102.23]”
- Outline your findings in plain English (avoid statistical jargon) and relate your results to your hypothesis, e.g., is it supported or rejected?
- Compare your results to background materials from the introduction section. Are your results similar or different? Discuss why/why not.
- How confident can we be in the results? Acknowledge limitations, but only if they can explain the result obtained. If the study has found a reliable effect, be very careful suggesting limitations as you are doubting your results. Unless you can think of any c onfounding variable that can explain the results instead of the IV, it would be advisable to leave the section out.
- Suggest constructive ways to improve your study if appropriate.
- What are the implications of your findings? Say what your findings mean for how people behave in the real world.
- Suggest an idea for further research triggered by your study, something in the same area but not simply an improved version of yours. Perhaps you could base this on a limitation of your study.
- Concluding paragraph – Finish with a statement of your findings and the key points of the discussion (e.g., interpretation and implications) in no more than 3 or 4 sentences.
Reference Page
The reference section lists all the sources cited in the essay (alphabetically). It is not a bibliography (a list of the books you used).
In simple terms, every time you refer to a psychologist’s name (and date), you need to reference the original source of information.
If you have been using textbooks this is easy as the references are usually at the back of the book and you can just copy them down. If you have been using websites then you may have a problem as they might not provide a reference section for you to copy.
References need to be set out APA style :
Author, A. A. (year). Title of work . Location: Publisher.
Journal Articles
Author, A. A., Author, B. B., & Author, C. C. (year). Article title. Journal Title, volume number (issue number), page numbers
A simple way to write your reference section is to use Google scholar . Just type the name and date of the psychologist in the search box and click on the “cite” link.

Next, copy and paste the APA reference into the reference section of your essay.

Once again, remember that references need to be in alphabetical order according to surname.
Psychology Lab Report Example
Quantitative paper template.
Quantitative professional paper template: Adapted from “Fake News, Fast and Slow: Deliberation Reduces Belief in False (but Not True) News Headlines,” by B. Bago, D. G. Rand, and G. Pennycook, 2020, Journal of Experimental Psychology: General , 149 (8), pp. 1608–1613 ( https://doi.org/10.1037/xge0000729 ). Copyright 2020 by the American Psychological Association.
Qualitative paper template
Qualitative professional paper template: Adapted from “‘My Smartphone Is an Extension of Myself’: A Holistic Qualitative Exploration of the Impact of Using a Smartphone,” by L. J. Harkin and D. Kuss, 2020, Psychology of Popular Media , 10 (1), pp. 28–38 ( https://doi.org/10.1037/ppm0000278 ). Copyright 2020 by the American Psychological Association.
Related Articles

Student Resources
How To Cite A YouTube Video In APA Style – With Examples

How to Write an Abstract APA Format

APA References Page Formatting and Example
 Format, Example, & Templates 13")
APA Title Page (Cover Page) Format, Example, & Templates

How do I Cite a Source with Multiple Authors in APA Style?

How to Write a Psychology Essay
- Peterborough

Writing Lab Reports: Methods
Keys to the methods section.
Purpose : How did you conduct this study? Relative size : 10-15% of total Scope : Narrow: the middle of the hourglass Verb Tense : Always use the past tense when summarizing the methods of the experiment.
The methods section sets out important details.
The purpose of this section is to provide sufficient detail of your methodology so that a reader could repeat your study and reproduce your results. Though the methods section is the most straightforward part of the lab report, you may find it difficult to balance enough information with too much extraneous detail. To test yourself, ask, “Would someone need to know this detail to reproduce this study?”
Avoid writing your methods as a step-by-step procedure; rather, present a concise summary of what you did. Consider the following examples:
Example 1: “First, each group chose a turtle. A member of each group then measured the carapace length, while another recorded the measurement in the lab book. A different group member then recorded the turtle’s weight.”
Example 2: “Students determined carapace length (cm) and weight (g) for all individuals.”
The first example provides unnecessary information (the reader need not know that each turtle was measured by a different group, nor which group member took the measurements) and is tedious to read. The second is clear and concise, and it also provides the units of measurements. Note that it is not necessary to mention that data were recorded – we assume that if you took the trouble to take a measurement, you also wrote it down.
The methods section should contain information specific to your study only. This means that you generally should not refer to other research and, therefore, should not include citations. Exceptions arise when using another author’s method, such as when following the procedure from your lab manual, or when using maps or diagrams from other sources.
Methods Section Details
Study area : Describe your study area. Geographic location, size, boundaries, topography, and habitat type (forest or meadow composition, type of water bodies, for example) may be relevant.
Organism : If studying a particular organism, provide details of gender, age, and other relevant information to your study.
Materials : Within the prose of your procedure text, integrate materials that you used. Include model numbers of specialized lab equipment, concentrations of chemical solutions, and other such details.
Procedure : What you did – write in paragraph format (no point form or numbered steps). Include an explanation of your experimental design, sample size, replicates, measurement techniques, etc.
Data Analysis : What statistical tests you used (including tests of normality), significance level set (α=?), and any data manipulation required. Include specific calculations, if appropriate.
Figures : Include diagrams of study area, equipment, or procedures, where appropriate. Number and title appropriately and refer to the figure within the text.
A good methods section should...
- Provide enough detail to allow an accurate reproduction of the study
- Be written in a logically flowing paragraph format
- Provide details on the study site, organism, materials, procedure, and statistical analysis
- Should reference the lab manual, if appropriate
A good methods section should NOT...
- Be a recipe-book-style instruction guide
- Provide a list of materials
- Use bullet points
- Cite other studies for comparison
Back to Writing Lab Reports
Next to Writing Results
How to Write a Lab Report
Lab Reports Describe Your Experiment
- Chemical Laws
- Periodic Table
- Projects & Experiments
- Scientific Method
- Biochemistry
- Physical Chemistry
- Medical Chemistry
- Chemistry In Everyday Life
- Famous Chemists
- Activities for Kids
- Abbreviations & Acronyms
- Weather & Climate
- Ph.D., Biomedical Sciences, University of Tennessee at Knoxville
- B.A., Physics and Mathematics, Hastings College
Lab reports are an essential part of all laboratory courses and usually a significant part of your grade. If your instructor gives you an outline for how to write a lab report, use that. Some instructors require a lab report to be included in a lab notebook , while others will request a separate report. Here's a format for a lab report you can use if you aren't sure what to write or need an explanation of what to include in the different parts of the report.
A lab report is how you explain what you did in your experiment, what you learned, and what the results meant.
Lab Report Essentials
Not all lab reports have title pages, but if your instructor wants one, it would be a single page that states:
- The title of the experiment.
- Your name and the names of any lab partners.
- Your instructor's name.
- The date the lab was performed or the date the report was submitted.
The title says what you did. It should be brief (aim for ten words or less) and describe the main point of the experiment or investigation. An example of a title would be: "Effects of Ultraviolet Light on Borax Crystal Growth Rate". If you can, begin your title using a keyword rather than an article like "The" or "A".
Introduction or Purpose
Usually, the introduction is one paragraph that explains the objectives or purpose of the lab. In one sentence, state the hypothesis. Sometimes an introduction may contain background information, briefly summarize how the experiment was performed, state the findings of the experiment, and list the conclusions of the investigation. Even if you don't write a whole introduction, you need to state the purpose of the experiment, or why you did it. This would be where you state your hypothesis .
List everything needed to complete your experiment.
Describe the steps you completed during your investigation. This is your procedure. Be sufficiently detailed that anyone could read this section and duplicate your experiment. Write it as if you were giving direction for someone else to do the lab. It may be helpful to provide a figure to diagram your experimental setup.
Numerical data obtained from your procedure usually presented as a table. Data encompasses what you recorded when you conducted the experiment. It's just the facts, not any interpretation of what they mean.
Describe in words what the data means. Sometimes the Results section is combined with the Discussion.
Discussion or Analysis
The Data section contains numbers; the Analysis section contains any calculations you made based on those numbers. This is where you interpret the data and determine whether or not a hypothesis was accepted. This is also where you would discuss any mistakes you might have made while conducting the investigation. You may wish to describe ways the study might have been improved.
Conclusions
Most of the time the conclusion is a single paragraph that sums up what happened in the experiment, whether your hypothesis was accepted or rejected, and what this means.
Figures and Graphs
Graphs and figures must both be labeled with a descriptive title. Label the axes on a graph, being sure to include units of measurement. The independent variable is on the X-axis, the dependent variable (the one you are measuring) is on the Y-axis. Be sure to refer to figures and graphs in the text of your report: the first figure is Figure 1, the second figure is Figure 2, etc.
If your research was based on someone else's work or if you cited facts that require documentation, then you should list these references.
- How to Format a Biology Lab Report
- Science Lab Report Template - Fill in the Blanks
- How to Write a Science Fair Project Report
- How to Write an Abstract for a Scientific Paper
- Six Steps of the Scientific Method
- How To Design a Science Fair Experiment
- Understanding Simple vs Controlled Experiments
- Make a Science Fair Poster or Display
- What Is an Experiment? Definition and Design
- How to Organize Your Science Fair Poster
- What Are the Elements of a Good Hypothesis?
- Scientific Method Lesson Plan
- How to Write a Film Review
- The 10 Most Important Lab Safety Rules
- 6 Steps to Writing the Perfect Personal Essay
Have a language expert improve your writing
Run a free plagiarism check in 10 minutes, automatically generate references for free.
- Knowledge Base
- Methodology
- A Quick Guide to Experimental Design | 5 Steps & Examples
A Quick Guide to Experimental Design | 5 Steps & Examples
Published on 11 April 2022 by Rebecca Bevans . Revised on 5 December 2022.
Experiments are used to study causal relationships . You manipulate one or more independent variables and measure their effect on one or more dependent variables.
Experimental design means creating a set of procedures to systematically test a hypothesis . A good experimental design requires a strong understanding of the system you are studying.
There are five key steps in designing an experiment:
- Consider your variables and how they are related
- Write a specific, testable hypothesis
- Design experimental treatments to manipulate your independent variable
- Assign subjects to groups, either between-subjects or within-subjects
- Plan how you will measure your dependent variable
For valid conclusions, you also need to select a representative sample and control any extraneous variables that might influence your results. If if random assignment of participants to control and treatment groups is impossible, unethical, or highly difficult, consider an observational study instead.
Table of contents
Step 1: define your variables, step 2: write your hypothesis, step 3: design your experimental treatments, step 4: assign your subjects to treatment groups, step 5: measure your dependent variable, frequently asked questions about experimental design.
You should begin with a specific research question . We will work with two research question examples, one from health sciences and one from ecology:
To translate your research question into an experimental hypothesis, you need to define the main variables and make predictions about how they are related.
Start by simply listing the independent and dependent variables .
Then you need to think about possible extraneous and confounding variables and consider how you might control them in your experiment.
Finally, you can put these variables together into a diagram. Use arrows to show the possible relationships between variables and include signs to show the expected direction of the relationships.

Here we predict that increasing temperature will increase soil respiration and decrease soil moisture, while decreasing soil moisture will lead to decreased soil respiration.
Prevent plagiarism, run a free check.
Now that you have a strong conceptual understanding of the system you are studying, you should be able to write a specific, testable hypothesis that addresses your research question.
The next steps will describe how to design a controlled experiment . In a controlled experiment, you must be able to:
- Systematically and precisely manipulate the independent variable(s).
- Precisely measure the dependent variable(s).
- Control any potential confounding variables.
If your study system doesn’t match these criteria, there are other types of research you can use to answer your research question.
How you manipulate the independent variable can affect the experiment’s external validity – that is, the extent to which the results can be generalised and applied to the broader world.
First, you may need to decide how widely to vary your independent variable.
- just slightly above the natural range for your study region.
- over a wider range of temperatures to mimic future warming.
- over an extreme range that is beyond any possible natural variation.
Second, you may need to choose how finely to vary your independent variable. Sometimes this choice is made for you by your experimental system, but often you will need to decide, and this will affect how much you can infer from your results.
- a categorical variable : either as binary (yes/no) or as levels of a factor (no phone use, low phone use, high phone use).
- a continuous variable (minutes of phone use measured every night).
How you apply your experimental treatments to your test subjects is crucial for obtaining valid and reliable results.
First, you need to consider the study size : how many individuals will be included in the experiment? In general, the more subjects you include, the greater your experiment’s statistical power , which determines how much confidence you can have in your results.
Then you need to randomly assign your subjects to treatment groups . Each group receives a different level of the treatment (e.g. no phone use, low phone use, high phone use).
You should also include a control group , which receives no treatment. The control group tells us what would have happened to your test subjects without any experimental intervention.
When assigning your subjects to groups, there are two main choices you need to make:
- A completely randomised design vs a randomised block design .
- A between-subjects design vs a within-subjects design .
Randomisation
An experiment can be completely randomised or randomised within blocks (aka strata):
- In a completely randomised design , every subject is assigned to a treatment group at random.
- In a randomised block design (aka stratified random design), subjects are first grouped according to a characteristic they share, and then randomly assigned to treatments within those groups.
Sometimes randomisation isn’t practical or ethical , so researchers create partially-random or even non-random designs. An experimental design where treatments aren’t randomly assigned is called a quasi-experimental design .
Between-subjects vs within-subjects
In a between-subjects design (also known as an independent measures design or classic ANOVA design), individuals receive only one of the possible levels of an experimental treatment.
In medical or social research, you might also use matched pairs within your between-subjects design to make sure that each treatment group contains the same variety of test subjects in the same proportions.
In a within-subjects design (also known as a repeated measures design), every individual receives each of the experimental treatments consecutively, and their responses to each treatment are measured.
Within-subjects or repeated measures can also refer to an experimental design where an effect emerges over time, and individual responses are measured over time in order to measure this effect as it emerges.
Counterbalancing (randomising or reversing the order of treatments among subjects) is often used in within-subjects designs to ensure that the order of treatment application doesn’t influence the results of the experiment.
Finally, you need to decide how you’ll collect data on your dependent variable outcomes. You should aim for reliable and valid measurements that minimise bias or error.
Some variables, like temperature, can be objectively measured with scientific instruments. Others may need to be operationalised to turn them into measurable observations.
- Ask participants to record what time they go to sleep and get up each day.
- Ask participants to wear a sleep tracker.
How precisely you measure your dependent variable also affects the kinds of statistical analysis you can use on your data.
Experiments are always context-dependent, and a good experimental design will take into account all of the unique considerations of your study system to produce information that is both valid and relevant to your research question.
Experimental designs are a set of procedures that you plan in order to examine the relationship between variables that interest you.
To design a successful experiment, first identify:
- A testable hypothesis
- One or more independent variables that you will manipulate
- One or more dependent variables that you will measure
When designing the experiment, first decide:
- How your variable(s) will be manipulated
- How you will control for any potential confounding or lurking variables
- How many subjects you will include
- How you will assign treatments to your subjects
The key difference between observational studies and experiments is that, done correctly, an observational study will never influence the responses or behaviours of participants. Experimental designs will have a treatment condition applied to at least a portion of participants.
A confounding variable , also called a confounder or confounding factor, is a third variable in a study examining a potential cause-and-effect relationship.
A confounding variable is related to both the supposed cause and the supposed effect of the study. It can be difficult to separate the true effect of the independent variable from the effect of the confounding variable.
In your research design , it’s important to identify potential confounding variables and plan how you will reduce their impact.
In a between-subjects design , every participant experiences only one condition, and researchers assess group differences between participants in various conditions.
In a within-subjects design , each participant experiences all conditions, and researchers test the same participants repeatedly for differences between conditions.
The word ‘between’ means that you’re comparing different conditions between groups, while the word ‘within’ means you’re comparing different conditions within the same group.
Cite this Scribbr article
If you want to cite this source, you can copy and paste the citation or click the ‘Cite this Scribbr article’ button to automatically add the citation to our free Reference Generator.
Bevans, R. (2022, December 05). A Quick Guide to Experimental Design | 5 Steps & Examples. Scribbr. Retrieved 14 May 2024, from https://www.scribbr.co.uk/research-methods/guide-to-experimental-design/
Is this article helpful?

Rebecca Bevans

Scientific Reports
What this handout is about.
This handout provides a general guide to writing reports about scientific research you’ve performed. In addition to describing the conventional rules about the format and content of a lab report, we’ll also attempt to convey why these rules exist, so you’ll get a clearer, more dependable idea of how to approach this writing situation. Readers of this handout may also find our handout on writing in the sciences useful.
Background and pre-writing
Why do we write research reports.
You did an experiment or study for your science class, and now you have to write it up for your teacher to review. You feel that you understood the background sufficiently, designed and completed the study effectively, obtained useful data, and can use those data to draw conclusions about a scientific process or principle. But how exactly do you write all that? What is your teacher expecting to see?
To take some of the guesswork out of answering these questions, try to think beyond the classroom setting. In fact, you and your teacher are both part of a scientific community, and the people who participate in this community tend to share the same values. As long as you understand and respect these values, your writing will likely meet the expectations of your audience—including your teacher.
So why are you writing this research report? The practical answer is “Because the teacher assigned it,” but that’s classroom thinking. Generally speaking, people investigating some scientific hypothesis have a responsibility to the rest of the scientific world to report their findings, particularly if these findings add to or contradict previous ideas. The people reading such reports have two primary goals:
- They want to gather the information presented.
- They want to know that the findings are legitimate.
Your job as a writer, then, is to fulfill these two goals.
How do I do that?
Good question. Here is the basic format scientists have designed for research reports:
- Introduction
Methods and Materials
This format, sometimes called “IMRAD,” may take slightly different shapes depending on the discipline or audience; some ask you to include an abstract or separate section for the hypothesis, or call the Discussion section “Conclusions,” or change the order of the sections (some professional and academic journals require the Methods section to appear last). Overall, however, the IMRAD format was devised to represent a textual version of the scientific method.
The scientific method, you’ll probably recall, involves developing a hypothesis, testing it, and deciding whether your findings support the hypothesis. In essence, the format for a research report in the sciences mirrors the scientific method but fleshes out the process a little. Below, you’ll find a table that shows how each written section fits into the scientific method and what additional information it offers the reader.
Thinking of your research report as based on the scientific method, but elaborated in the ways described above, may help you to meet your audience’s expectations successfully. We’re going to proceed by explicitly connecting each section of the lab report to the scientific method, then explaining why and how you need to elaborate that section.
Although this handout takes each section in the order in which it should be presented in the final report, you may for practical reasons decide to compose sections in another order. For example, many writers find that composing their Methods and Results before the other sections helps to clarify their idea of the experiment or study as a whole. You might consider using each assignment to practice different approaches to drafting the report, to find the order that works best for you.
What should I do before drafting the lab report?
The best way to prepare to write the lab report is to make sure that you fully understand everything you need to about the experiment. Obviously, if you don’t quite know what went on during the lab, you’re going to find it difficult to explain the lab satisfactorily to someone else. To make sure you know enough to write the report, complete the following steps:
- What are we going to do in this lab? (That is, what’s the procedure?)
- Why are we going to do it that way?
- What are we hoping to learn from this experiment?
- Why would we benefit from this knowledge?
- Consult your lab supervisor as you perform the lab. If you don’t know how to answer one of the questions above, for example, your lab supervisor will probably be able to explain it to you (or, at least, help you figure it out).
- Plan the steps of the experiment carefully with your lab partners. The less you rush, the more likely it is that you’ll perform the experiment correctly and record your findings accurately. Also, take some time to think about the best way to organize the data before you have to start putting numbers down. If you can design a table to account for the data, that will tend to work much better than jotting results down hurriedly on a scrap piece of paper.
- Record the data carefully so you get them right. You won’t be able to trust your conclusions if you have the wrong data, and your readers will know you messed up if the other three people in your group have “97 degrees” and you have “87.”
- Consult with your lab partners about everything you do. Lab groups often make one of two mistakes: two people do all the work while two have a nice chat, or everybody works together until the group finishes gathering the raw data, then scrams outta there. Collaborate with your partners, even when the experiment is “over.” What trends did you observe? Was the hypothesis supported? Did you all get the same results? What kind of figure should you use to represent your findings? The whole group can work together to answer these questions.
- Consider your audience. You may believe that audience is a non-issue: it’s your lab TA, right? Well, yes—but again, think beyond the classroom. If you write with only your lab instructor in mind, you may omit material that is crucial to a complete understanding of your experiment, because you assume the instructor knows all that stuff already. As a result, you may receive a lower grade, since your TA won’t be sure that you understand all the principles at work. Try to write towards a student in the same course but a different lab section. That student will have a fair degree of scientific expertise but won’t know much about your experiment particularly. Alternatively, you could envision yourself five years from now, after the reading and lectures for this course have faded a bit. What would you remember, and what would you need explained more clearly (as a refresher)?
Once you’ve completed these steps as you perform the experiment, you’ll be in a good position to draft an effective lab report.
Introductions
How do i write a strong introduction.
For the purposes of this handout, we’ll consider the Introduction to contain four basic elements: the purpose, the scientific literature relevant to the subject, the hypothesis, and the reasons you believed your hypothesis viable. Let’s start by going through each element of the Introduction to clarify what it covers and why it’s important. Then we can formulate a logical organizational strategy for the section.
The inclusion of the purpose (sometimes called the objective) of the experiment often confuses writers. The biggest misconception is that the purpose is the same as the hypothesis. Not quite. We’ll get to hypotheses in a minute, but basically they provide some indication of what you expect the experiment to show. The purpose is broader, and deals more with what you expect to gain through the experiment. In a professional setting, the hypothesis might have something to do with how cells react to a certain kind of genetic manipulation, but the purpose of the experiment is to learn more about potential cancer treatments. Undergraduate reports don’t often have this wide-ranging a goal, but you should still try to maintain the distinction between your hypothesis and your purpose. In a solubility experiment, for example, your hypothesis might talk about the relationship between temperature and the rate of solubility, but the purpose is probably to learn more about some specific scientific principle underlying the process of solubility.
For starters, most people say that you should write out your working hypothesis before you perform the experiment or study. Many beginning science students neglect to do so and find themselves struggling to remember precisely which variables were involved in the process or in what way the researchers felt that they were related. Write your hypothesis down as you develop it—you’ll be glad you did.
As for the form a hypothesis should take, it’s best not to be too fancy or complicated; an inventive style isn’t nearly so important as clarity here. There’s nothing wrong with beginning your hypothesis with the phrase, “It was hypothesized that . . .” Be as specific as you can about the relationship between the different objects of your study. In other words, explain that when term A changes, term B changes in this particular way. Readers of scientific writing are rarely content with the idea that a relationship between two terms exists—they want to know what that relationship entails.
Not a hypothesis:
“It was hypothesized that there is a significant relationship between the temperature of a solvent and the rate at which a solute dissolves.”
Hypothesis:
“It was hypothesized that as the temperature of a solvent increases, the rate at which a solute will dissolve in that solvent increases.”
Put more technically, most hypotheses contain both an independent and a dependent variable. The independent variable is what you manipulate to test the reaction; the dependent variable is what changes as a result of your manipulation. In the example above, the independent variable is the temperature of the solvent, and the dependent variable is the rate of solubility. Be sure that your hypothesis includes both variables.
Justify your hypothesis
You need to do more than tell your readers what your hypothesis is; you also need to assure them that this hypothesis was reasonable, given the circumstances. In other words, use the Introduction to explain that you didn’t just pluck your hypothesis out of thin air. (If you did pluck it out of thin air, your problems with your report will probably extend beyond using the appropriate format.) If you posit that a particular relationship exists between the independent and the dependent variable, what led you to believe your “guess” might be supported by evidence?
Scientists often refer to this type of justification as “motivating” the hypothesis, in the sense that something propelled them to make that prediction. Often, motivation includes what we already know—or rather, what scientists generally accept as true (see “Background/previous research” below). But you can also motivate your hypothesis by relying on logic or on your own observations. If you’re trying to decide which solutes will dissolve more rapidly in a solvent at increased temperatures, you might remember that some solids are meant to dissolve in hot water (e.g., bouillon cubes) and some are used for a function precisely because they withstand higher temperatures (they make saucepans out of something). Or you can think about whether you’ve noticed sugar dissolving more rapidly in your glass of iced tea or in your cup of coffee. Even such basic, outside-the-lab observations can help you justify your hypothesis as reasonable.
Background/previous research
This part of the Introduction demonstrates to the reader your awareness of how you’re building on other scientists’ work. If you think of the scientific community as engaging in a series of conversations about various topics, then you’ll recognize that the relevant background material will alert the reader to which conversation you want to enter.
Generally speaking, authors writing journal articles use the background for slightly different purposes than do students completing assignments. Because readers of academic journals tend to be professionals in the field, authors explain the background in order to permit readers to evaluate the study’s pertinence for their own work. You, on the other hand, write toward a much narrower audience—your peers in the course or your lab instructor—and so you must demonstrate that you understand the context for the (presumably assigned) experiment or study you’ve completed. For example, if your professor has been talking about polarity during lectures, and you’re doing a solubility experiment, you might try to connect the polarity of a solid to its relative solubility in certain solvents. In any event, both professional researchers and undergraduates need to connect the background material overtly to their own work.
Organization of this section
Most of the time, writers begin by stating the purpose or objectives of their own work, which establishes for the reader’s benefit the “nature and scope of the problem investigated” (Day 1994). Once you have expressed your purpose, you should then find it easier to move from the general purpose, to relevant material on the subject, to your hypothesis. In abbreviated form, an Introduction section might look like this:
“The purpose of the experiment was to test conventional ideas about solubility in the laboratory [purpose] . . . According to Whitecoat and Labrat (1999), at higher temperatures the molecules of solvents move more quickly . . . We know from the class lecture that molecules moving at higher rates of speed collide with one another more often and thus break down more easily [background material/motivation] . . . Thus, it was hypothesized that as the temperature of a solvent increases, the rate at which a solute will dissolve in that solvent increases [hypothesis].”
Again—these are guidelines, not commandments. Some writers and readers prefer different structures for the Introduction. The one above merely illustrates a common approach to organizing material.
How do I write a strong Materials and Methods section?
As with any piece of writing, your Methods section will succeed only if it fulfills its readers’ expectations, so you need to be clear in your own mind about the purpose of this section. Let’s review the purpose as we described it above: in this section, you want to describe in detail how you tested the hypothesis you developed and also to clarify the rationale for your procedure. In science, it’s not sufficient merely to design and carry out an experiment. Ultimately, others must be able to verify your findings, so your experiment must be reproducible, to the extent that other researchers can follow the same procedure and obtain the same (or similar) results.
Here’s a real-world example of the importance of reproducibility. In 1989, physicists Stanley Pons and Martin Fleischman announced that they had discovered “cold fusion,” a way of producing excess heat and power without the nuclear radiation that accompanies “hot fusion.” Such a discovery could have great ramifications for the industrial production of energy, so these findings created a great deal of interest. When other scientists tried to duplicate the experiment, however, they didn’t achieve the same results, and as a result many wrote off the conclusions as unjustified (or worse, a hoax). To this day, the viability of cold fusion is debated within the scientific community, even though an increasing number of researchers believe it possible. So when you write your Methods section, keep in mind that you need to describe your experiment well enough to allow others to replicate it exactly.
With these goals in mind, let’s consider how to write an effective Methods section in terms of content, structure, and style.
Sometimes the hardest thing about writing this section isn’t what you should talk about, but what you shouldn’t talk about. Writers often want to include the results of their experiment, because they measured and recorded the results during the course of the experiment. But such data should be reserved for the Results section. In the Methods section, you can write that you recorded the results, or how you recorded the results (e.g., in a table), but you shouldn’t write what the results were—not yet. Here, you’re merely stating exactly how you went about testing your hypothesis. As you draft your Methods section, ask yourself the following questions:
- How much detail? Be precise in providing details, but stay relevant. Ask yourself, “Would it make any difference if this piece were a different size or made from a different material?” If not, you probably don’t need to get too specific. If so, you should give as many details as necessary to prevent this experiment from going awry if someone else tries to carry it out. Probably the most crucial detail is measurement; you should always quantify anything you can, such as time elapsed, temperature, mass, volume, etc.
- Rationale: Be sure that as you’re relating your actions during the experiment, you explain your rationale for the protocol you developed. If you capped a test tube immediately after adding a solute to a solvent, why did you do that? (That’s really two questions: why did you cap it, and why did you cap it immediately?) In a professional setting, writers provide their rationale as a way to explain their thinking to potential critics. On one hand, of course, that’s your motivation for talking about protocol, too. On the other hand, since in practical terms you’re also writing to your teacher (who’s seeking to evaluate how well you comprehend the principles of the experiment), explaining the rationale indicates that you understand the reasons for conducting the experiment in that way, and that you’re not just following orders. Critical thinking is crucial—robots don’t make good scientists.
- Control: Most experiments will include a control, which is a means of comparing experimental results. (Sometimes you’ll need to have more than one control, depending on the number of hypotheses you want to test.) The control is exactly the same as the other items you’re testing, except that you don’t manipulate the independent variable-the condition you’re altering to check the effect on the dependent variable. For example, if you’re testing solubility rates at increased temperatures, your control would be a solution that you didn’t heat at all; that way, you’ll see how quickly the solute dissolves “naturally” (i.e., without manipulation), and you’ll have a point of reference against which to compare the solutions you did heat.
Describe the control in the Methods section. Two things are especially important in writing about the control: identify the control as a control, and explain what you’re controlling for. Here is an example:
“As a control for the temperature change, we placed the same amount of solute in the same amount of solvent, and let the solution stand for five minutes without heating it.”
Structure and style
Organization is especially important in the Methods section of a lab report because readers must understand your experimental procedure completely. Many writers are surprised by the difficulty of conveying what they did during the experiment, since after all they’re only reporting an event, but it’s often tricky to present this information in a coherent way. There’s a fairly standard structure you can use to guide you, and following the conventions for style can help clarify your points.
- Subsections: Occasionally, researchers use subsections to report their procedure when the following circumstances apply: 1) if they’ve used a great many materials; 2) if the procedure is unusually complicated; 3) if they’ve developed a procedure that won’t be familiar to many of their readers. Because these conditions rarely apply to the experiments you’ll perform in class, most undergraduate lab reports won’t require you to use subsections. In fact, many guides to writing lab reports suggest that you try to limit your Methods section to a single paragraph.
- Narrative structure: Think of this section as telling a story about a group of people and the experiment they performed. Describe what you did in the order in which you did it. You may have heard the old joke centered on the line, “Disconnect the red wire, but only after disconnecting the green wire,” where the person reading the directions blows everything to kingdom come because the directions weren’t in order. We’re used to reading about events chronologically, and so your readers will generally understand what you did if you present that information in the same way. Also, since the Methods section does generally appear as a narrative (story), you want to avoid the “recipe” approach: “First, take a clean, dry 100 ml test tube from the rack. Next, add 50 ml of distilled water.” You should be reporting what did happen, not telling the reader how to perform the experiment: “50 ml of distilled water was poured into a clean, dry 100 ml test tube.” Hint: most of the time, the recipe approach comes from copying down the steps of the procedure from your lab manual, so you may want to draft the Methods section initially without consulting your manual. Later, of course, you can go back and fill in any part of the procedure you inadvertently overlooked.
- Past tense: Remember that you’re describing what happened, so you should use past tense to refer to everything you did during the experiment. Writers are often tempted to use the imperative (“Add 5 g of the solid to the solution”) because that’s how their lab manuals are worded; less frequently, they use present tense (“5 g of the solid are added to the solution”). Instead, remember that you’re talking about an event which happened at a particular time in the past, and which has already ended by the time you start writing, so simple past tense will be appropriate in this section (“5 g of the solid were added to the solution” or “We added 5 g of the solid to the solution”).
- Active: We heated the solution to 80°C. (The subject, “we,” performs the action, heating.)
- Passive: The solution was heated to 80°C. (The subject, “solution,” doesn’t do the heating–it is acted upon, not acting.)
Increasingly, especially in the social sciences, using first person and active voice is acceptable in scientific reports. Most readers find that this style of writing conveys information more clearly and concisely. This rhetorical choice thus brings two scientific values into conflict: objectivity versus clarity. Since the scientific community hasn’t reached a consensus about which style it prefers, you may want to ask your lab instructor.
How do I write a strong Results section?
Here’s a paradox for you. The Results section is often both the shortest (yay!) and most important (uh-oh!) part of your report. Your Materials and Methods section shows how you obtained the results, and your Discussion section explores the significance of the results, so clearly the Results section forms the backbone of the lab report. This section provides the most critical information about your experiment: the data that allow you to discuss how your hypothesis was or wasn’t supported. But it doesn’t provide anything else, which explains why this section is generally shorter than the others.
Before you write this section, look at all the data you collected to figure out what relates significantly to your hypothesis. You’ll want to highlight this material in your Results section. Resist the urge to include every bit of data you collected, since perhaps not all are relevant. Also, don’t try to draw conclusions about the results—save them for the Discussion section. In this section, you’re reporting facts. Nothing your readers can dispute should appear in the Results section.
Most Results sections feature three distinct parts: text, tables, and figures. Let’s consider each part one at a time.
This should be a short paragraph, generally just a few lines, that describes the results you obtained from your experiment. In a relatively simple experiment, one that doesn’t produce a lot of data for you to repeat, the text can represent the entire Results section. Don’t feel that you need to include lots of extraneous detail to compensate for a short (but effective) text; your readers appreciate discrimination more than your ability to recite facts. In a more complex experiment, you may want to use tables and/or figures to help guide your readers toward the most important information you gathered. In that event, you’ll need to refer to each table or figure directly, where appropriate:
“Table 1 lists the rates of solubility for each substance”
“Solubility increased as the temperature of the solution increased (see Figure 1).”
If you do use tables or figures, make sure that you don’t present the same material in both the text and the tables/figures, since in essence you’ll just repeat yourself, probably annoying your readers with the redundancy of your statements.
Feel free to describe trends that emerge as you examine the data. Although identifying trends requires some judgment on your part and so may not feel like factual reporting, no one can deny that these trends do exist, and so they properly belong in the Results section. Example:
“Heating the solution increased the rate of solubility of polar solids by 45% but had no effect on the rate of solubility in solutions containing non-polar solids.”
This point isn’t debatable—you’re just pointing out what the data show.
As in the Materials and Methods section, you want to refer to your data in the past tense, because the events you recorded have already occurred and have finished occurring. In the example above, note the use of “increased” and “had,” rather than “increases” and “has.” (You don’t know from your experiment that heating always increases the solubility of polar solids, but it did that time.)
You shouldn’t put information in the table that also appears in the text. You also shouldn’t use a table to present irrelevant data, just to show you did collect these data during the experiment. Tables are good for some purposes and situations, but not others, so whether and how you’ll use tables depends upon what you need them to accomplish.
Tables are useful ways to show variation in data, but not to present a great deal of unchanging measurements. If you’re dealing with a scientific phenomenon that occurs only within a certain range of temperatures, for example, you don’t need to use a table to show that the phenomenon didn’t occur at any of the other temperatures. How useful is this table?

As you can probably see, no solubility was observed until the trial temperature reached 50°C, a fact that the text part of the Results section could easily convey. The table could then be limited to what happened at 50°C and higher, thus better illustrating the differences in solubility rates when solubility did occur.
As a rule, try not to use a table to describe any experimental event you can cover in one sentence of text. Here’s an example of an unnecessary table from How to Write and Publish a Scientific Paper , by Robert A. Day:

As Day notes, all the information in this table can be summarized in one sentence: “S. griseus, S. coelicolor, S. everycolor, and S. rainbowenski grew under aerobic conditions, whereas S. nocolor and S. greenicus required anaerobic conditions.” Most readers won’t find the table clearer than that one sentence.
When you do have reason to tabulate material, pay attention to the clarity and readability of the format you use. Here are a few tips:
- Number your table. Then, when you refer to the table in the text, use that number to tell your readers which table they can review to clarify the material.
- Give your table a title. This title should be descriptive enough to communicate the contents of the table, but not so long that it becomes difficult to follow. The titles in the sample tables above are acceptable.
- Arrange your table so that readers read vertically, not horizontally. For the most part, this rule means that you should construct your table so that like elements read down, not across. Think about what you want your readers to compare, and put that information in the column (up and down) rather than in the row (across). Usually, the point of comparison will be the numerical data you collect, so especially make sure you have columns of numbers, not rows.Here’s an example of how drastically this decision affects the readability of your table (from A Short Guide to Writing about Chemistry , by Herbert Beall and John Trimbur). Look at this table, which presents the relevant data in horizontal rows:

It’s a little tough to see the trends that the author presumably wants to present in this table. Compare this table, in which the data appear vertically:

The second table shows how putting like elements in a vertical column makes for easier reading. In this case, the like elements are the measurements of length and height, over five trials–not, as in the first table, the length and height measurements for each trial.
- Make sure to include units of measurement in the tables. Readers might be able to guess that you measured something in millimeters, but don’t make them try.
- Don’t use vertical lines as part of the format for your table. This convention exists because journals prefer not to have to reproduce these lines because the tables then become more expensive to print. Even though it’s fairly unlikely that you’ll be sending your Biology 11 lab report to Science for publication, your readers still have this expectation. Consequently, if you use the table-drawing option in your word-processing software, choose the option that doesn’t rely on a “grid” format (which includes vertical lines).
How do I include figures in my report?
Although tables can be useful ways of showing trends in the results you obtained, figures (i.e., illustrations) can do an even better job of emphasizing such trends. Lab report writers often use graphic representations of the data they collected to provide their readers with a literal picture of how the experiment went.
When should you use a figure?
Remember the circumstances under which you don’t need a table: when you don’t have a great deal of data or when the data you have don’t vary a lot. Under the same conditions, you would probably forgo the figure as well, since the figure would be unlikely to provide your readers with an additional perspective. Scientists really don’t like their time wasted, so they tend not to respond favorably to redundancy.
If you’re trying to decide between using a table and creating a figure to present your material, consider the following a rule of thumb. The strength of a table lies in its ability to supply large amounts of exact data, whereas the strength of a figure is its dramatic illustration of important trends within the experiment. If you feel that your readers won’t get the full impact of the results you obtained just by looking at the numbers, then a figure might be appropriate.
Of course, an undergraduate class may expect you to create a figure for your lab experiment, if only to make sure that you can do so effectively. If this is the case, then don’t worry about whether to use figures or not—concentrate instead on how best to accomplish your task.
Figures can include maps, photographs, pen-and-ink drawings, flow charts, bar graphs, and section graphs (“pie charts”). But the most common figure by far, especially for undergraduates, is the line graph, so we’ll focus on that type in this handout.
At the undergraduate level, you can often draw and label your graphs by hand, provided that the result is clear, legible, and drawn to scale. Computer technology has, however, made creating line graphs a lot easier. Most word-processing software has a number of functions for transferring data into graph form; many scientists have found Microsoft Excel, for example, a helpful tool in graphing results. If you plan on pursuing a career in the sciences, it may be well worth your while to learn to use a similar program.
Computers can’t, however, decide for you how your graph really works; you have to know how to design your graph to meet your readers’ expectations. Here are some of these expectations:
- Keep it as simple as possible. You may be tempted to signal the complexity of the information you gathered by trying to design a graph that accounts for that complexity. But remember the purpose of your graph: to dramatize your results in a manner that’s easy to see and grasp. Try not to make the reader stare at the graph for a half hour to find the important line among the mass of other lines. For maximum effectiveness, limit yourself to three to five lines per graph; if you have more data to demonstrate, use a set of graphs to account for it, rather than trying to cram it all into a single figure.
- Plot the independent variable on the horizontal (x) axis and the dependent variable on the vertical (y) axis. Remember that the independent variable is the condition that you manipulated during the experiment and the dependent variable is the condition that you measured to see if it changed along with the independent variable. Placing the variables along their respective axes is mostly just a convention, but since your readers are accustomed to viewing graphs in this way, you’re better off not challenging the convention in your report.
- Label each axis carefully, and be especially careful to include units of measure. You need to make sure that your readers understand perfectly well what your graph indicates.
- Number and title your graphs. As with tables, the title of the graph should be informative but concise, and you should refer to your graph by number in the text (e.g., “Figure 1 shows the increase in the solubility rate as a function of temperature”).
- Many editors of professional scientific journals prefer that writers distinguish the lines in their graphs by attaching a symbol to them, usually a geometric shape (triangle, square, etc.), and using that symbol throughout the curve of the line. Generally, readers have a hard time distinguishing dotted lines from dot-dash lines from straight lines, so you should consider staying away from this system. Editors don’t usually like different-colored lines within a graph because colors are difficult and expensive to reproduce; colors may, however, be great for your purposes, as long as you’re not planning to submit your paper to Nature. Use your discretion—try to employ whichever technique dramatizes the results most effectively.
- Try to gather data at regular intervals, so the plot points on your graph aren’t too far apart. You can’t be sure of the arc you should draw between the plot points if the points are located at the far corners of the graph; over a fifteen-minute interval, perhaps the change occurred in the first or last thirty seconds of that period (in which case your straight-line connection between the points is misleading).
- If you’re worried that you didn’t collect data at sufficiently regular intervals during your experiment, go ahead and connect the points with a straight line, but you may want to examine this problem as part of your Discussion section.
- Make your graph large enough so that everything is legible and clearly demarcated, but not so large that it either overwhelms the rest of the Results section or provides a far greater range than you need to illustrate your point. If, for example, the seedlings of your plant grew only 15 mm during the trial, you don’t need to construct a graph that accounts for 100 mm of growth. The lines in your graph should more or less fill the space created by the axes; if you see that your data is confined to the lower left portion of the graph, you should probably re-adjust your scale.
- If you create a set of graphs, make them the same size and format, including all the verbal and visual codes (captions, symbols, scale, etc.). You want to be as consistent as possible in your illustrations, so that your readers can easily make the comparisons you’re trying to get them to see.
How do I write a strong Discussion section?
The discussion section is probably the least formalized part of the report, in that you can’t really apply the same structure to every type of experiment. In simple terms, here you tell your readers what to make of the Results you obtained. If you have done the Results part well, your readers should already recognize the trends in the data and have a fairly clear idea of whether your hypothesis was supported. Because the Results can seem so self-explanatory, many students find it difficult to know what material to add in this last section.
Basically, the Discussion contains several parts, in no particular order, but roughly moving from specific (i.e., related to your experiment only) to general (how your findings fit in the larger scientific community). In this section, you will, as a rule, need to:
Explain whether the data support your hypothesis
- Acknowledge any anomalous data or deviations from what you expected
Derive conclusions, based on your findings, about the process you’re studying
- Relate your findings to earlier work in the same area (if you can)
Explore the theoretical and/or practical implications of your findings
Let’s look at some dos and don’ts for each of these objectives.
This statement is usually a good way to begin the Discussion, since you can’t effectively speak about the larger scientific value of your study until you’ve figured out the particulars of this experiment. You might begin this part of the Discussion by explicitly stating the relationships or correlations your data indicate between the independent and dependent variables. Then you can show more clearly why you believe your hypothesis was or was not supported. For example, if you tested solubility at various temperatures, you could start this section by noting that the rates of solubility increased as the temperature increased. If your initial hypothesis surmised that temperature change would not affect solubility, you would then say something like,
“The hypothesis that temperature change would not affect solubility was not supported by the data.”
Note: Students tend to view labs as practical tests of undeniable scientific truths. As a result, you may want to say that the hypothesis was “proved” or “disproved” or that it was “correct” or “incorrect.” These terms, however, reflect a degree of certainty that you as a scientist aren’t supposed to have. Remember, you’re testing a theory with a procedure that lasts only a few hours and relies on only a few trials, which severely compromises your ability to be sure about the “truth” you see. Words like “supported,” “indicated,” and “suggested” are more acceptable ways to evaluate your hypothesis.
Also, recognize that saying whether the data supported your hypothesis or not involves making a claim to be defended. As such, you need to show the readers that this claim is warranted by the evidence. Make sure that you’re very explicit about the relationship between the evidence and the conclusions you draw from it. This process is difficult for many writers because we don’t often justify conclusions in our regular lives. For example, you might nudge your friend at a party and whisper, “That guy’s drunk,” and once your friend lays eyes on the person in question, she might readily agree. In a scientific paper, by contrast, you would need to defend your claim more thoroughly by pointing to data such as slurred words, unsteady gait, and the lampshade-as-hat. In addition to pointing out these details, you would also need to show how (according to previous studies) these signs are consistent with inebriation, especially if they occur in conjunction with one another. To put it another way, tell your readers exactly how you got from point A (was the hypothesis supported?) to point B (yes/no).
Acknowledge any anomalous data, or deviations from what you expected
You need to take these exceptions and divergences into account, so that you qualify your conclusions sufficiently. For obvious reasons, your readers will doubt your authority if you (deliberately or inadvertently) overlook a key piece of data that doesn’t square with your perspective on what occurred. In a more philosophical sense, once you’ve ignored evidence that contradicts your claims, you’ve departed from the scientific method. The urge to “tidy up” the experiment is often strong, but if you give in to it you’re no longer performing good science.
Sometimes after you’ve performed a study or experiment, you realize that some part of the methods you used to test your hypothesis was flawed. In that case, it’s OK to suggest that if you had the chance to conduct your test again, you might change the design in this or that specific way in order to avoid such and such a problem. The key to making this approach work, though, is to be very precise about the weakness in your experiment, why and how you think that weakness might have affected your data, and how you would alter your protocol to eliminate—or limit the effects of—that weakness. Often, inexperienced researchers and writers feel the need to account for “wrong” data (remember, there’s no such animal), and so they speculate wildly about what might have screwed things up. These speculations include such factors as the unusually hot temperature in the room, or the possibility that their lab partners read the meters wrong, or the potentially defective equipment. These explanations are what scientists call “cop-outs,” or “lame”; don’t indicate that the experiment had a weakness unless you’re fairly certain that a) it really occurred and b) you can explain reasonably well how that weakness affected your results.
If, for example, your hypothesis dealt with the changes in solubility at different temperatures, then try to figure out what you can rationally say about the process of solubility more generally. If you’re doing an undergraduate lab, chances are that the lab will connect in some way to the material you’ve been covering either in lecture or in your reading, so you might choose to return to these resources as a way to help you think clearly about the process as a whole.
This part of the Discussion section is another place where you need to make sure that you’re not overreaching. Again, nothing you’ve found in one study would remotely allow you to claim that you now “know” something, or that something isn’t “true,” or that your experiment “confirmed” some principle or other. Hesitate before you go out on a limb—it’s dangerous! Use less absolutely conclusive language, including such words as “suggest,” “indicate,” “correspond,” “possibly,” “challenge,” etc.
Relate your findings to previous work in the field (if possible)
We’ve been talking about how to show that you belong in a particular community (such as biologists or anthropologists) by writing within conventions that they recognize and accept. Another is to try to identify a conversation going on among members of that community, and use your work to contribute to that conversation. In a larger philosophical sense, scientists can’t fully understand the value of their research unless they have some sense of the context that provoked and nourished it. That is, you have to recognize what’s new about your project (potentially, anyway) and how it benefits the wider body of scientific knowledge. On a more pragmatic level, especially for undergraduates, connecting your lab work to previous research will demonstrate to the TA that you see the big picture. You have an opportunity, in the Discussion section, to distinguish yourself from the students in your class who aren’t thinking beyond the barest facts of the study. Capitalize on this opportunity by putting your own work in context.
If you’re just beginning to work in the natural sciences (as a first-year biology or chemistry student, say), most likely the work you’ll be doing has already been performed and re-performed to a satisfactory degree. Hence, you could probably point to a similar experiment or study and compare/contrast your results and conclusions. More advanced work may deal with an issue that is somewhat less “resolved,” and so previous research may take the form of an ongoing debate, and you can use your own work to weigh in on that debate. If, for example, researchers are hotly disputing the value of herbal remedies for the common cold, and the results of your study suggest that Echinacea diminishes the symptoms but not the actual presence of the cold, then you might want to take some time in the Discussion section to recapitulate the specifics of the dispute as it relates to Echinacea as an herbal remedy. (Consider that you have probably already written in the Introduction about this debate as background research.)
This information is often the best way to end your Discussion (and, for all intents and purposes, the report). In argumentative writing generally, you want to use your closing words to convey the main point of your writing. This main point can be primarily theoretical (“Now that you understand this information, you’re in a better position to understand this larger issue”) or primarily practical (“You can use this information to take such and such an action”). In either case, the concluding statements help the reader to comprehend the significance of your project and your decision to write about it.
Since a lab report is argumentative—after all, you’re investigating a claim, and judging the legitimacy of that claim by generating and collecting evidence—it’s often a good idea to end your report with the same technique for establishing your main point. If you want to go the theoretical route, you might talk about the consequences your study has for the field or phenomenon you’re investigating. To return to the examples regarding solubility, you could end by reflecting on what your work on solubility as a function of temperature tells us (potentially) about solubility in general. (Some folks consider this type of exploration “pure” as opposed to “applied” science, although these labels can be problematic.) If you want to go the practical route, you could end by speculating about the medical, institutional, or commercial implications of your findings—in other words, answer the question, “What can this study help people to do?” In either case, you’re going to make your readers’ experience more satisfying, by helping them see why they spent their time learning what you had to teach them.
Works consulted
We consulted these works while writing this handout. This is not a comprehensive list of resources on the handout’s topic, and we encourage you to do your own research to find additional publications. Please do not use this list as a model for the format of your own reference list, as it may not match the citation style you are using. For guidance on formatting citations, please see the UNC Libraries citation tutorial . We revise these tips periodically and welcome feedback.
American Psychological Association. 2010. Publication Manual of the American Psychological Association . 6th ed. Washington, DC: American Psychological Association.
Beall, Herbert, and John Trimbur. 2001. A Short Guide to Writing About Chemistry , 2nd ed. New York: Longman.
Blum, Deborah, and Mary Knudson. 1997. A Field Guide for Science Writers: The Official Guide of the National Association of Science Writers . New York: Oxford University Press.
Booth, Wayne C., Gregory G. Colomb, Joseph M. Williams, Joseph Bizup, and William T. FitzGerald. 2016. The Craft of Research , 4th ed. Chicago: University of Chicago Press.
Briscoe, Mary Helen. 1996. Preparing Scientific Illustrations: A Guide to Better Posters, Presentations, and Publications , 2nd ed. New York: Springer-Verlag.
Council of Science Editors. 2014. Scientific Style and Format: The CSE Manual for Authors, Editors, and Publishers , 8th ed. Chicago & London: University of Chicago Press.
Davis, Martha. 2012. Scientific Papers and Presentations , 3rd ed. London: Academic Press.
Day, Robert A. 1994. How to Write and Publish a Scientific Paper , 4th ed. Phoenix: Oryx Press.
Porush, David. 1995. A Short Guide to Writing About Science . New York: Longman.
Williams, Joseph, and Joseph Bizup. 2017. Style: Lessons in Clarity and Grace , 12th ed. Boston: Pearson.
You may reproduce it for non-commercial use if you use the entire handout and attribute the source: The Writing Center, University of North Carolina at Chapel Hill
Make a Gift
If you're seeing this message, it means we're having trouble loading external resources on our website.
If you're behind a web filter, please make sure that the domains *.kastatic.org and *.kasandbox.org are unblocked.
To log in and use all the features of Khan Academy, please enable JavaScript in your browser.
Biology library
Course: biology library > unit 1, the scientific method.
- Controlled experiments
- The scientific method and experimental design
Introduction
- Make an observation.
- Ask a question.
- Form a hypothesis , or testable explanation.
- Make a prediction based on the hypothesis.
- Test the prediction.
- Iterate: use the results to make new hypotheses or predictions.
Scientific method example: Failure to toast
1. make an observation..
- Observation: the toaster won't toast.
2. Ask a question.
- Question: Why won't my toaster toast?
3. Propose a hypothesis.
- Hypothesis: Maybe the outlet is broken.
4. Make predictions.
- Prediction: If I plug the toaster into a different outlet, then it will toast the bread.
5. Test the predictions.
- Test of prediction: Plug the toaster into a different outlet and try again.
- If the toaster does toast, then the hypothesis is supported—likely correct.
- If the toaster doesn't toast, then the hypothesis is not supported—likely wrong.
Logical possibility
Practical possibility, building a body of evidence, 6. iterate..
- Iteration time!
- If the hypothesis was supported, we might do additional tests to confirm it, or revise it to be more specific. For instance, we might investigate why the outlet is broken.
- If the hypothesis was not supported, we would come up with a new hypothesis. For instance, the next hypothesis might be that there's a broken wire in the toaster.
Want to join the conversation?
- Upvote Button navigates to signup page
- Downvote Button navigates to signup page
- Flag Button navigates to signup page

Purdue Online Writing Lab Purdue OWL® College of Liberal Arts
Writing the Experimental Report: Methods, Results, and Discussion

Welcome to the Purdue OWL
This page is brought to you by the OWL at Purdue University. When printing this page, you must include the entire legal notice.
Copyright ©1995-2018 by The Writing Lab & The OWL at Purdue and Purdue University. All rights reserved. This material may not be published, reproduced, broadcast, rewritten, or redistributed without permission. Use of this site constitutes acceptance of our terms and conditions of fair use.
Method section
Your method section provides a detailed overview of how you conducted your research. Because your study methods form a large part of your credibility as a researcher and writer, it is imperative that you be clear about what you did to gather information from participants in your study.
With your methods section, as with the sections above, you want to walk your readers through your study almost as if they were a participant. What happened first? What happened next?
The method section includes the following sub-sections.
I. Participants: Discuss who was enrolled in your experiment. Include major demographics that have an impact on the results of the experiment (i.e. if race is a factor, you should provide a breakdown by race). The accepted term for describing a person who participates in research studies is a participant not a subject.
II. Apparatus and materials: The apparatus is any equipment used during data collection (such as computers or eye-tracking devices). Materials include scripts, surveys, or software used for data collection (not data analysis). It is sometimes necessary to provide specific examples of materials or prompts, depending on the nature of your study.
III. Procedure: The procedure includes the step-by-step how of your experiment. The procedure should include:
- A description of the experimental design and how participants were assigned conditions.
- Identification of your independent variable(s) (IV), dependent variable(s) (DV), and control variables. Give your variables clear, meaningful names so that your readers are not confused.
- Important instructions to participants.
- A step-by-step listing in chronological order of what participants did during the experiment.
Results section
The results section is where you present the results of your research-both narrated for the readers in plain English and accompanied by statistics.
Note : Depending on the requirements or the projected length of your paper, sometimes the results are combined with the discussion section.
Organizing Results
Continue with your story in the results section. How do your results fit with the overall story you are telling? What results are the most compelling? You want to begin your discussion by reminding your readers once again what your hypotheses were and what your overall story is. Then provide each result as it relates to that story. The most important results should go first.
Preliminary discussion: Sometimes it is necessary to provide a preliminary discussion in your results section about your participant groups. In order to convince your readers that your results are meaningful, you must first demonstrate that the conditions of the study were met. For example, if you randomly assigned subjects into groups, are these two groups comparable? You can't discuss the differences in the two groups until you establish that the two groups can be compared.
Provide information on your data analysis: Be sure to describe the analysis you did. If you are using a non-conventional analysis, you also need to provide justification for why you are doing so.
Presenting Results : Bem (2006) recommends the following pattern for presenting findings:
- Remind readers of the conceptual hypotheses or questions you are asking
- Remind readers of behaviors measured or operations performed
- Provide the answer/result in plain English
- Provide the statistic that supports your plain English answer
- Elaborate or qualify the overall conclusion if necessary
Writers new to psychology and writing with statistics often dump numbers at their readers without providing a clear narration of what those numbers mean. Please see our Writing with Statistics handout for more information on how to write with statistics.
Discussion section
Your discussion section is where you talk about what your results mean and where you wrap up the overall story you are telling. This is where you interpret your findings, evaluate your hypotheses or research questions, discuss unexpected results, and tie your findings to the previous literature (discussed first in your literature review). Your discussion section should move from specific to general.
Here are some tips for writing your discussion section.
- Begin by providing an interpretation of your results: what is it that you have learned from your research?
- Discuss each hypotheses or research question in more depth.
- Do not repeat what you have already said in your results—instead, focus on adding new information and broadening the perspective of your results to you reader.
- Discuss how your results compare to previous findings in the literature. If there are differences, discuss why you think these differences exist and what they could mean.
- Briefly consider your study's limitations, but do not dwell on its flaws.
- Consider also what new questions your study raises, what questions your study was not able to answer, and what avenues future research could take in this area.
Example: Here is how this works.
References section
References should be in standard APA format. Please see our APA Formatting guide for specific instructions.
- Bipolar Disorder
- Therapy Center
- When To See a Therapist
- Types of Therapy
- Best Online Therapy
- Best Couples Therapy
- Best Family Therapy
- Managing Stress
- Sleep and Dreaming
- Understanding Emotions
- Self-Improvement
- Healthy Relationships
- Student Resources
- Personality Types
- Guided Meditations
- Verywell Mind Insights
- 2024 Verywell Mind 25
- Mental Health in the Classroom
- Editorial Process
- Meet Our Review Board
- Crisis Support
How to Write a Methods Section for a Psychology Paper
Tips and Examples of an APA Methods Section
Kendra Cherry, MS, is a psychosocial rehabilitation specialist, psychology educator, and author of the "Everything Psychology Book."
:max_bytes(150000):strip_icc():format(webp)/IMG_9791-89504ab694d54b66bbd72cb84ffb860e.jpg "how to write experiment method")
Emily is a board-certified science editor who has worked with top digital publishing brands like Voices for Biodiversity, Study.com, GoodTherapy, Vox, and Verywell.
:max_bytes(150000):strip_icc():format(webp)/Emily-Swaim-1000-0f3197de18f74329aeffb690a177160c.jpg "how to write experiment method")
Verywell / Brianna Gilmartin
The methods section of an APA format psychology paper provides the methods and procedures used in a research study or experiment . This part of an APA paper is critical because it allows other researchers to see exactly how you conducted your research.
Method refers to the procedure that was used in a research study. It included a precise description of how the experiments were performed and why particular procedures were selected. While the APA technically refers to this section as the 'method section,' it is also often known as a 'methods section.'
The methods section ensures the experiment's reproducibility and the assessment of alternative methods that might produce different results. It also allows researchers to replicate the experiment and judge the study's validity.
This article discusses how to write a methods section for a psychology paper, including important elements to include and tips that can help.
What to Include in a Method Section
So what exactly do you need to include when writing your method section? You should provide detailed information on the following:
- Research design
- Participants
- Participant behavior
The method section should provide enough information to allow other researchers to replicate your experiment or study.
Components of a Method Section
The method section should utilize subheadings to divide up different subsections. These subsections typically include participants, materials, design, and procedure.
Participants
In this part of the method section, you should describe the participants in your experiment, including who they were (and any unique features that set them apart from the general population), how many there were, and how they were selected. If you utilized random selection to choose your participants, it should be noted here.
For example: "We randomly selected 100 children from elementary schools near the University of Arizona."
At the very minimum, this part of your method section must convey:
- Basic demographic characteristics of your participants (such as sex, age, ethnicity, or religion)
- The population from which your participants were drawn
- Any restrictions on your pool of participants
- How many participants were assigned to each condition and how they were assigned to each group (i.e., randomly assignment , another selection method, etc.)
- Why participants took part in your research (i.e., the study was advertised at a college or hospital, they received some type of incentive, etc.)
Information about participants helps other researchers understand how your study was performed, how generalizable the result might be, and allows other researchers to replicate the experiment with other populations to see if they might obtain the same results.
In this part of the method section, you should describe the materials, measures, equipment, or stimuli used in the experiment. This may include:
- Testing instruments
- Technical equipment
- Any psychological assessments that were used
- Any special equipment that was used
For example: "Two stories from Sullivan et al.'s (1994) second-order false belief attribution tasks were used to assess children's understanding of second-order beliefs."
For standard equipment such as computers, televisions, and videos, you can simply name the device and not provide further explanation.
Specialized equipment should be given greater detail, especially if it is complex or created for a niche purpose. In some instances, such as if you created a special material or apparatus for your study, you might need to include an illustration of the item in the appendix of your paper.
In this part of your method section, describe the type of design used in the experiment. Specify the variables as well as the levels of these variables. Identify:
- The independent variables
- Dependent variables
- Control variables
- Any extraneous variables that might influence your results.
Also, explain whether your experiment uses a within-groups or between-groups design.
For example: "The experiment used a 3x2 between-subjects design. The independent variables were age and understanding of second-order beliefs."
The next part of your method section should detail the procedures used in your experiment. Your procedures should explain:
- What the participants did
- How data was collected
- The order in which steps occurred
For example: "An examiner interviewed children individually at their school in one session that lasted 20 minutes on average. The examiner explained to each child that he or she would be told two short stories and that some questions would be asked after each story. All sessions were videotaped so the data could later be coded."
Keep this subsection concise yet detailed. Explain what you did and how you did it, but do not overwhelm your readers with too much information.
Tips for How to Write a Methods Section
In addition to following the basic structure of an APA method section, there are also certain things you should remember when writing this section of your paper. Consider the following tips when writing this section:
- Use the past tense : Always write the method section in the past tense.
- Be descriptive : Provide enough detail that another researcher could replicate your experiment, but focus on brevity. Avoid unnecessary detail that is not relevant to the outcome of the experiment.
- Use an academic tone : Use formal language and avoid slang or colloquial expressions. Word choice is also important. Refer to the people in your experiment or study as "participants" rather than "subjects."
- Use APA format : Keep a style guide on hand as you write your method section. The Publication Manual of the American Psychological Association is the official source for APA style.
- Make connections : Read through each section of your paper for agreement with other sections. If you mention procedures in the method section, these elements should be discussed in the results and discussion sections.
- Proofread : Check your paper for grammar, spelling, and punctuation errors.. typos, grammar problems, and spelling errors. Although a spell checker is a handy tool, there are some errors only you can catch.
After writing a draft of your method section, be sure to get a second opinion. You can often become too close to your work to see errors or lack of clarity. Take a rough draft of your method section to your university's writing lab for additional assistance.
A Word From Verywell
The method section is one of the most important components of your APA format paper. The goal of your paper should be to clearly detail what you did in your experiment. Provide enough detail that another researcher could replicate your study if they wanted.
Finally, if you are writing your paper for a class or for a specific publication, be sure to keep in mind any specific instructions provided by your instructor or by the journal editor. Your instructor may have certain requirements that you need to follow while writing your method section.
Frequently Asked Questions
While the subsections can vary, the three components that should be included are sections on the participants, the materials, and the procedures.
- Describe who the participants were in the study and how they were selected.
- Define and describe the materials that were used including any equipment, tests, or assessments
- Describe how the data was collected
To write your methods section in APA format, describe your participants, materials, study design, and procedures. Keep this section succinct, and always write in the past tense. The main heading of this section should be labeled "Method" and it should be centered, bolded, and capitalized. Each subheading within this section should be bolded, left-aligned and in title case.
The purpose of the methods section is to describe what you did in your experiment. It should be brief, but include enough detail that someone could replicate your experiment based on this information. Your methods section should detail what you did to answer your research question. Describe how the study was conducted, the study design that was used and why it was chosen, and how you collected the data and analyzed the results.
Erdemir F. How to write a materials and methods section of a scientific article ? Turk J Urol . 2013;39(Suppl 1):10-5. doi:10.5152/tud.2013.047
Kallet RH. How to write the methods section of a research paper . Respir Care . 2004;49(10):1229-32. PMID: 15447808.
American Psychological Association. Publication Manual of the American Psychological Association (7th ed.). Washington DC: The American Psychological Association; 2019.
American Psychological Association. APA Style Journal Article Reporting Standards . Published 2020.
By Kendra Cherry, MSEd Kendra Cherry, MS, is a psychosocial rehabilitation specialist, psychology educator, and author of the "Everything Psychology Book."

- school Campus Bookshelves
- menu_book Bookshelves
- perm_media Learning Objects
- login Login
- how_to_reg Request Instructor Account
- hub Instructor Commons
Margin Size
- Download Page (PDF)
- Download Full Book (PDF)
- Periodic Table
- Physics Constants
- Scientific Calculator
- Reference & Cite
- Tools expand_more
- Readability
selected template will load here
This action is not available.
27.5: Guide for writing a lab report
- Last updated
- Save as PDF
- Page ID 19582
\( \newcommand{\vecs}[1]{\overset { \scriptstyle \rightharpoonup} {\mathbf{#1}} } \)
\( \newcommand{\vecd}[1]{\overset{-\!-\!\rightharpoonup}{\vphantom{a}\smash {#1}}} \)
\( \newcommand{\id}{\mathrm{id}}\) \( \newcommand{\Span}{\mathrm{span}}\)
( \newcommand{\kernel}{\mathrm{null}\,}\) \( \newcommand{\range}{\mathrm{range}\,}\)
\( \newcommand{\RealPart}{\mathrm{Re}}\) \( \newcommand{\ImaginaryPart}{\mathrm{Im}}\)
\( \newcommand{\Argument}{\mathrm{Arg}}\) \( \newcommand{\norm}[1]{\| #1 \|}\)
\( \newcommand{\inner}[2]{\langle #1, #2 \rangle}\)
\( \newcommand{\Span}{\mathrm{span}}\)
\( \newcommand{\id}{\mathrm{id}}\)
\( \newcommand{\kernel}{\mathrm{null}\,}\)
\( \newcommand{\range}{\mathrm{range}\,}\)
\( \newcommand{\RealPart}{\mathrm{Re}}\)
\( \newcommand{\ImaginaryPart}{\mathrm{Im}}\)
\( \newcommand{\Argument}{\mathrm{Arg}}\)
\( \newcommand{\norm}[1]{\| #1 \|}\)
\( \newcommand{\Span}{\mathrm{span}}\) \( \newcommand{\AA}{\unicode[.8,0]{x212B}}\)
\( \newcommand{\vectorA}[1]{\vec{#1}} % arrow\)
\( \newcommand{\vectorAt}[1]{\vec{\text{#1}}} % arrow\)
\( \newcommand{\vectorB}[1]{\overset { \scriptstyle \rightharpoonup} {\mathbf{#1}} } \)
\( \newcommand{\vectorC}[1]{\textbf{#1}} \)
\( \newcommand{\vectorD}[1]{\overrightarrow{#1}} \)
\( \newcommand{\vectorDt}[1]{\overrightarrow{\text{#1}}} \)
\( \newcommand{\vectE}[1]{\overset{-\!-\!\rightharpoonup}{\vphantom{a}\smash{\mathbf {#1}}}} \)
Write a few short sentences briefly summarizing what you did, how you did it, what you found and whether anything went wrong in your experiment.
Describe relevant theories that relate to your experiment here, and the steps to carry out your procedure.
Consider the following questions:
- What are the relevant theories/principles that you used?
- What equations did you use? Show how you modeled your experiment.
- What materials, equipment and/or tools were necessary in making your measurements?
- Where was this experiment conducted?
- How did you make your measurements? How many times did you make them?
- How did you record your measurements?
- How did you determine and minimize the uncertainties in your measurements? Why did you choose to measure a specific quantity in a certain way?
It can be useful to predict the value (and uncertainty) that you expect to measure before conducting the measurement. You should report on this initial prediction in order to help you better understand the data from your experiment.
- Predict your measured values and uncertainties. How precise do you expect your measurements to be?
- What assumptions did you have to make to predict your results?
- Have these predictions influenced how you should approach your procedure? Make relevant adjustments to the procedure based on your predictions.
Data and Analysis
Present your data. Include relevant tables/graphs. Describe in detail how you analysed the data, including how you propagated uncertainties. If the data do not agree with your model prediction (or the prediction from your proposal), examine whether you can improve your model.
- How did you obtain the “final” measurement/value from your collected data?
- How did you propagate uncertainties? Why did you do it that way?
- What is the relative uncertainty on your value(s)?
Discussion and Conclusion
Summarize your findings, and address whether or not your model described the data. Discuss possible reasons why your measured value is not consisted with your model expectation (is it the model? is it the data?).
- Were there any systematic errors that you didn’t consider?
- Did you learn anything that you didn’t previously know? (eg. about the subject of your experiment, about the scientific method in general)
- If you could redo this experiment, what would you change (if anything)?
Guide for reviewing a lab report
Summarize your overall evaluation of the report in 2-3 sentences. Focus on the experiment’s method and its result. For example, “The authors dropped balls from different heights to determine the value of g”. You don’t need to go into the specific details, just give a high level summary of the report. If the report is unclear, specify this.
- Is the the procedure well thought-out, clearly and concisely described?
- Do you have sufficient information that you could repeat this experiment?
- Does the report clearly describe how different quantities were measured and how the uncertainties were determined?
- Does the report motivate why the specific procedure was chosen? (e.g. to minimize uncertainties).
- Does the experiment clearly state how uncertainties were propagated and how the data were analyzed?
- Do you believe their result to be scientifically valid?
Overall Rating of the Experiment
Give the report an overall score, based on the criteria described above. Use one of the following to rate the proposal and include a sentence to justify your choice.
- Satisfactory
How to write the methods section of a research paper
Affiliation.
- 1 Respiratory Care Services, San Francisco General Hospital, NH:GA-2, 1001 Potrero Avenue, San Francisco, CA 94110, USA. [email protected]
- PMID: 15447808
The methods section of a research paper provides the information by which a study's validity is judged. Therefore, it requires a clear and precise description of how an experiment was done, and the rationale for why specific experimental procedures were chosen. The methods section should describe what was done to answer the research question, describe how it was done, justify the experimental design, and explain how the results were analyzed. Scientific writing is direct and orderly. Therefore, the methods section structure should: describe the materials used in the study, explain how the materials were prepared for the study, describe the research protocol, explain how measurements were made and what calculations were performed, and state which statistical tests were done to analyze the data. Once all elements of the methods section are written, subsequent drafts should focus on how to present those elements as clearly and logically as possibly. The description of preparations, measurements, and the protocol should be organized chronologically. For clarity, when a large amount of detail must be presented, information should be presented in sub-sections according to topic. Material in each section should be organized by topic from most to least important.
- Biomedical Research*
- Research Design
- Writing* / standards

- Langson Library
- Science Library
- Grunigen Medical Library
- Law Library
- Connect From Off-Campus
- Accessibility
- Gateway Study Center
Email this link
Writing a scientific paper.
- Writing a lab report
- INTRODUCTION
Writing a "good" methods section
"methods checklist" from: how to write a good scientific paper. chris a. mack. spie. 2018..
- LITERATURE CITED
- Bibliography of guides to scientific writing and presenting
- Peer Review
- Presentations
- Lab Report Writing Guides on the Web
The purpose is to provide enough detail that a competent worker could repeat the experiment. Many of your readers will skip this section because they already know from the Introduction the general methods you used. However careful writing of this section is important because for your results to be of scientific merit they must be reproducible. Otherwise your paper does not represent good science.
- Exact technical specifications and quantities and source or method of preparation
- Describe equipment used and provide illustrations where relevant.
- Chronological presentation (but related methods described together)
- Questions about "how" and "how much" are answered for the reader and not left for them to puzzle over
- Discuss statistical methods only if unusual or advanced
- When a large number of components are used prepare tables for the benefit of the reader
- Do not state the action without stating the agent of the action
- Describe how the results were generated with sufficient detail so that an independent researcher (working in the same field) could reproduce the results sufficiently to allow validation of the conclusions.
- Can the reader assess internal validity (conclusions are supported by the results presented)?
- Can the reader assess external validity (conclusions are properly generalized beyond these specific results)?
- Has the chosen method been justified?
- Are data analysis and statistical approaches justified, with assumptions and biases considered?
- Avoid: including results in the Method section; including extraneous details (unnecessary to enable reproducibility or judge validity); treating the method as a chronological history of events; unneeded references to commercial products; references to “proprietary” products or processes unavailable to the reader.
- << Previous: INTRODUCTION
- Next: RESULTS >>
- Last Updated: Aug 4, 2023 9:33 AM
- URL: https://guides.lib.uci.edu/scientificwriting
Off-campus? Please use the Software VPN and choose the group UCIFull to access licensed content. For more information, please Click here
Software VPN is not available for guests, so they may not have access to some content when connecting from off-campus.

An official website of the United States government
The .gov means it’s official. Federal government websites often end in .gov or .mil. Before sharing sensitive information, make sure you’re on a federal government site.
The site is secure. The https:// ensures that you are connecting to the official website and that any information you provide is encrypted and transmitted securely.
- Publications
- Account settings
Preview improvements coming to the PMC website in October 2024. Learn More or Try it out now .
- Advanced Search
- Journal List
- Turk J Urol
- v.39(Suppl 1); 2013 Sep
How to write a materials and methods section of a scientific article?
In contrast to past centuries, scientific researchers have been currently conducted systematically in all countries as part of an education strategy. As a consequence, scientists have published thousands of reports. Writing an effective article is generally a significant problem for researchers. All parts of an article, specifically the abstract, material and methods, results, discussion and references sections should contain certain features that should always be considered before sending a manuscript to a journal for publication. It is generally known that the material and methods section is a relatively easy section of an article to write. Therefore, it is often a good idea to begin by writing the materials and methods section, which is also a crucial part of an article. Because “reproducible results” are very important in science, a detailed account of the study should be given in this section. If the authors provide sufficient detail, other scientists can repeat their experiments to verify their findings. It is generally recommended that the materials and methods should be written in the past tense, either in active or passive voice. In this section, ethical approval, study dates, number of subjects, groups, evaluation criteria, exclusion criteria and statistical methods should be described sequentially. It should be noted that a well-written materials and methods section markedly enhances the chances of an article being published.
How to Write a Materials and Methods Section of a Scientific Article?
Up to the 18 th Century scientific researches were performed on a voluntary basis by certain scientists. However from the second half of the 19 th century, scientific development has gained momentum with the contributions of numerous scientists including Edison, Fleming, and Koch. In parallel with these developments, apparently each scientific field, and even their branches made, and still making magnificent progressions from the end of the 18 th century. Secondary to these developments, scientific researches have been implemented systematically by universities, and various institutions in every part of the world as an integral component of national strategies. Naturally, the number of researchers who performed scientific investigations or sponsored by various institutions increased considerably. Also, as is known very well, all over the world scientists, and researchers move from one place to another to disseminate scientific knowledge. All of these scientific efforts, and activities reflect on clinical practice, and hundreds of thousands, and millions scientific articles which we can currently gain access into all of them online. As indicated by the investigator Gerard Piel, “Without publication, science is dead” which explains the importance of publication. In other words, if you don’t share your investigation and knowledge, they don’t mean anything by themselves. Although sharing the knowledge is essential for writing a scientific paper, nowadays writing a scientific article is mostly learnt as a master-apprentice relationship, and therefore certain standards have not been established. This phenomenon creates serious stress especially for young investigators in their early stage of writing scientific papers. Indeed investigators receiving their residency training confront this reality finally during writing of their dissertations. Though sharing knowledge is known as a fundamental principle in writing a scientific paper, it creates difficulties in the whole world. Relevant to this issue, in the whole world investigations have been performed, and books have been written on the subject of how to write a scientific paper. Accordingly, in our country mostly local meetings, and courses have been organized. These organizations, and investigations should be performed. Indeed, nowadays, in the first assessments, the rejection rate of the journals by internationally acknowledged scientific indexes as “Science Citation İndex (SCI)” and “Science Citation İndex Expanded (SCI-extended” which have certain scientific standards, increases to 62 percent. As a matter of fact only 25% of Class A journals have been included in the lists of SCI, and SCI-extended.
As we all know very well, scientific articles consist of sections of summary, introduction, material, and methods, discussion, and references. Among them, conventionally Materials and Methods section has been reported as the most easily written or will be written section. Although it is known as the most easily written section, nearly 30% of the reasons for rejection are related to this section per se. Therefore due care, and attention should be given to the writing of this section. In the writing process of the ‘Material and Methods’ section, all achievements performed throughout the study period should be dealt with in consideration of certain criteria in a specific sequence. Since as a globally anticipated viewpoint, ‘Materials and Methods’ section can be written quite easily, it has been indicated that if difficulties are encountered in writing a manuscript, then one should start writing from this section. In writing this section, study design describing the type of the article, study subjects to be investigated, methods, and procedures of measurements should be provided under four main headings. [ 1 , 2 ] Accordingly, in brief, we can emphasize the importance of providing clear-cut, adequate, and detailed information in the ‘Materials and Methods’ section to the scientists who will read this scientific article. Meeting these criteria carries great importance with respect to the evaluation of reliability of the investigation by the readers, and reviewers, and also informing them about procedural method, design, data collection, and assessment methods of the investigation, Priorly, as is the case in all scientific investigations, one should be reminded about the importance, and indispensability of compliance with certain standard writing rules. Accordingly, rules of grammar should be obeyed, and if possible passive voice of simple past tense should be used. Related to these rules, use of verbs ‘investigated’, ‘evaluated’ or ‘performed’ will be appropriate. Recently, expressions showing the ownership of the investigation as ‘we performed’, ‘we evaluated’, ‘we implemented’ have taken priority. Since the important point is communication of the message contained in the scientific study, the message should be clearly comprehensible. While ensuring clarity of the message, use of flourishing, and irrelevant sentences should be avoided. [ 1 , 3 ] According to another approach, since our article will be read by professionals of other disciplines, it is important to comply with certain rules of writing. To that end, standard units of measurements, and international abbreviations should be used. Abbreviations should be explained within parentheses at their first mention in the manuscript. For instance let’s analyze the following sentence” The patients were evaluated with detailed medical history, physical examination, complete urinalysis, PSA, and urinary system ultrasound” The abbreviation PSA is very well known by the urologist. However we shouldn’t forget that this article will be read by the professionals in other medical disciplines. Similarly this sentence should not be written as: “The patients were evaluated with detailed medical history, physical examination, complete urinalysis PSA (prostate-specific antigen), and urinary system ultrasound.” Indeed the abbreviation should follow the explanation of this abbreviation. Then the appropriate expression of the sentence should be. “The patients were evaluated with detailed medical history, physical examination, complete urinalysis, prostate-specific antigen (PSA), and urinary system ultrasound.”
In addition to the abovementioned information, in the beginning paragraphs of ‘Materials and Methods’ section of a clinical study the answers to the following questions should be absolutely provided:
- The beginning, and termination dates of the study period.
- Number of subjects/patients/experimental animals etc. enrolled in the study,
- Has the approval of the ethics committee been obtained?
- Study design (prospective, retrospective or other). [ 1 , 2 , 4 – 7 ]
Still additional features of the study design (cross-sectional) should be indicated. Apart from this, other types of study designs (randomized, double-blind, placebo-controlled or double-blind, parallel control etc.) should be revealed.
The heading of the section “Materials and Methods” can be changed to “Patients and the Method” in accordance with writing rules of the journal in question. Indication of starting, and termination dates of a clinical study will facilitate scientific interpretation of the article. Accordingly, outcomes obtained during development phase of a newly implemented method might be considered differently from those acquired during conventional use of this method. Besides, incidence of the diseases, and number of affected people might vary under the impact of social fluctuations, and environmental factors. Therefore with this justification study period should be specified. Number of cases included in the study should be absolutely indicated in the ‘Materials and Methods’ section. It will be appropriate to determine study population after consultation to a statistician-and if required-following “power analysis” Accordingly, the need for a control group will be indicated based on the study design. Nowadays, as a requirement of patient rights, obtainment of approval from ethics committee should be indicated with its registration number. In addition, acquirement of informed consent forms from patients should be indicated. Ethics Committee approval should be obtained in prospective studies performed with study drugs. Otherwise in case of occurrence of adverse effects, it should be acknowledged that in compliance with Article #90 of the Turkish Criminal Law, a 3-year prison sentence is given to the guilty parties. [ 8 ] Since issues related to the Ethics Committee are the subject of another manuscript, they won’t be handled herein.
The following paragraph exemplifies clearly the aforementioned arguments: “After approval of the local ethics committee (BADK-22), informed consent forms from the patients were obtained, and a total of 176 cases with lower urinary tract symptoms (LUTS) were retrospectively evaluated between January 2011, and December 2012.” In a prospectively designed study, methods used to communicate with the cases including face-to-face interviews, phone calls and/or e-mail should be indicated. [ 1 , 2 ] Each paragraph or subheading in the ‘Materials and Methods’ section should be in accordance with the related ones in the ‘Results’ section. In other words, the sequence of paragraphs, and subheadings in the ‘Results’ section should be the same in the ‘Materials and Methods’ section.
As a next step, names of the groups, and distribution of the cases in these groups should be indicated. For instance: the statement “Cases were divided into 3 groups based on their LUTS scores as. Groups 1 (0–9; n=91), 2 (10–18; n=66), and 3 (≥19; n=20)” clearly delineates the scope of the study at baseline.. In the ‘Materials and Methods’ section the number of study subjects should be absolutely documented. Herein, after assignment of names to groups, in the rest of the manuscript, these names should be used. For example instead of saying: “Mean ages of the cases with LUTS scores between 0–9, 10–18, and ≥19 were determined to be 63.2±2.1, 62.8±4.5, and 65.7±3.9 years, respectively” it will be more comprehensible to use the expression: “Mean ages of the Groups 1, 2, and 3 were specified as 63.2±2.1, 62.8±4.5, and 65.7±3.9 years.” (p=0.478). Expressions indicated in the ‘Materials and Methods’ section should not be repeated in the “Results” section. Thus, errors of repetition will be precluded. Following the abovementioned information, the evaluation method of the cases enrolled in the study should be indicated. Hence, results of medical history, physical examination, and if performed laboratory or radiological evaluations-in that order-should be indicated. The application of survey study-if any-should be investigated, and documented. Therefore, the following sentences encompass all the information stated above: “The cases were evaluated with detailed medical history, physical examination, measurements of serum follicle stimulating hormone (FSH), luteinizing hormone (LH), testosterone (T) levels, complete urinalysis, urinary flow rate, direct urinary system roentgenograms, urinary system ultrasound, and if required cyctoscopy. Lower urinary system complaints, and erectile dysfunction were evaluated using International Prostate Symptom Score (IPSS), and International Erectile Function Scale (IIEF), respectively.” Apparently, questionnaire forms were used in the above-cited study. However, methods used for the evaluation of questionnaire forms, and significance of the results obtained, and if possible, the first performer of this survey should be written with accompanying references. In relation to the abovementioned questionnaires the following statements constitute standard expressions for the ‘Materials and Methods’ section: “International Prostate Symptom Score (IPPS) was used in the determination of the severity of prostatic symptoms. IPSS used to determine the severity of the disease, evaluate treatment response, and ascertain the symptomatic progression, is the most optimal scoring system recommended by European Association of Urology (EAU) which classifies the severity of the disease based on IPSS scores as mild (0–7), moderate (8–19), and severe symptomatic (20–35) disease. In the evaluation of sexual function International Erectile Function Scale (IIEF) was used. IIEF is one of the most prevalently used form for the patients who consulted for the complaints of sexual dysfunction Based on IIEF scores, the severity of the disease was classified as severe (1–10), moderate (11–16), mild to moderate (17–21), mild (22–25), and no ED (26–30).”
Whether the institutions of the authors working for should be written in the ‘Materials and Methods’ section can be a subject of debate, generally viewpoints favour provision of this information. However, in compliance with their writing rules, some journals do not favour open-label studies where name of the study site is indicated, and this principle is communicated to the author during editorial evaluation Besides, in the ‘Materials and Methods’ section, the brand of the study object, and its country of origin should be indicated. (ie. if radiological methods are used, then the brand of radiological equipment, and its manufacturing country should be specified. In a study entitled ‘The Impact of Computed Tomography in the Prediction of Post-Radical Nephrectomy Stage in Renal Tumours’ since the main topic of the study is computed tomography, the specifications of the equipment used should be explicitely indicated. On the other hand, the details of the medical method which can effect the outcomes of the study should be also recorded. Accordingly, the methods applied for percutaneous nephrolithotomy, ureterorenoscopy, varicocelectomy, transurethral prostatectomy, radical prostatectomy (perineal, open, laparoscopic or robotic should be absolutely indicated. Then inclusion, and exclusion criteria, and if used control group, and its characteristics should be documented. Thus the following paragraph about exclusion criteria will be appropriate: Patients with a history of neurogenic bladder, prostatic or abdominal operation, and transrectal ultrasound guided prostate biopsy (within the previous 6 months), those aged <40 or >70 years, individuals with a peak urine flow rate below 10 ml/sec, and residual urine more than 150 cc were not included in the study.” [ 1 – 3 , 9 ]
Some diseases mentioned in the “Materials and Methods” section require special monitorization procedures. In these cases the procedure of monitorization should be documented for the sake of the validity of the study in question. Accordingly, in conditions such as “nephrectomy, prostatectomy, orchidectomy, pyeloplasty, varicocelectomy, drug therapies, penile prosthesis, and urethral stricture” clinical follow-up protocols should be provided.
The abovementioned rules, and recommendations are most frequently valid for a clinical study, and some points indicated in experimental studies should be also considered. Types, weights, gender, and number of the animals used in animal studies should be absolutely specified. Besides condition of evaluation of experimental animals should be noted. Then as is the case with clinical studies, approval of the ethics committee should be obtained, and documented. Accordingly, the beginning paragraphs of the ‘Materials and Methods’ can be expressed as follows:
“In the study, 40 Wistar-Albino 6-month-old rats each weighing 350–400 g were used. After approval of the ethics committee (HADYEK-41) the study was performed within the frame of rules specified by the National Institute for animal experiments. The rats were divided into 3 groups. Hence, Group 1 (n=7) was accepted as the control group. The rats subjected to partial ureteral obstruction with or without oral carvedilol therapy at daily doses of 2 mg/kg maintained for 7 days constituted Groups 3 (n=8), and 2 (n=8), respectively. Each group of 4 rats was housed in standard cages with an area of 40×60 cm. The animals were fed with standard 8 mm food pellets, and fresh daily tap water. The rats were kept in the cages under 12 hours of light, and 12 hours of dark. Ambient temperature, and humidity were set at 22±2°C, and 50±10%, respectively.”
Herein, the method, and agent of anesthesia used (local or general anesthesia) in surgical procedures, and then the experimental method applied should be clearly indicated. For example the following sentences explain our abovementioned arguments; “All surgical procedures were performed under xylazine-ketamine anesthesia. In all groups, ureters were approached through midline abdominal incision. In Group 1, ureters were manipulated without causing obstruction. Results of biochemical, and pathological evaluations performed in Group 1 were considered as baseline values.”
“Through a midline abdominal incision partial ureteral obstruction was achieved by embedding two-thirds of the distal part of the left ureter into psoas muscle using 4/0 silk sutures as described formerly by Wen et al. [ 10 ] ( Figure 1 ). [ 11 ] All rats were subjected to left nephrectomies at the end of the experimental study.” As formulated by the above paragraph, if the method used is not widely utilized, then the first researcher who describes the method should be indicated with relevant references. One or more than one figures with a good resolution, and easily comprehensible legends should be also included in the explanation of the experimental model. For very prevalently used experimental models as torsion models cited in the “Materials and Methods” section, there is no need to include figures in the manuscript.

Partial ureteral obstruction model [ 11 ]
Appropriate signs, and marks placed on the figure will facilitate comprehension of the legends ( Figure 2 ).

Ureteral segments (black arrows) seen in a rat partial ureteral obstruction model [ 11 ]
The signs used will also improve intelligibility of the target. The figures should be indicated within parentheses in their first mention in the “Materials and Methods” section. Headings and as a prevalent convention legends of the figures should be indicated at the end of the manuscript.
If a different method is used in the study, this should be explained in detail. For instance, in a study where the effect of smoking on testes was investigated, the method, and the applicator used to expose rats to cigarette smoke should be indicated in the ‘Methods’ section following classical description. Relevant to the study in question, the following paragraph explaining the study method should be written: “A glass chamber with dimensions of 75 × 50 × 50 cm was prepared, and divided into 4 compartments with wire fences. The rats in the 2., and 4. cages were placed in these compartments. Each compartment contained 4 rats. Cigarette smoke was produced using one cigarette per hour, and smoke coming from the tip, and the filter of the lighted cigarette was pumped into the gas chamber with a pneumatic motor. The rats were exposed to smoke of 6 cigarettes for 6 hours. The compartments of the rats were changed every day so as to achieve balanced exposure of the rats to cigarette smoke.” [ 12 ]
Meanwhile, chemical names, doses, and routes of administration of the substances used in experimental studies should be indicated. If the substance used is a solution or an antibody, then manufacturing firm, and its country should be indicated in parenthesis. This approach can be exemplified as “Animals used in experiments were randomized into 4 groups of 8 animals. Each group was housed in 2 cages each containing 4 animals. The first group did not undergo any additional procedure (Group 1). The second group was exposed to cigarette smoke (Group 2). The third (Group 3), and the fourth (Group 4) groups received daily intraperitoneal injectable doses of 10 mg/kg resveratrol (Sigma-Aldrich, St. Louis, MO, USA). The Group 4 was also exposed to cigarette smoke. [ 12 ]
After all of these procedures, method, and analytical procedure of histopathological examination used should be described-if possible-by a pathologist Similarly, biochemical method used should be referenced, and written by the department of clinical chemistry. It can be inferred that each division should describe its own method. In other words, histopathological, microbiological, and pharmacological method should be described in detail by respective divisions.
If we summarize all the information stated above, understandably sharing of the scientific knowledge is essential.. Since reproducibility of a study demonstrates the robustness of a study, with the detailed approaches indicated above, reproducibility of our study is provided, and the relevant questions of “How?”, and “How much?” are answered. Besides, since ‘Materials, and Methods’, and ‘Results’ sections will constitute a meaningful whole, explanations of all information related to the data mentioned in the ‘Results’ section should be provided. As an important point not to be forgotten, evaluation or measurement method used for each parameter indicated in the ‘Results’ section should be expounded in the “Materials and Methods” section. For example if you used an expression in the” Results” section like “median body mass index (BMI) of the patients was 27.42 kg/m 2 ”, then you should beforehand indicate that comparative evaluation of BMIs will be done in the “Materials and Methods” section. In addition, the description, and significance of the values expressed in the “Results” section should be indicated in the “Materials and Methods” section. In other words, it should be stated that the patients were evaluated based on their BMIs as normal (18–24.9 kg/m 2 ), overweight (25 kg/m 2 –40 kg/m 2 ), and morbid obesity (>40 kg/m 2 ). If you encounter difficulties in writing “Materials and Methods” section, also a valid approach for other sections, firstly simple headings can be written, then you can go into details. In brief, for every parameter, the reader should get clear-cut answers to the questions such as “How did they evaluate this parameter, and which criteria were used?”. [ 1 , 3 , 13 – 15 ]
The last paragraph of the ‘Materials, and Methods’ section should naturally involve statistical evaluations. This section should be written by statisticians. Accordingly, the preferred statistical method, and the justifications for this preference should be indicated. In conventional statistical evaluations, provision of details is not required. In information indicated above, the statement “For statistical analysis, ANOVA test, chi-square test, T test, Kruskal-Wallis test have been used.” is not required very much. Instead, more appropriate expression will be a statement indicating that recommendations of a knowledgeable, and an experienced statistician were taken into consideration or advanced statistical information was reflected on the statistical evaluations as follows: “Chi-square tests were used in intergroup comparisons of categorical variables, and categorical variables were expressed as numbers, and percentages. In comparisons between LUTS, and ED as for age, independent two samples t-test was used. In the evaluation of the factors effective on erectile dysfunction multivariate logistic regresssion test was used. P values lower than 0.05 were considered as statistically significant The calculations were performed using a statistical package program (PASW v18, SPSS Inc, Chicago, IL).” Herein, the type of statistical package used for statistical methods should be emphasized.

How to Get Started on Your First Psychology Experiment
Acquiring even a little expertise in advance makes science research easier..
Updated May 15, 2024 | Reviewed by Ray Parker
- Why Education Is Important
- Find a Child Therapist
- Students often struggle at the beginning of research projects—knowing how to begin.
- Research projects can sometimes be inspired by everyday life or personal concerns.
- Becoming something of an "expert" on a topic in advance makes designing a study go more smoothly.

One of the most rewarding and frustrating parts of my long career as a psychology professor at a small liberal arts college has been guiding students through the senior capstone research experience required near the end of their college years. Each psychology major must conduct an independent experiment in which they collect data to test a hypothesis, analyze the data, write a research paper, and present their results at a college poster session or at a professional conference.
The rewarding part of the process is clear: The students' pride at seeing their poster on display and maybe even getting their name on an article in a professional journal allows us professors to get a glimpse of students being happy and excited—for a change. I also derive great satisfaction from watching a student discover that he or she has an aptitude for research and perhaps start shifting their career plans accordingly.
The frustrating part comes at the beginning of the research process when students are attempting to find a topic to work on. There is a lot of floundering around as students get stuck by doing something that seems to make sense: They begin by trying to “think up a study.”
The problem is that even if the student's research interest is driven by some very personal topic that is deeply relevant to their own life, they simply do not yet know enough to know where to begin. They do not know what has already been done by others, nor do they know how researchers typically attack that topic.
Students also tend to think in terms of mission statements (I want to cure eating disorders) rather than in terms of research questions (Why are people of some ages or genders more susceptible to eating disorders than others?).
Needless to say, attempting to solve a serious, long-standing societal problem in a few weeks while conducting one’s first psychology experiment can be a showstopper.
Even a Little Bit of Expertise Can Go a Long Way
My usual approach to helping students get past this floundering stage is to tell them to try to avoid thinking up a study altogether. Instead, I tell them to conceive of their mission as becoming an “expert” on some topic that they find interesting. They begin by reading journal articles, writing summaries of these articles, and talking to me about them. As the student learns more about the topic, our conversations become more sophisticated and interesting. Researchable questions begin to emerge, and soon, the student is ready to start writing a literature review that will sharpen the focus of their research question.
In short, even a little bit of expertise on a subject makes it infinitely easier to craft an experiment on that topic because the research done by others provides a framework into which the student can fit his or her own work.
This was a lesson I learned early in my career when I was working on my own undergraduate capstone experience. Faced with the necessity of coming up with a research topic and lacking any urgent personal issues that I was trying to resolve, I fell back on what little psychological expertise I had already accumulated.
In a previous psychology course, I had written a literature review on why some information fails to move from short-term memory into long-term memory. The journal articles that I had read for this paper relied primarily on laboratory studies with mice, and the debate that was going on between researchers who had produced different results in their labs revolved around subtle differences in the way that mice were released into the experimental apparatus in the studies.
Because I already had done some homework on this, I had a ready-made research question available: What if the experimental task was set up so that the researcher had no influence on how the mouse entered the apparatus at all? I was able to design a simple animal memory experiment that fit very nicely into the psychological literature that was already out there, and this saved me from a lot of angst.
Please note that my undergraduate research project was guided by the “expertise” that I had already acquired rather than by a burning desire to solve some sort of personal or social problem. I guarantee that I had not been walking around as an undergraduate student worrying about why mice forget things, but I was nonetheless able to complete a fun and interesting study.

My first experiment may not have changed the world, but it successfully launched my research career, and I fondly remember it as I work with my students 50 years later.

Frank McAndrew, Ph.D., is the Cornelia H. Dudley Professor of Psychology at Knox College.
- Find a Therapist
- Find a Treatment Center
- Find a Psychiatrist
- Find a Support Group
- Find Online Therapy
- International
- New Zealand
- South Africa
- Switzerland
- Asperger's
- Bipolar Disorder
- Chronic Pain
- Eating Disorders
- Passive Aggression
- Personality
- Goal Setting
- Positive Psychology
- Stopping Smoking
- Low Sexual Desire
- Relationships
- Child Development
- Therapy Center NEW
- Diagnosis Dictionary
- Types of Therapy

At any moment, someone’s aggravating behavior or our own bad luck can set us off on an emotional spiral that threatens to derail our entire day. Here’s how we can face our triggers with less reactivity so that we can get on with our lives.
- Emotional Intelligence
- Gaslighting
- Affective Forecasting
- Neuroscience
IMAGES
VIDEO
COMMENTS
Introduction. Your lab report introduction should set the scene for your experiment. One way to write your introduction is with a funnel (an inverted triangle) structure: Start with the broad, general research topic. Narrow your topic down your specific study focus. End with a clear research question.
1. Start with an abstract. The abstract is a very short summary of the paper, usually no more than 200 words. Base the structure of your abstract on the structure of your paper. This will allow the reader to see in short form the purpose, results, and significance of the experiment.
Your Methods Section contextualizes the results of your study, giving editors, reviewers and readers alike the information they need to understand and interpret your work. Your methods are key to establishing the credibility of your study, along with your data and the results themselves. A complete methods section should provide enough detail ...
The methods section should describe what was done to answer the research question, describe how it was done, justify the experimental design, and explain how the results were analyzed. Scientific writing is direct and orderly. Therefore, the methods section structure should: describe the materials used in the study, explain how the materials ...
Table of contents. Step 1: Define your variables. Step 2: Write your hypothesis. Step 3: Design your experimental treatments. Step 4: Assign your subjects to treatment groups. Step 5: Measure your dependent variable. Other interesting articles. Frequently asked questions about experiments.
Author, A. A., Author, B. B., & Author, C. C. (year). Article title. Journal Title, volume number (issue number), page numbers. A simple way to write your reference section is to use Google scholar. Just type the name and date of the psychologist in the search box and click on the "cite" link. Next, copy and paste the APA reference into the ...
Example 1: "First, each group chose a turtle. A member of each group then measured the carapace length, while another recorded the measurement in the lab book. A different group member then recorded the turtle's weight.". Example 2: "Students determined carapace length (cm) and weight (g) for all individuals.".
Title Page. Not all lab reports have title pages, but if your instructor wants one, it would be a single page that states: . The title of the experiment. Your name and the names of any lab partners. Your instructor's name. The date the lab was performed or the date the report was submitted.
A good experimental design requires a strong understanding of the system you are studying. There are five key steps in designing an experiment: Consider your variables and how they are related. Write a specific, testable hypothesis. Design experimental treatments to manipulate your independent variable.
Scientific method step: As well as… Introduction: states your hypothesis: explains how you derived that hypothesis and how it connects to previous research; gives the purpose of the experiment/study: Methods: details how you tested your hypothesis: clarifies why you performed your study in that particular way: Results
The Scientific Method starts with aquestion, and background research is conducted to try to answer that question. If you want to find evidence for an answer or an answer itself then you construct a hypothesis and test that hypothesis in an experiment. If the experiment works and the data is analyzed you can either prove or disprove your hypothesis.
At the core of biology and other sciences lies a problem-solving approach called the scientific method. The scientific method has five basic steps, plus one feedback step: Make an observation. Ask a question. Form a hypothesis, or testable explanation. Make a prediction based on the hypothesis. Test the prediction.
method used for obtaining reliable results, and the results you aim to attain. Usually, an abstract is no more than a few lines. For a detailed report, which can easily go over ten pages, you can allocate an entire page for the title and abstract. However, for a simpler experiment with a concise report, you can start the introduction
Procedure: The procedure includes the step-by-step how of your experiment. The procedure should include: A description of the experimental design and how participants were assigned conditions. Identification of your independent variable (s) (IV), dependent variable (s) (DV), and control variables. Give your variables clear, meaningful names so ...
Use the past tense: Always write the method section in the past tense.; Be descriptive: Provide enough detail that another researcher could replicate your experiment, but focus on brevity.Avoid unnecessary detail that is not relevant to the outcome of the experiment. Use an academic tone: Use formal language and avoid slang or colloquial expressions.. Word choice is also importa
1 Answer to this question. To write any research paper, you must first read several published papers. Each type of scholarly article is written in a specific style, and you need to understand and be able to write in that style. Since you are planning to write an experimental report or a lab report, you should read several such published reports.
To structure your methods section, you can use the subheadings of "Participants," "Materials," and "Procedures.". These headings are not mandatory—aim to organize your methods section using subheadings that make sense for your specific study. Note that not all of these topics will necessarily be relevant for your study.
Summary. Summarize your overall evaluation of the report in 2-3 sentences. Focus on the experiment's method and its result. For example, "The authors dropped balls from different heights to determine the value of g". You don't need to go into the specific details, just give a high level summary of the report.
Identify the hazards associated with the experiment and provide a method to prevent or minimise the risks. A hazard is something that can cause harm, and the risk is the likelihood that harm will occur from the hazard. ... The rule of thumb is that you should write the method in a clear way so that readers are able to repeat the experiment and ...
Clear scientific writing generally follows a specific format with key sections: an introduction to a particular topic, hypotheses to be tested, a description of methods, key results, and finally, a discussion that ties these results to our broader knowledge of the topic (Day and Gastel 2012). This general format is inherent in most scientific ...
Writing* / standards. The methods section of a research paper provides the information by which a study's validity is judged. Therefore, it requires a clear and precise description of how an experiment was done, and the rationale for why specific experimental procedures were chosen. The methods section should describe wh ….
However careful writing of this section is important because for your results to be of scientific merit they must be reproducible. Otherwise your paper does not represent good science. Goals: Describe equipment used and provide illustrations where relevant. "Methods Checklist" from: How to Write a Good Scientific Paper. Chris A. Mack. SPIE. 2018.
4. Use subheadings: Dividing the Methods section in terms of the experiments helps the reader to follow the section better. You may write the specific objective of each experiment as a subheading. Alternatively, if applicable, the name of each experiment can also be used as subheading. 5.
Key points. Developing a method is an important part of planning an investigation. In an experiment, evaluate the validity of the steps leading up to the conclusion for it to be valid. Random and ...
The figures should be indicated within parentheses in their first mention in the "Materials and Methods" section. Headings and as a prevalent convention legends of the figures should be indicated at the end of the manuscript. If a different method is used in the study, this should be explained in detail.
Even a Little Bit of Expertise Can Go a Long Way. My usual approach to helping students get past this floundering stage is to tell them to avoid thinking up a study altogether. Instead, I tell ...