Please enable JavaScript in your browser to enjoy a better experience.

30 Cool Abstract and Background Photoshop Tutorials
List of useful Photoshop tutorial, articles, and guides to create different types of cool abstract backgrounds.
Backgrounds are perhaps the most multi-purpose design elements that can be used in almost any kind of design. Although you can download different backgrounds from the web but the flexibility and possibilities are greater when you design them yourself in Photoshop .
Previously, I did a post on Photoshop text effect tutorials , and similarly, in this post, I am covering the best and most updated collection of cool and abstract Photoshop background tutorials. Let’s take a dig at it.
Read Also: 50 Best Website Interface Photoshop Tutorials
Abstract Background
Here is a simple Photoshop tutorial which will help you to create a green and yellow abstract backdrop .
Windows Vista Style Wallpaper
This is an excellent blue abstract background inspired by Windows . Watch this video to replicate it yourself quickly.
Colorful Wavy Stripes
In this guide, you are going to learn to create a colorful background with waves and stripes.
Colorful Computer Background
This is Aurora abstract background video tutorial. You can use it for your future design project or as a desktop wallpaper.
Abstract Low-Poly Pattern
The low poly technique was initially used for 3D models and scenes. With this article, you can create this pastel colors background .
Abstract Design with Patterns
Create an abstract background using simple shapes and gradients in Photoshop. It takes 20 minutes to recreate it.
Low poly Background Design
Here is an unusual low poly background with a yellow and red gradient. Watch this tutorial on YouTube to create the same pattern.
Abstract Wallpaper
You would need to use both Photoshop and Illustrator to create this complicated abstract background.
Abstract Wallpaper in Pixelmator
The effect on this pattern seems complicated, but you will be surprised how easy it is to recreate it in Photoshop .
MSNBC New Background Design
This is one more Photoshop tutorial from Abduzeedo. It will teach you to make MSNBC header effect from scratch.
Seamless, Circular, Geometric Background Pattern
You can quickly create this black and white geometric background in Photoshop with this guide. It’s seamless pattern which means you can make as big as you want.
Abstract Explosion
This is a 15-minutes video tutorial on how to create this impressive color explosion pattern.
Abstract Design
This is a geometric background with squares and circles. You are going to use simple shapes and gradients in Photoshop .
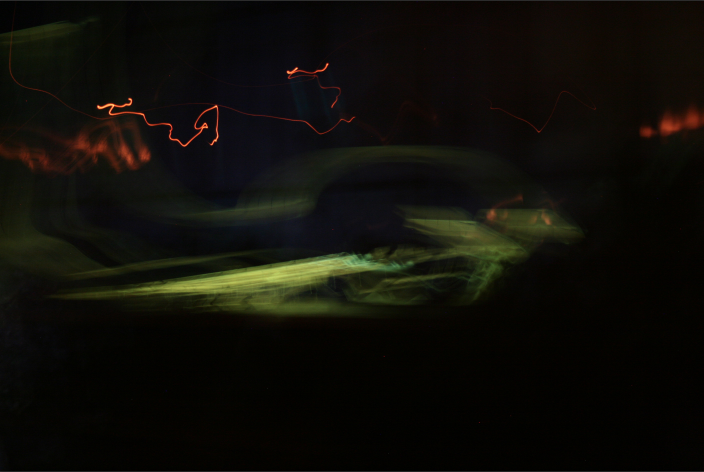
Abstract Twisted Light Fibers Effect
This is a beautiful abstract backdrop with twisted light in red and yellow colors. You can replicate this technique after watching the video.
Make Your Own Design into a Seamless Pattern
Easy and efficient way to create a seamless pattern using your own design. You will use blending modes, simple shapes, and layers .
Geometric Sunburst & Starburst Design
Create a cool geometric sunburst (or a starburst) with just a few effects in Adobe Photoshop.
Polygon Shapes
This tutorial will tell you how to turn a beautiful picture with dandelions into a stylish polygon shapes pattern with a gradient.
Abstracts “Polygon Blast”
This video tutorial is a part of Youtube series called ‘Abstrakts’. It will walk you through the process of creating these fantastic polygon blasts with Photoshop.
Simple Geometric Pattern
Here is a one-minute tutorial which will tell you how to create a seamless pattern with triangles in orange, yellow, and green.
Abstract Wallpaper in Photoshop CC
Check out this simple video tutorial which will help you to make this purple abstract funnel with Photoshop . The video has no words, just step-by-step process.
Abstract background in Photoshop
Watch this quick video of how to create a simple abstract pattern with circles and blue and green light leaks.
Abstract Liquify Effect Background Texture
This is an essential tutorial on how to make a stunning liquid backdrop in Photoshop. You are going to use Gradient Map and Filters.
Abstract Wormhole Background
Do you like a sky full of stars? Then you would like this tutorial showing the process of creating an abstract background with wormhole effect .
Abstract Wallpaper in Adobe Photoshop cc 2017
This video guide will walk you through the process of building an abstract background with a gradient from scratch .
Making of Organic Design with Distorted Type
Here is a fantastic simple tutorial from Vimeo showing you how to create an organic military pattern in Photoshop.
Geometric Background Effect
Quick Tip is a series of articles created to help you spend less time on designs. Here is a basic tutorial on how to create a geometric triangle pattern .
Carpet Pattern From “The Shining”
Here is a design which looks like an old carpet pattern. You can recreate this background with Photoshop.
Knitted Pattern
Get to know how to make this cute knitted pattern with Adobe Photoshop. Here you’ll find step-by-step instructions .
Intertwining Trellis Pattern
This is a simple guide on how to create this cool intertwining trellis pattern in Photoshop from start to finish. You will use rectangles and grid layout.
Colorful Geometric Pattern
You see here a colorful geometric pattern which can add more depth to your designs. You can replicate the background using this article .
What are You Looking for?
- Affinity Designer Tutorials
- Affinity Publisher Tutorials
- Assembly App
- Design Careers
- Design Challenges
- Design Fundamentals & Theory
- Design Inspiration
- Design Schools
- Design Software
- Experiences in Design
- Fonts And Imagery
- Illustrator Tutorials
- Learning Design Online
- Logo Analysis
- Logo Design
- Marketing & Design Agencies
- Mobile Design
- Photoshop Tutorials
- Starting In Design
- The Design Industry

5 Easy Ways To Make Abstract Art in Photoshop
Create beautiful works of digital art.
I’m going to level with you here. There are probably hundreds of ways to make abstract art in Photoshop; and each way will produce a completely different look. Even using the same technique each time can produce a different look. That’s the beauty of digital art.
Rather than tell you every single specific way to create abstract art in Photoshop, I’m instead going to walk you through some of the ways I use to create. The five tools and techniques I use most often to create abstract art in Photoshop are the Clouds and Fibers filters, and the Depth Maps, Warp, and Liquify tools. Here’s a bit about how to use each of those to easily create abstract, digital art.
Note: I’m using a canvas size of 1600 x 1080 at 72 dpi, RGB if you want to follow along.
Using Clouds & Difference Clouds
How to create clouds.
There are a lot of things you can create from the clouds tools. They give you a quick, one step way to generate some texture on an otherwise blank canvas.
To use, just go to Filter > Render > Clouds or Difference Clouds
This creates a cloud like texture on your canvas that is based on the foreground and background colours you have selected. Using Clouds will give you a texture using the exact colours you have selected, while Difference Clouds will give you the inverted colours.
For example, the below example is using Clouds with a foreground colour of #00eaff and a background colour of #ff0072

From here, you can play around with the colours until you find the perfect combination. Also, note that the actual texture of the clouds is random each time you generate it. This means that if you’re not happy with the look, just do it again.
This is a very simplistic way of creating abstract art in Photoshop, but it’s really just a starting point. Now that you’ve created a unique texture you can manipulate it however you like. Change the colours, play with the contrast, or pile layers of clouds on top of each other using blend modes. If that makes no sense, let me explain.
Combining Clouds
Using the image I created with Clouds (The blue and magenta one), I’m going to create a new layer by hitting the New Layer icon on the Layers panel, or by going Layer > New Layer, then hitting OK. Now that I have a new layer created, above my other Clouds created image, I’m going to go Filter > Render > Clouds once again, using the same foreground and background colours as before.
Now that I have two layers of blue and magenta clouds, I’m going to click the top layer and add the blend effect Hard Mix in the drop down menu. This is what I get:

At this point, you can see some really solid forms with hard edges. You can keep going with this look, or if you prefer one of the other blend modes, experiment with them instead. To continue we can make subtle adjustments to the colours and brightness in the above image to change the entire look.
With the top layer selected, go to Image > Adjustments > Hue/Saturation
Adjust the sliders until you’re happy with your image. Or, to follow along with mine, bring the Hue down to -50, the Saturation to -20, and Lightness to +1 (Or just ignore Lightness since that +1 isn’t doing much).

Suddenly, just by making those minor adjustments, we have a really cool piece of abstract art. From there you can keep experimenting with more cloud layers, blend effects, and adjustments.

How To Create Fibers
Using the Fibers tool/filter is another great way to generate texture from a blank canvas. It works the same way as the Clouds tool where it generates a specific texture based on your foreground and background colours.
To use fibers, go Filter > Render > Fibers
You can then adjust the Variance and Strength settings based on the look you’re after. I just went with the default.

The image that’s created is a highly textured pattern of vertical lines that looks similar to either close up hair or fur.
How To Take it Further
From here you have lots of options depending on what kind of abstract image you’re going for. For instance, you can add a third colour to part of the image using the gradient tool.
Create a new layer by hitting the New Layer icon on the Layers panel, or by going Layer > New Layer, then hitting OK. Next, I’m going to change the foreground colour to #e20180. Then using the Gradient Tool (Press G or find it in the toolbar) I’m going to draw a gradient that blends to transparent from the top left corner diagonally down to the bottom right. Here’s what that looks like.

Next I’ll do what I did with the clouds image and play with the blend layer effects. On the layers panel, set the magenta gradient layer to Exclusion from the drop down menu to get a cool effect that looks something like this.

From here you can continue adding additional colours, text, or you can just call it a day. However, this is a really good jumping off point for the next way to make abstract art on this list, which is using one of the 3D tools.

Using A Depth Map
How to create a depth map.
Using the 3D tools in Photoshop is a lot of fun and I’ve done many videos and tutorials on them . One tool in particular is really great to for creating abstract art; the depth map to plane tool. However, unlike the two previous effects, for this one you need to first have an image ready to go. The depth map to plane effect only manipulates an existing image rather than creating a new one from a foreground and background colour. For that reason, we’re going to use our Fibers image from above as the starting point.
The first thing you’ll need to do is flatten your layers from the Fibers effect. To do this, you can select all your layers together by holding Shift , then right-clicking and hitting Merge Layers . Now you should have a single layer in your Photoshop layers panel. We’ll use the Depth Map effect on this layer only.
To create a Depth Map, go to 3D > New Mesh from Layer > Depth Map to > Plane

This particular 3D tool works really well in this case because there’s so much texture in the Fibers image. In fact, you get a pretty intricate looking 3D image right away.

To get an effect that will actually render without overheating your computer, open the Properties panel and the 3D panel from the Windows menu. In the Properties panel, hit Unlit Texture in the drop down menu at the top. Then, click Current View on the 3D panel and bring the FOV up to a number that lets your image take up the whole screen. I’m using 80 .

At this point you can see how interesting this 3D tool is. You can adjust the angle of the 3D shape to until your happy with how it looks. To adjust the angle, click on Scene in the 3D panel and click on the image to move it around. Remember to adjust the FOV if needed as you adjust the angle of your 3D form.

When you’re happy with how your image looks, right-click on it’s layer in the Layers panel and hit Render 3D Layer , then wait for it to render. Next, right-click that same layer and hit Rasterize to completely flatten your 3D image. If you’re happy with your image, then great. But if your image looks like mine then you might want to make some adjustments.
Making Adjustments To Your Image
In my image, I want to increase the texture and contrast. To do this, I’ll use the Camera Raw Filter via Filter > Camera Raw Filter. Here I’m going to adjust the Temperature, Contrast, Texture , Clarity , and Vibrance . Then hit OK . The end result is pretty cool looking.

You can use the Depth Map to Plane effect on any image; one you’ve created yourself or even a photo. It simply extrudes all details from the image into a 3D space and makes a really cool abstract effect when it does so.

Using Warps
How to warp.
Another really fun way to making abstract art in Photoshop is to use the Warp tool.
The warp tool is found in Edit > Transform > Warp
The warp tool distorts existing imagery in any way you manipulate it. You can start with an existing image, like we did above, or create something brand new. Since we used an existing image last time, I think we’ll create something new here using simple techniques.
To begin, I’m going to create a new layer with a dark coloured background. I’m using #0c0422 assigned to my foreground colour and filling in my canvas by going Edit > Fill then selecting the foreground colour.
Next, let’s use the Elliptical Marquee tool in the main toolbar to create a circular selection in the middle of the canvas. Press Shift while drawing the circle to make it perfect.

Create a new layer above the background colour by going to the New Layer icon on the Layers panel, or by going Layer > New Layer, then hitting OK.
Here we’re simply going to use a large brush (Mine is 350 px)with a 0% Hardness to draw in some colour into the circle. I’m using the colours #00ffcc, #ffea00, and #ad00fe to colour inside the circle. You can add as much colour as you like.

Next we’re going to use the Warp tool to completely distort our colourful circle. So with the circle layer selected, go to Edit > Transform > Warp
Now there are some options on how you can warp the shape. You can warp any area of the shape either by clicking and dragging on the shape itself or the blue points around the bounding box. Manipulate the shape however you like, stretching, folding, etc.

Once you’re happy with your shape you can leave it as the interesting piece of digital art it is, or duplicate the shape to fill a larger area. That’s what I’m going to do next.
What To Do With The Warped Image
Since we have a pretty fantastic warped image already, why not duplicate it? Click on the layer you want to duplicate in the Layers panel, then press Ctrl J or right-click on the layer and hit Duplicate Layer , then hit OK .
Duplicate the shape as many times as you like, placing it all around the canvas. You can rotate some of the shapes ( Ctrl T to transform, then Rotate from the corner) so they don’t all look identical, or even add more Warp to some of the shapes.
With each new shape you duplicate, try giving it a blend mode (As we’ve done previously) that works well with the look you’re trying to achieve. For example, in this image I’ve duplicated the initial shape twice and the two new shapes each have a blend mode of Linear Dodge.

I’m going to duplicate the shape three more times and place the new shapes around the canvas, rotating some of them. When all the shapes are placed, the last thing I want to do is add some noise to each one of my warped shapes.
Add noise to a layer by going Filter > Noise > Add Noise… then decide how much noise you want to add with the slider. I’m going with 11.55%

For each shape on your canvas, click its layer then go Filter > Add Noise to add the same amount of noise that you previously applied. Do this will all your shapes.

When you’re done you might have something that looks like this. You can decide to add noise to the background or not; I didn’t. You can continue to move the shapes around until you’re happy, but remember that once you’ve applied Noise , if you Warp any shape, the noise will warp as well. So try to have your shapes finalized before adding noise.

Using Liquify
How to use liquify.
Liquify is one of the coolest tools in Photoshop. It’s a really powerful tool for photo editing, but also for creating abstract art. Liquify is another tool that needs to work on an already existing image so we’re going to make one.
To use Liquefy, go Filter > Liquify … to open the liquify options.
First, we’re going to do something similar to what we did above, but simpler. Create a new layer and hide any other layers you have, or use the purple background from the previous image. I’m using a simple white background that I made by clicking on the new layer, then going Edit > Fill then selecting White under contents.
Using your brush tools, with a soft brush ( 0% Hardness ), draw in some colour on the page. Really anywhere you like. You can use the colours we used above to make it easy. Those colours are: #00ffcc, #ffea00, #ad00fe, and 0c0422. This is what I’ve created:

The next thing I’m going to do is optional. I want the edges of each colour to be a little softer so I’m going to blur the whole image by going Filter > Blur > Gaussian Blur and bring to radius to 50 . Now we’re ready to liquify.

With your image layer selected, go to Filter > Liquify. Now things get interesting. The Liquify tools let you manipulate the pixels in an image in a few different ways.
The different Liquify tools you can use are on the left of the Liquify window. There’s the Forward Warp tool, the Smooth tool, Twirl , Pucker , Bloat , and a few more. On the right are the settings for each tool. If you’re unfamiliar with the Liquify tools all the options here can be pretty overwhelming. So let’s just keep things simple for now.
I’m going to only use the Forward Warp tool which is found at the top left of the Liquify window. I’m using a brush size of 200 and default everything else. Now comes the fun part. Just mess around with the image. Click and drag that forward warp tool all over the image to make things liquid.

After playing with the Liquify tool for awhile, you’ll notice how your image has a very liquid-like effect. Mine looks like glistening oil, but I like it. Here’s what I made, moving the forward warp tool in every which direction, moving fast and slow, making large gestures and small.

After Liquifying
And that’s pretty much it. You can go back and add more Liquify whenever you want, change colours, or take the whole image and make it a depth map like we did before. That might actually look pretty intense… but I’ll let you do that one for yourself.

Creating Abstract Art in Photoshop – In Summary
I really hope you enjoyed learning about the various ways you can create abstract art in Photoshop. I use these techniques and tools on a regular basis for creating abstract art; often using two or three at a time.
Is there another great way to make abstract art in Photoshop you know of? Do you have a favorite way to create abstract art in Photoshop? Let me know in the comments below!
If you want to learn more, including how to make abstract art in Photoshop, check out the official Adobe Photoshop Classroom in a Book .
- Clouds Tool
- Difference Clouds
- Fibers Tool
- Hue/Saturation
- Photoship Filters
- Warp. Noise
How To Do A Simple Glitch Effect in Photoshop – Tutorial

Can You Make Awesome Album Cover Art With Dall-E?

How To Design A Business Card in Affinity Publisher | Tutorial
How To Design A Logo On Your Phone – Assembly Logo Tutorial
Leave a reply cancel reply.
Your email address will not be published. Required fields are marked *
Your Name *
Email Address *
Save my name, email, and website in this browser for the next time I comment.
Submit Comment
Privacy Overview
How Do I Create an Abstract Background in Photoshop?

Creating abstract backgrounds in Photoshop is a fantastic way to add a touch of creativity and uniqueness to your designs. Whether you're designing a website, poster, or any other type of graphic, an abstract background can make your project stand out. In this tutorial, we will explore different techniques to create stunning abstract backgrounds using Photoshop.
Step 1: Setting up the Canvas
To begin, open Photoshop and create a new document by navigating to File > New . Set the dimensions and resolution according to your requirements. For example, if you're designing a website header, you might choose a width of 1200 pixels and a height of 400 pixels.
Step 2: Choosing Colors
The first step in creating an abstract background is selecting the colors you want to use. You can either choose complementary colors or opt for a monochromatic scheme. To select colors, you can use the Color Picker tool located on the left-hand side toolbar.
- Experiment with different color combinations - Don't be afraid to try out various color combinations and see what works best for your design. Remember that contrasting colors often create a visually striking effect.
- Use color palettes - If you're struggling to find the right color combination, consider using online color palette generators for inspiration.
Step 3: Adding Gradient Backgrounds
To add depth and visual interest to your abstract background, gradients are an excellent choice. Follow these steps:
- Select the Gradient tool from the left-hand side toolbar.
- Click and drag on the canvas to create a gradient. You can experiment with different directions and lengths to achieve the desired effect.
- Adjust the gradient colors by double-clicking on the gradient preview in the top toolbar. This will open the Gradient Editor, where you can modify the colors and transitions.
Step 4: Applying Filters and Effects
To further enhance your abstract background, you can apply filters and effects. Photoshop offers numerous options to experiment with:
- Noise filter - Adds a grainy texture to your background, giving it a vintage or futuristic feel.
- Blur filter - Softens elements of your background, creating a dreamy or ethereal effect.
- Liquify filter - Allows you to distort and transform parts of your background, creating interesting shapes and patterns.
The specific filters and effects you choose will depend on your personal preferences and design goals. Don't be afraid to play around with different options until you achieve the desired outcome.
Step 5: Adding Shapes or Textures
If you want to add more complexity to your abstract background, consider incorporating shapes or textures:
- Add shapes using shape tools - Select shapes such as circles, rectangles, or polygons from the left-hand side toolbar. Experiment with different sizes, colors, and opacities to create unique patterns.
- Add textures using blending modes - Overlaying textures onto your background can add depth and visual interest. To do this, find a texture image online or use one of Photoshop's built-in textures. Place the texture layer above your background layer and experiment with blending modes to achieve the desired effect.
Step 6: Saving and Exporting
Once you're satisfied with your abstract background, it's time to save and export your creation:
- Save your Photoshop document in its native format (.psd) so you can easily make changes later if needed.
- Export your abstract background as an image file (.jpg, .png, etc.) by selecting File > Export > Export As . Choose the desired file format, adjust any additional settings, and click "Export. "
Remember to consider the intended use of your abstract background when choosing the appropriate file format (e.g., transparent backgrounds for web design).
Congratulations! You have successfully created an abstract background in Photoshop. By combining colors, gradients, filters, and shapes/textures, you can create unique and captivating backgrounds for all your design projects.

About the author:

Related posts
How Do I Create a Background in Photoshop? How Do I Create a Background in Photoshop? Creating a background in Photoshop is a fundamental skill for any designer or photographer. Whether you... September 8, 2023 photoshop -->
How Do I Create a Transparent Background in Photoshop? Creating a transparent background in Photoshop can be incredibly useful for various design projects. Whether you want to remove the background of an... September 8, 2023 photoshop -->
How to Create an Animated Background in Photoshop? Creating an Animated Background in Photoshop If you're looking to add some visual appeal to your designs, creating an animated background can be a... September 8, 2023 photoshop -->
How Do You Create a Textured Background in Photoshop? Creating a Textured Background in Photoshop Have you ever wanted to give your designs or images an extra touch of depth and personality? One way... September 8, 2023 photoshop -->
How Do I Create an Action in Photoshop? Creating an Action in Photoshop Photoshop offers a wide range of powerful tools and features that can help you streamline your workflow and save... September 8, 2023 photoshop -->
How Do I Create an Icon in Photoshop? In this tutorial, we will learn how to create an icon in Photoshop. Icons are essential graphical elements that represent various functions,... September 24, 2023 photoshop -->
How Do I Create an Action in Photoshop CC? Creating actions in Photoshop CC can save you a lot of time and effort, especially when you have repetitive tasks that need to be done. In this... September 8, 2023 photoshop -->
How Do I Eliminate Background in Photoshop? How Do I Eliminate Background in Photoshop? When working with images, it's often necessary to remove the background to isolate the subject. This... September 8, 2023 photoshop -->
How Do I Create a Stripe Pattern in Photoshop? Creating a stripe pattern in Adobe Photoshop is easy and can be a great way to add texture and interest to your designs. Whether you're creating a... February 15, 2023 photoshop -->
How Do I Create a Grid in Photoshop? Creating a Grid in Photoshop In this tutorial, we will learn how to create a grid in Photoshop. A grid is a useful tool that helps designers align... September 8, 2023 photoshop -->
You haven't yet saved any bookmarks. To bookmark a post, just click .
- Template Shop
- Create an Abstract Background in Photoshop
- May 28, 2012
- Tutorials | Photoshop | Create an Abstract Background in Photoshop
In this tutorial we will learn how to create an abstract background in Photoshop.

Program: Photoshop CS5
Estimated Completion Time: 30-40 Minutes
Tutorial Assets
The following assets were used in the creation of this tutorial.
* Grunge Textures
* Halftone-2-brushes by env1ro
Create a new document with width 800px and height 800px.

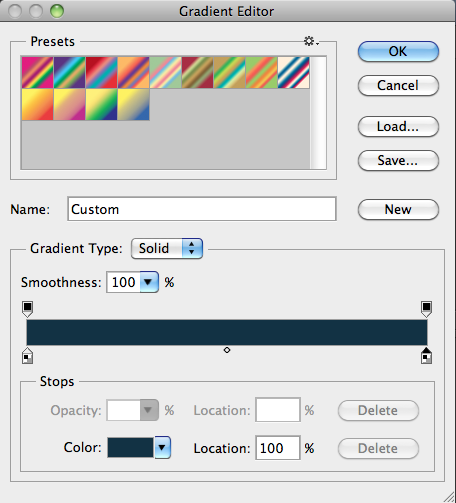
Click on the icon of ‘create new fill or adjustment layer’ present at the bottom of layers panel and select the option of ‘Gradient’. Use the given settings.

Open the grunge patterns file. Now click on this gradient layer and go to Layer > Layer style > Blending options. Use the given settings.

Set # 5f4000 as your foreground color. Create a new layer by going to Layer > New layer. Select the brush tool and pick brush4, 6 from the halftone2 brush pack and apply it at the edges as shown below.

Click on this brush strokes layer and go to Layer > Layer style > Blending options. Apply the given settings.

Create a new layer, select the ‘pen tool’ and click on the option of ‘shape layers’ from the top options bar. Draw the shape as shown below.

Draw few more shapes in different colors as shown below.

Click on one of the shapes layer and apply the following layer style settings on it.

Right click on this layer and select the option of ‘copy layer style’. Now right click on rest of the shape layers and select ‘paste layer style’ to apply the same effects on them.

Next, we’ll create few silver lines. Select the hard round brush and adjust its size at 8px. Now create a new layer. Select the ‘pen tool’ and choose the option of ‘paths’ from the top options bar. Draw the curvy line. Now right click and select the option of ‘stroke path’, choose brush as shown below.

After that, right click again and this time select the option of ‘delete path’. Place this layer in between the colorful lines layers. Draw another line on a new layer in the same way.

Select one of the white lines layer and apply the following layer style settings.

Create a new layer, select # 5f4000 color and apply hard round brush on it in different sizes. Change the blending mode of this layer to ‘Color burn’ and reduce its opacity to 30%. Place this layer just above the background gradient layer.

Create a new layer; select the ‘elliptical marquee tool’ to draw a circle. Fill this selection with #622300 color using ‘paint bucket tool’. Duplicate this layer. Now with the selection still on, go to Select > Modify > Contract. Use 10px value here and hit ‘delete’. This will form a ring on this layer. Now click on the circle layer and reduce its size a bit using ‘free transform tool’. To activate free transform tool’ press Ctrl+ T.
You can add drop shadow to the ring layer to give it some character. Reduce the opacity of circle layer to 25% and ring layer to 40%. Duplicate these layers few times to place the circles at different positions.

Our background is done. We can stylize text according to it. Create a new layer and type in your text using # 5e2f00 color.

Now apply the following layer style settings for the text.

Photoshop Tutorials & Resources
- Amazing Photo Manipulation Tutorials in Photoshop
- Amazing Water & Light Splash Effect in PhotoShop
- Colorful Cosmic Effect in Photoshop
- Awesome Special Effects in Photoshop
- Learn How To Create An Oil Painting Effect in Photoshop
- Vintage Image Effect in Photoshop
- Learn How To Make Photos Come to Life in Photoshop
- Applying a Grunge Shattered Glass Effect to Your Design using Photoshop
- How to create a grunge effect and apply it on a photo in photoshop
- Create A Dream in a Bottle Photo Montage in Photoshop
- Create a Melting Photo Frame in Photoshop
- Learn How To Create A Grass Effect In Photoshop
- Shattering Photo Manipulation in Photoshop
- Create a Magical Fantasy Image Effect in Photoshop
- How To Create A Beautiful Animated Effect in PhotoShop
- Learn How To Create A Scenic Sun Rise In Photoshop
- Realistic Rainy Window Effect in Photoshop
- Colors Of Autumn – Photoshop Blending Tutorial
- Creative Thinking – Photo Manipulation
- Create A Realistic Rain Effect in Photoshop
- Learn How To Create A Realistic Underwater Effect In Photoshop
- Shiny Starburst Effect in Photoshop
- Retro Disco Background Design in Photoshop
- Mind-Blowing Artistic Portrait Photo Effects With Photoshop
- How to Easily Add a Shimmering Bokeh Effect on Any Image in Photoshop
- Creative Photo Effects With PhotoShop Actions
- How to create a beautiful watercolor effect on any Photograph in PhotoShop
- Learn How to Create A Night Effect in Photoshop
- Flaming Meteor Collision Effect in Photoshop
- Create Wheel on Fire Effect in Photoshop
- Create a Fantasy Photo Manipulation in Photoshop
- Learn How to Create Water Reflection and Fog Effect in Photoshop
- Transform a Photograph with a Paint Splash Effect in Photoshop CS6
- How to Create a Polaroid Photo Collage Using Photoshop CS6
- How to do Selective coloring of an Image in Adobe Photoshop CS6
- Photo Re-Touch Using Photographic Toning Effect in Photoshop CS6
- How to Blur Part of an Image in Photoshop CS6
- Creating Tilt-Shift Blur Effects With Photoshop CS6
- Creating Beautiful Bokeh Effects Using Photoshop CS6
- Tutorial on Content-Aware Move/Extend Tool in Adobe Photoshop CS6
- How to Brighten An Image in Photoshop
- Create Bubbles using Photoshop
- Create a Brick wall texture using Photoshop
- Twirl / Swirl Effect in Photoshop
- Halo Effect in Photoshop
- Create a Collage using Photoshop
- Creating a Typographic Portrait in Photoshop
- Add A Colorful Spring Look to Your Photos using Photoshop
- Hearts Valentine’s Day Card Tutorial in Photoshop
- Learn How to Create A Gorgeous New Year Card in Photoshop
- How To Create A Clipping Path In Photoshop
- Retouch an image using photoshop
- Book Poster Design in Photoshop
- Learn to Make a Delicious Cupcake in Photoshop
- How to Convert a Photo to a Vector Painting in Photoshop in one simple step
- How to transform a photo into a Pencil Sketch in PhotoShop
- How to create a circular photo collage in Photoshop
- Learn How to Create a Realistic Mailbox Icon in Photoshop
- Create a Rainbow in Photoshop
- Create a Smoke Effect in Photoshop CS
- Lighting Effects in Photoshop
- Poster, Banner, Business Card, Logo, Flyer & Website Design
- Music Poster Design in Photoshop
- Typography Poster Design
- Designing a simple website banner with a logo using Photoshop
- How to Create a Dynamic Party Flyer in Photoshop
- Create a Double Exposure Business Card Using Photoshop
- Learn How to Create a Print Ready Business Card in Photoshop
- 3D Logo Design Tutorial in Illustrator & Photoshop
- Learn how to design a stylish Portfolio Layout in Photoshop
- Grunge Style Blog Design – Photoshop Tutorial
- Create a website header using Photoshop
- How to design a website layout in Photoshop
- Slice your layout and export images using Photoshop
- Text Effects
- Glossy Text Effect in Photoshop
- Nature-Inspired Text Effect in Photoshop
- Fun & Exciting Text Effect in Photoshop
- Learn How To Create Sand Text Effect In PhotoShop
- Create a Cool Metallic Text Effect in Photoshop
- Learn How To Create Graffiti Text in Photoshop
- 100 Stunning Photoshop Text Effects & Layer Styles
- Magical Christmas Text Effects and Photoshop Styles
- Awesome Text Effect in Photoshop
- Create a Mystery Green Text Effect in Photoshop
- Brushes & Actions
- Photoshop Star Brushes
- Photoshop Christmas Brush Collection
- Best Splatter & Spray Paint Photoshop Brushes
- Mind Blowing Free Sparkling Space Photoshop Brushes
- Showcase of High Quality Free Swirly Photoshop Brushes
- Best Photoshop Heart Resources
- Amazing Photoshop Actions for Quick Photo Enhancements
- Cool Photoshop Actions – Create Amazing Photo Effects Within Minutes!
- Amazing Photo Collage Templates in Photoshop
- Free Photo Collage Template Using Smart Objects in Photoshop
- Dazzling Photo Effect Templates in Photoshop
- Free Photoshop Website Templates
- 20 Outstanding tutorials for creating Web Layouts in Photoshop
- Premium Photoshop Templates More Photoshop Resources >>
Related Posts
Tutorials categories.
- 3D Modeling
- Adobe Dreamweaver
- Adobe Fireworks
- Autodesk Maya
- Content Writing
- CorelDraw Tutorials
- Flash Tutorials
- Graphic Design
- Illustrator
- Java Script
- Print Design
- Website Design
Latest posts

Happy Mother’s Day Images – Mother’s Day Wishes

Mom You’re the Best eCards

I Love You Mom Images
Logo & Text Animation in Maya Tutorial

The ABCs of Video Game Design: A Beginner’s Guide

Game Design Document (GDD) Sample

Featured Templates

How to add different photos inside alphabets in Canva usi...

How to add videos inside alphabets in Canva using frame e...

Free Website Add-ons & Web Tools
- WordPress Themes
- Landing Page Templates
- Shopify Themes
- Creative Resume Templates
- Print and Corporate Identity Templates
- Powerpoint Templates
- Social Media Templates
Blog Navigation
- Website Templates
- Resume Templates
- WooCommerce Themes
Write For Us
We are open to publishing guest posts related to graphic and web design. These could be tutorials, useful graphic/web design resources or in-depth guides. If would like to contribute, we would love to hear from you. Please contact us using the button below.

Please leave this field empty.
30 Best Photoshop Abstract Effect Tutorials
Sometimes, you may find it difficult to look for some of the highest quality photoshop tutorials using search engines. As most of time, almost all tutorials would label themselves to be good, high quality or even the best photoshop tutorial you can find. When searching through all these tutorials, your time is wasted.
In order to save your time, Photoshop Lady come up with 30 Best Photoshop Abstract Effect Tutorials of All Time. These are selected from our Photoshop users and readers.

Create a Simple Vibrant Light Effect in Photoshop
Under: abstract effect , photoshop tutorial ,.
In this tutorial, you will use a few household objects to create some super photographic resources. Then follow this Adobe Photoshop tutorial manipula

Create Interesting Abstract Backgrounds in Photoshop CS6
Share this article
Photoshop is a great tool for image creation and editing. Photoshop CS6 in particular has some impressive new functions that allow you to easily create a variety of abstract backgrounds. Instead of searching online for well-suited backgrounds or browsing through stock photography libraries, you should consider making your own background; you’d be surprised at how little time or technique is involved.
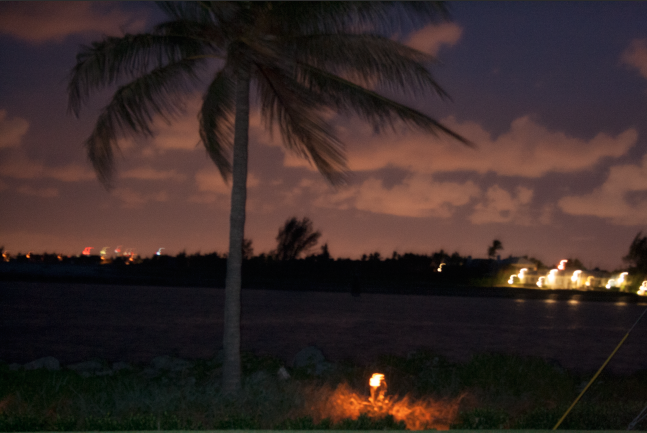
Turning a Bad Photo Into a Useful Bokeh Background
Turning a Good Photo Into a Useful Background
Create a Useful Background With A Custom Brush
Create a Diagonal Spectrum Effect

Frequently Asked Questions on Creating Abstract Backgrounds in Photoshop CS6
How can i change the foreground and background color in photoshop cs6.
Changing the foreground and background color in Photoshop CS6 is quite simple. First, select the foreground color box, located at the bottom of the toolbar. A color picker window will appear, allowing you to choose the desired color. Repeat the same process for the background color box. Remember, the foreground color is used when painting, filling, and creating paths, while the background color is used to make gradients and fill in the erased areas of an image.
What is the use of fiber fill in Photoshop CS6?
Fiber fill is not a feature in Photoshop CS6. It might be confused with the term ‘Fibers’, a filter in Photoshop used to create a fibrous texture or increase the detail in an image. To use it, go to Filter > Render > Fibers, then adjust the variance and strength to your liking.
How can I remove the background of an image in Photoshop CS6?
To remove the background of an image in Photoshop CS6, use the Quick Selection Tool from the toolbar. Drag it over the area you want to keep. Then, go to Select > Inverse to select everything but your initial selection. Hit the delete key to remove the background. Remember to save your work as a PNG or GIF to maintain transparency.
Where can I find abstract backgrounds for Photoshop CS6?
There are numerous online resources where you can find abstract backgrounds. Websites like Pexels offer a wide variety of high-quality, royalty-free images. Simply search for ‘abstract background’, download your preferred image, and open it in Photoshop CS6.
How can I contrast foreground and background colors in Photoshop CS6?
Contrasting colors can be achieved by selecting colors that are opposite each other on the color wheel. In Photoshop CS6, you can use the Color Balance or Hue/Saturation adjustments to alter the colors of your foreground and background until you achieve the desired contrast.
How can I create a gradient background in Photoshop CS6?
To create a gradient background, select the Gradient Tool from the toolbar. Choose your desired colors for the foreground and background. Click and drag across your canvas to create the gradient. The length and direction of your drag will determine the gradient’s spread and angle.
Can I use custom shapes while creating abstract backgrounds in Photoshop CS6?
Yes, you can use custom shapes. Photoshop CS6 has a Custom Shape Tool in the toolbar. You can select a shape from the options panel and draw it onto your canvas. You can also import your own custom shapes into Photoshop.
How can I add texture to my abstract background in Photoshop CS6?
You can add texture by using the Texturizer filter. Go to Filter > Texture > Texturizer and choose from the different texture options. You can adjust the scaling, relief, and light direction for the texture.
Can I use brushes to create an abstract background in Photoshop CS6?
Absolutely! Brushes are a great way to add unique elements to your abstract background. Photoshop CS6 comes with a variety of brushes, and you can also download more from the internet. You can adjust the size, hardness, and opacity of the brush as needed.
How can I save my abstract background in Photoshop CS6?
Once you’re satisfied with your abstract background, go to File > Save As. Choose the desired format (JPEG, PNG, etc.) and location for your file. If you want to preserve layers for future editing, save your file as a Photoshop (.PSD) file.
James George is a professional web developer and graphic designer. James is an expert in design, and a professional web developer, with a special interest in WordPress. Founder of Design Crawl , James has been a professional designer since 2005.

18 Photoshop Background & Texture Tutorials
Textures and backgrounds can be used in a wide variety of ways in web design and graphic design projects. In this post I have brought to you a collection of Photoshop tutorials that will show how you can create your own backgrounds and textures in Photoshop and use them in your work. Not only these tutorials will help improve your skills and are fun to follow, you can also apply the learnings to create something new!
Each tutorial in this list will help you pick up techniques to make popular backgrounds such as starburst background, blurred background, geometric effect background and bokeh background in Photoshop. This post also has tutorials to create realistic wooden and metal textures in Photoshop from scratch using its powerful filters.
Most of these tutorials show how to make backgrounds and textures from scratch, while a couple of them use an image as the starting point and build upon it to create different backgrounds. Good thing is that all these Photoshop tutorials are for beginner skill level and can be easily followed by anyone. Wherever available, I have included the video tutorial as well.
How to Create Sunburst Background in Photoshop
In this video tutorial I will show you how to create sunburst in Photoshop by using distortion filters – wave and polar coordinates. You can also read my Photoshop sunburst tutorial for more detailed steps.
As a bonus, here are 10 free sunburst backgrounds for you that I made for readers of Super Dev Resources.
View Tutorial
How to Create a Geometric Background Effect in Photoshop

In this tutorial by Envato Tuts+, you will learn how to quickly create a geometric background effect using simple shapes and transparency in Photoshop.
Don’t forget to get our set of free colorful geometric backgrounds .
How to Create Blurred Background in Photoshop
Soft, blurry backgrounds act as excellent backdrops for text and graphic elements. This short video tutorial shows how you can quickly create blurred backgrounds using a photo as starting point.
If you are interested, you can also read my tutorial on creating blurred background using free tool Paint.NET .
Create Gold and Silver Reflective Foil Textures with Photoshop

Learn to create shimmering, metallic gold and silver foil textures in Photoshop with this tutorial. Gold and silver foil textures make awesome backgrounds and can also be used to emulate real hot foil stamping in your designs.
Here is a bonus resource for you to download – Free high quality gold foil textures .
Marble Texture Photoshop Tutorial

In this tutorial, you will learn about creating smooth rocky lines found on marble stones digitally in Photoshop. Additionally, the tutorial also shows how you can add gold veins to your texture and make it stand out as seen in the image above.
Do also check out this set of luxurious Gold Marble Texture backgrounds .
Metallic Effect in Photoshop

This tutorial will show you how to create brushed metal texture in Photoshop from scratch using gradients and basic filters like motion blur and noise. As an added bonus, grab our set of free brushed metal textures .
Create a Sparkling Gold Glitter Background in Photoshop

Love the sparkling and glittery textures? With this Photoshop tutorial, you can learn to create your own gold glitter texture background and use in your designs such as blog and social media posts.
Related: 10 Free Sweet Girly Textures in Purple, Pink and Lavender
Create a realistic star field with space dust in Photoshop

Well shot night sky and galaxy images are a piece of art. They are an excellent resource to add an interesting touch to your photo compositions. I used a starry night image as background for our freebie, New Year card inspired by the 80’s retro text effect .
And in this tutorial, you can learn to create a star field background digitally from scratch using various Photoshop filters like noise, Gaussian blur, clouds, lens flare along with some layer adjustments and blending modes.
Unique Texture without using Brushes in Photoshop

This tutorial from Bittbox shows how you can combine images of different textures to create a new unique texture. The texture you see above is made using two diverse textures – paper texture and nebula texture. Interesting technique that you can experiment using other textures.
Create a Unique Abstract Line Background in Photoshop

This tutorial shows how you can create a cool looking abstract line background in Photoshop. Using gradients, vector shapes and layer styles, you learn to create an illusion of depth in your background.
Digital bokeh effect in Photoshop

Photoshop brush engine, blending modes, filters – you learn a lot of techniques while learning to create a colourful bokeh background in Photoshop. Tutorial courtesy, Abduzeedo.
Here is a set of free bokeh backgrounds , that I had created previously, for you.
How to Create a Linen Texture in Photoshop

This tutorial shows how to reproduce the texture of linen fabric digitally in Photoshop using only a couple of filters, noise and motion blur. You can also check our collection of free fabric textures .
Create Your Own Leather Texture Using Filters

Build upon stained glass filter and create your own leather texture in Photoshop as you follow this tutorial by Envato Tuts+.
How to Create an Abstract Mosaic Background in Photoshop

This tutorial uses a photograph as a base and uses filters and adjustment layers in Photoshop to convert it into a unique abstract background with mosaic effect.
Old Paper Background Texture With Photoshop

In this tutorial, you will learn to create old, aged paper texture in Photoshop. The tutorial uses different filters and blend modes to reach the final output.
Create a Curved Wood Presentation Background in Photoshop

This tutorial will show how you can turn a flat seamless texture into a curved background perfect to present your products on. This tutorial uses a wooden background texture , but the techniques shown will work with any high resolution texture.
Create an Easy Seamless Grunge Texture Pattern in Adobe Photoshop

Gritty grunge textures are great for adding distressed effects to your digital artwork. In this tutorial, you will learn to create seamless grunge texture pattern in Photoshop using adjustment layers and different filters.
Reverse Grunge – Easy Texture Technique in Photoshop

You start with a solid, filled layer and use an eraser with a grunge or splatter tip shape to erase away the fill color. This process is repeated with different eraser tips on separate layers at and different blending modes to reach the end result of a grungy texture background.
These basic Photoshop tutorials will help you explore the different possibilities of this powerful tool.
More Photoshop Tutorials:
- 25 Amazing Photoshop Text Effect tutorials: Beginners to Advanced
- 30 Photoshop Photo Effect Tutorials to Improve your Skills
Before you go, do not forget to check the backgrounds and textures archives to find great free resources for your web and graphic design projects.

Monika loves graphic design & other forms of creative art. When not found tinkering with her favorite graphic design tools, she is mostly reading or writing on wide array of topics. Follow her on Twitter @monikaratan
3 thoughts on “18 Photoshop Background & Texture Tutorials”
Hi. Nice list of tutorials. I like the second the most.
Hello may I use these in my Computer Graphics project?
Hi Mr.Heller
Leave a Comment Cancel reply
How to Transform a Photo Into an Abstract Portrait Using Photoshop
Want to transform a photo into an abstract portrait? We'll show you how in Photoshop.
There are many things that Photoshop can still do better than a smartphone. Transforming a photo into abstract art is one of them.
In this tutorial, we will show you how to combine two photos in Photoshop to create a stunning work of art.
If you’d like to follow along, you can download the image of the woman from Pexels and the background from Pexels . Or feel free to use two of your own images. Let's get started.
Step 1: Cut Out the Subject
The first step is removing the subject from the background so that we can place it over the background layer.
- Click on the Add to Selection icon ( + ) at the top of the screen.
- Use the bracket keys on the keyboard ( [ and ] ) to increase and decrease the Brush size.
You'll now have a non-destructive selection of the portrait that can be moved over the background layer document. Check out our beginner’s guide for using the Brush tool if you need help painting the selection.
You might have noticed that there are several tools we didn't use for this cut-out, one of them being the Refine Edge Tool. This tool lets you work in fine detail to make the perfect selection.
Step 2: Flip the Background Texture
After loading the background texture into Photoshop, you might have to flip it so that it’s vertical and aligns better with the portrait. Go to Image > Image Rotation > 90 Degrees Clockwise .
Step 3: Move the Portrait Selection Over the Background Texture Document
The next step is moving the portrait image over the background texture file. There are a few ways to do this .
For this example, click and drag the Background Copy of the woman over the background texture document, and release. The portrait of the woman will appear in front of the background texture in the layer stack.
Step 4: Create the Abstract Portrait
Now that both of the layers are ready, we’re going to transform the whole thing into an abstract portrait. Follow these steps:
- Duplicate the layer by pressing Ctrl + J .
- Make the Background Copy 2 layer visible and activate it. Change the Blend mode to Multiply .
- Convert Layer 1 to a Smart Object like as we did in the first step.
Most of the work for our abstract portrait is complete. We could stop here but there are a few finishing touches that can further enhance the portrait.
Step 5: The Finishing Touches
You can give this step a skip, but it's a great way to brighten up the image. Let’s add some quick lighting effects with the Overlay Blend Mode .
- Change the Flow to 30 .
If you own any third-party plugins for Photoshop, you can experiment with them for additional enhancements. For instance, Luminar AI is a great choice to make your images stand out.
Create an Abstract Portrait in Photoshop
Photoshop isn’t just for performing technical edits, it’s also a space where you can explore your creativity and make art happen. As you can see, creating abstract portraits is a lengthy process, but we promise that the end results are worth it.
Give this tutorial a go and turn your favorite photographs into abstract portraits.
Home > Photo Effects > Portrait Studio Background

Create A Portrait Studio Background With Photoshop
In this Photoshop Effects tutorial , we'll learn how to quickly and easily create a simple photo studio background in Photoshop which can then be used to make any portrait-style photo look as if it was taken in an actual photo studio, even if it was really taken in your office, your kitchen, your neighbor's backyard, or basically any place other than a photo studio. As with most Photoshop effects, this background works best when used with the right type of photo, so since we're trying to make it appear as if the photo was taken in a portrait studio, it helps if the person in the photo is dressed nicely, hair in place, and sitting in one of those completely unnatural portrait studio poses.
One other thing to keep in mind before we begin... If you're planning on taking a photo to use with this background, try to have the person (or people) sit in front of a plain white background if possible when you take the shot, since that will make it much easier to select them in the original photo when you go to move them in front of this new background we're about to create.
Here's the image I'll be using for this tutorial:

Obviously, this photo wasn't taken inside a studio, but here's how it will look when we're done:

This tutorial is from our Photo Effects series. Let's get started!
Step 1: Create A New Photoshop Document Set To 72 Pixels/Inch
To begin, we need to create a new Photoshop document, so go up to the File menu at the top of the screen and choose New , or use the keyboard shortcut Ctrl+N (Win) / Command+N (Mac). Either way brings up Photoshop's New Document dialog box. Let's use a standard size of 8x10 inches for our new document, so I'll select that from the list of Preset sizes. I also want to make sure that I enter 72 pixels/inch for my Resolution value:
Now, if you know anything about image resolution and print quality , you're probably wondering why I've set my resolution to only 72 pixels/inch, which is far lower than the professional print quality resolution of 300 pixels/inch, and you're most likely thinking that if we go to print this image at only 72 pixels/inch, it's going to look rather horrible, and you'd be right. There's no way we can print our image at such a low resolution and expect it to look good. Don't worry though, we won't be leaving it like this.
The reason we're starting off at only 72 pixels/inch is because we're going to be using Photoshop's Clouds filter to help us create our background, and the Clouds filter is resolution-dependent and only works well at low resolutions. If we tried to use the Clouds filter at 300 pixels/inch, we'd get a whole bunch of really small clouds instead of a few large ones, and we want the larger ones for this effect. I'll show you what I mean in just a moment. For now though, go ahead and create your new document by clicking OK in the top right corner of the dialog box.
Step 2: Fill The New Document With Black
We need our background to be black, so press the letter D on your keyboard to reset your Foreground and Background colors if needed, which sets black as your Foreground color (white becomes your Background color), and then use the keyboard shortcut Alt+Backspace (Win) / Option+Delete (Mac) to fill the document with black:
Step 3: Create A New Blank Layer
If we look in our Layers palette, we can see that we currently have only one layer, the Background layer. We need to add a new blank layer to the document, so click on the New Layer icon at the bottom of the Layers palette (it's the icon directly to the left of the trash bin):
Photoshop adds a new blank layer to the document, places it above the original Background layer, and names it "Layer 1":
Step 4: Apply The "Clouds" Filter To The New Layer
With the new layer selected in the Layers palette (the currently selected layer is highlighted in blue), go up to the Filter menu at the top of the screen, choose Render , and then choose Clouds . I don't think you'll find too many people who'll claim that Photoshop's Clouds filter gives you anything remotely close to realistic-looking clouds, but still, your document should now look something like this:

The Clouds filter gives you something different each time you apply it, so if you want to experiment with it a little to see different variations of the effect, simply press Ctrl+F (Win) / Command+F several times to re-apply the filter and you'll see a different cloud pattern each time.
Before we continue, just to show you what I meant earlier about how the Clouds filter would give us a different result if we tried running in at 300 pixels/inch instead of 72 pixels/inch, here's what we'd get with it at 300 pixels/inch:
That's a few too many clouds for what we need here, which is why we're running it at a low resolution value.
Step 5: Lower The Opacity Of The Clouds Layer To 40%
We've added our clouds but they're too intense at the moment. We need them to be much more subtle, so go to the Opacity option in the top right corner of the Layers palette and lower the layer's opacity down to 40% :
Step 6: Merge The Layers
We need to merge our two layers together at this point, and we can do that with the keyboard shortcut Ctrl+E (Win) / Command+E (Mac). If we look again in our Layers palette, we can see that two layers have been merged into one:
Step 7: Apply The "Spatter" Brush Filter
Let's make the background look a bit more interesting by adding a little texture to it. Going up to the Filter menu once again, this time choose Brush Strokes , and then choose Spatter . When the dialog box appears, enter 10 for the Spray Radius and 5 for the Smoothness , then click OK to apply the filter to the image:
This gives the background a bit of a "painted" look to it:

Step 8: Fade The Filter Effect's Opacity To 50%
Before you click anywhere else in Photoshop, go up to the Edit menu at the top of the screen and choose Fade Spatter . The "Fade" option is only available as the very next thing you do after applying a filter, so if you click somewhere else first and then try and select the Fade option, it will be grayed out and unavailable. When the Fade dialog box appears, lower the opacity value of the filter effect to 50% to reduce the intensity of the effect:
Step 9: Apply The "Sprayed Stokes" Filter
Let's add just a bit more texture to the background by once again going back up to the Filter menu, again choosing Brush Strokes , and this time choosing Sprayed Strokes . When the dialog box appears, enter 12 for the Stroke Length , 7 for the Spray Radius and Right Diagonal for the Stroke Direction option, then click OK to apply the filter:
This adds even more to the "painted" look of the background, although it's a little hard to see in the screenshot below but it should be easier to see in your own document:

Step 10: Fade The Filter Effect's Opacity To 50%
Once again, let's fade the opacity of our filter effect by going up to the Edit menu and choosing Fade Sprayed Strokes . When the dialog box appears, lower the opacity value to 50% just as we did with the Spatter brush filter a moment ago, then click OK:
Step 11: Increase The Image Resolution To 300 Pixels/Inch
Now that we've finished with the Clouds filter, we can increase the resolution to what it should be if we want professional print quality. Of course, increasing the resolution of an image in Photoshop is usually something we want to avoid as much as possible since all you're doing is making the image larger without adding any more detail to it (as powerful as Photoshop is, it still has no way of knowing what the image would have looked like in higher resolution), and you end up with an image that went from crisp and sharp to soft and dull. However, since all we're doing here is creating a background, and backgrounds are often blurred out anyway to bring more attention to the main subject in the foreground, we can get away with it.
To increase the resolution, go up to the Image menu at the top of the screen and choose Image Size . When the Image Size dialog box appears, enter a value of 300 pixels per inch (which is the standard for professional quality printing) for the Resolution option. Also, make sure the Resample Image option is checked at the bottom of the dialog box, and if you're using Photoshop CS2 or higher, set the Interpolation Method (it's the drop-down list to the right of where it says "Resample Image") to Bicubic Smoother , which is generally what we use when making images larger. If you're using an older version of Photoshop, set it to Bicubic :
The only difference you'll notice after increasing the resolution is that the image will now appear much larger on your screen if you zoom in to 100%.
Step 12: Add A "Hue/Saturation" Adjustment Layer
At this point, our background is pretty much complete, but let's give ourselves a bit more control over it by adding a "Hue/Saturation" adjustment layer, which is going to give us the ability to not only lighten the background if we think it's looking a little too dark but also change its color. To do that, simply click on the New Adjustment Layer icon at the bottom of the Layers palette (it's the icon that looks like a circle split diagonally between black and white):
Then choose Hue/Saturation from the list of adjustment layers that appears:
When the Hue/Saturation dialog box appears, if you think your background looks a little too dark, simply drag the Lightness slider to the right to lighten the background. If you want to add some color to your background, first select the Colorize option in the bottom right corner of the dialog box, then drag the Hue slider left or right to select a color. You can adjust the intensity of the color by dragging the Saturation slider in the middle of the dialog box. Here I've used the Hue/Saturation adjustment layer to add blue to the background, just as an example:

If you don't need or want to lighten or add any color to your background at this point, simply click OK to exit out of the dialog box, and if you look in your Layers palette, you'll see the Hue/Saturation adjustment layer sitting there above the Background layer. At any point down the road, if you decide to lighten the background or change its color, all you need to do is double-click directly on the adjustment layer's thumbnail in the Layers palette, which will bring up the Hue/Saturation dialog box and you can make your changes:
Step 13: Save The Photoshop Document
We've completed our work on the background, so let's save our Photoshop document so we can use it whenever we need it instead of recreating it each time. To do that, use the keyboard shortcut Ctrl+S (Win) / Command+S (Mac). Normally this is the keyboard shortcut for the "Save" option, but if this is the first time you're saving the document, Photoshop will bring up the Save As dialog box instead, since it needs to know where to save it, what to call it and what format to save it in. Make sure you save the document as a Photoshop .PSD file. Name the document something that makes sense to you ("Studio-Background.PSD" works nicely) and then save it to your computer's hard drive in a location where you can easily access it again.
Step 14: Drag The Person From Their Original Photo Into The Background Document
At this point, all we need is someone to place in front of our newly created background, so open the photo that contains the person and use the selection tool of your choice (Lasso Tool, Pen Tool , Extract filter, etc.) to select them. Here I've used the Extract filter (which we'll cover in another tutorial) to remove the woman from her background in the original photo. I've also cropped away part of the bottom of the image since I won't be needing it:

Then, with her selected, all I need to do is press the letter V on my keyboard to quickly select the Move Tool and drag her into the Background document. Make sure you have the Hue/Saturation adjustment layer selected first in the Background document so that the person appears on a new layer above it, otherwise the adjustment layer will lighten and/or colorize not only the background but the person as well:
Still with the Move Tool selected, drag the person into position in front of the background:

If I want to add a little color to the background at this point, all I need to is double-click on the Hue/Saturation layer's thumbnail in the Layers palette and when the dialog box appears, I'll select the Colorize option in the bottom right corner, then drag the Hue slider to about 27, which gives me a nice warm color that works well with her skin tone. I'll also lower the Saturation to about 15 so the color is more subtle:

And here we have the final result:
And there we have it! We've now created a simple portrait studio-style background in Photoshop that we've saved and can re-use, as well as lighten and/or colorize, whenever we need it! Visit our Photo Effects section for more Photoshop effects tutorials!
AbstractCurves
Abstract art generator, create amazing & unique artwork.
Generate stunning abstract backgrounds, wallpapers, posters, logos, paintings, patterns, icons and avatars. Let your imagination run wild.
4 simple steps for creating your artworks: 1. Launch AbstractCurves 2. Select a preset from Galleries 3. Adjust its settings to make your own masterpiece 4. Save your artwork as a preset or graphic file (JPG, PNG, BMP)
No experience is needed to enter the special world of digital abstract art. All you need is an eye for appreciating the intricate beauty which evolves automatically within the graphic images that AbstractCurves will generate for you with just a few simple adjustments. The only hard part is knowing when to stop.
Imagine what AbstractCurves can create for you!
A small sampling of over a million possibilities.
For more, view our larger full screen gallery of AbstractCurves creations.
- Backgrounds
- Photorealism
Applications
AbstractCurves is a unique graphics design tool which automatically generates one-of-a-kind images so that you can add fantastic effects to your photographs and commercial artwork with ease. It allows you to easily create stunning wallpapers, posters, images, logos and avatars in just a few minutes, all without a steep learning curve.
Unlimited Design Capabilities
You will find yourself getting lost in the program, as the potential for inspiration is limitless. Try superimposing the images you generate onto your own photos using the Transparent Background option and create logos, icons, avatars, etc.
This ensures that any images you wish to use or sell as backgrounds, wallpapers, icons or within your graphic media will be unique to you, the designing artist. For even though the program paints with magical brushes, you're the one who determines the final masterpiece.
As it is clearly difficult to imagine the unimaginable, we've set up several examples as starting points for your inspirational trips into the unknown abyss of creativity.
Custom Presets
Not only can you create an unlimited number of effects, you have the ability to create and save your own presets. We start you off with over ten galleries with no less than 130 built-in presets.
You can choose any color for your generated image or your background. Along with the ability to use over 30 built-in color palettes with over 7000 colors, you can also create and save your own palettes and color themes. Once you get going, you will realize that the odds of someone both creating and saving the same image as your own masterpiece will be over a billion to one. There's even 16-bit image support.
Release the artist trapped within your soul
Express your creativity with digital imagery, demo version.
- 130+ built-in presets in 10+ galleries
- 30+ built-in color palettes with 7000+ colors
- No image size limits - Generate pictures up to 8191px without loss in quality
- Adding generated images to your photos (Open Image Mode)
- Works as a standalone application and as a plugin - 8bf file format
- Save images in high quality
- Scripting support (Plugin only)
- 16-bit image support
- Popup nag screens
LIFETIME LICENSE
software informer EDITOR'S PICK 2021 AbstractCurves Good choice
Includes 15 extra Galleries with 155 Presets!!!
Includes 12 extra Galleries with 233 Presets!!!
Full Version
- All demo features + Commercial use
- Create and edit color palettes to set foreground and background of abstract image
- Create and edit presets/panel presets to save your own archive of abstract images
- Create and edit galleries to categorize your images
- Import color palettes from Adobe Photoshop (.aco), Corel PaintShop Pro (.PspPalette), GIMP (.gpl).
- Transparent background option for creating logos, icons, avatars, etc.
- No popup nag screens
Every artist was first an amateur.
Ralph waldo emerson, the stand-alone has a sophisticated and professional feel. the fun little program also works as a plug-in for my favorite graphic software., camntx - user, to create one’s own world takes courage., georgia o’keeffe, i played with the interface a bit in photoshop cs6 and find it very easy to use. it will save time looking to download, or having to create, backgrounds., one should like to paint like a man who has never seen a painting., philip guston, thanks for the beautiful filter, i love it for backgrounds and for special effects without the background., ingrid - user, art enables us to find ourselves and lose ourselves at the same time., thomas merton, been making myself some amazing icon packs and tiles, not to forget all the social media formats. good quality software, recommend it to all., shawn - user, art reaches its greatest peak when devoid of self-consciousness., the software does an incredible job creating compelling images for those who want great wallpapers, posters and images, but don’t want to spend much on software., dennis nelson - reviewer at sharewareonsale, art attracts us only by what it reveals of our most secret self., jean-luc godard, a complex and reliable application that enables you to design artistic wallpapers using the numerous available effects and filters., marina dan - softpedia reviewer, i've only scratched the surface of all of the artwork i can create with this unique coreldraw / photoshop plug-in and i can already see that i’ll be using it regularly in projects going forward., foster d. coburn iii - graphics unleashed, see the masks i created using abstractcurves, which has lots of features and works as a psp plugin or a stand-alone program. have fun with it., zantara - zantaras vision, art will remain the most astonishing activity of mankind born out of struggle between wisdom and madness, between dream and reality in our mind., magdalena abakanowicz, absolutely love your program $20 is a steal. the best part about your program is it is compatible with other digital art programs, and flexible too, christopher wright - user, infinite options for backgrounds. in combination with photoshop layer blends, unbeatable. one of very few apps where i feel one is getting genuine value for money., sigrid.de - user, works quite well with plenty of options for flame type art., bjorn berkowitz - user, i rarely, if ever, comment on a program but this program is imaginative, easy to use and has superior quality graphics., kalmar - user, this is a brilliant piece of software. the program is loaded with amazing levels of control, yet the multitude of options are laid out in an elegant and logical way., ron essen - user, i love this program. it's a lot of fun creating stunning images. i've used it to create backgrounds, headers and logos for my website. the images fit beautifully, do not repeat, and allow for smooth scrolling., c west - user, very easy to use, lots of nice examples, and the option to save with a transparent background in .png format too. extremely useful to create a background for a logo., john thomas - user, thank you for creating this very interesting program. i cannot tell you how much i have spent on abstract wallpapers for my powerpoint .ppt presentations. now i can make them myself, sally andrukaitis - user, i've used starfish and imagespace (which are two freeware projects to generate wallpaper / backgrounds), but i've gotta say your program really gives life to the rendering. when i print your designs on paper, it creates the perfect wrapping paper., shawn dion - user, infinite number of unique images require your imagination to come to life..
Become an AbstractCurves artist today!
- Privacy Policy
- Terms of Use
- Cookie Policy
© 2014-2024 AbstractCurves Software ABSTRACT ART GENERATOR
Made with on Planet Earth

How to Make an Image Background Transparent: 7 Different Ways
N eed to get rid of a distracting background on an otherwise picture-perfect photo? There are a number of easy ways to remove the background from an image and make it transparent, which can be useful in many situations.
Most standard photo editors will have a background removal option, and there are even some online tools dedicated just to that task. But which are the best ones? And how can you use them in the most effective way?
Why Would You Want to Make an Image Background Transparent?
There are a number of reasons why you'd want to generate an invisible background for an image. The most common one is to create a versatile logo . When you design a logo, you want it to look good on every website and over any color print. A transparent background is the best way to achieve that.
Additionally, learning how to make a background transparent can help you edit multiple layers of an image easily and efficiently. You can freely move an object with a see-through background and produce a whole new image that looks just as professional.
By making the background transparent, you can pick the picture's most important object, and place it in different locations, which is great for marketing purposes. Here are the best tools to help you with that.
1. Adobe Photoshop
Photoshop is by far the most common software that graphic designers use. It contains multiple tools to help you create beautiful images, or touch up existing ones. But even if you're not an expert, it's quite easy to understand how to make an image background transparent with this software.
Thanks to Adobe Sensei's AI core, which helps identify the parts of the image that make up the background, you can remove it in just a few steps. First, you'll need to duplicate your current layer. Then, it's just a matter of picking Remove Background from Properties .
For more details, here is a full step-by-step guide on how to make the image background transparent with Photoshop .
For most people, GIMP is the best Photoshop equivalent. It offers many of the same editing features. However, since it's an open-source tool, it's completely free to use. You just need to download it and install the app on your computer.
The best way to remove the background is with the Foreground Selection Tool , which is located under Tools > Selection Tools .
- Draw with the tools around the object you wish to keep. You don't have to be accurate here; a rough sketch will do. Just try to be as close to the object as possible and make sure to close the selection.
- Press Enter . This will show the background as blue.
- Brush over the part of the picture that you want to keep. Again, this doesn't have to be completely accurate, just close to the border. You can enlarge or reduce the brush size with the [ ] keys.
- Tick Preview Mask to see the result, so you can tweak it if you're not satisfied.
- When you are satisfied, click Select .
- Go to Select > Invert .
- On the right side of the screen, right-click on your image and select Add Alpha Channel . This will provide a transparent background.
- Hit the Delete button.
- Save the image to your computer as a PNG.
If you don't have the greatest eye for design, but want to create sleek graphics, Canva is the best way to go. It is user-friendly and comes with a variety of drag-and-drop templates, as well as free-to-use pictures to help create anything from a calendar to an Instagram puzzle feed .
While the option to make a background transparent is not available in the free version, it may be worth the extra $9.99 per month. Especially when you take into account that it's much cheaper than paying for Photoshop.
It takes just one click in the Effects menu to produce amazing results. And if you're not satisfied with the way the picture turned out, Canva recently added an option to refine the borders for the transparent image. So just like with Photoshop, you can correct any edges that didn't come out as clean as you wanted (for instance, around a person's hair).
4. Adobe Express
Adobe Express has many features that are similar to Canva. It allows you to create presentations, Facebook posts, business cards, and more—all with beautiful templates that are also drag-and-drop.
Like Canva, this online software can make an image background transparent with just one click in the Image menu, and a button called Remove Background. But unlike Canva, this feature is free, and you can also save this image as a transparent PNG. Simply go to Download > PNG > Transparent PNG.
While this feature is free, if you want to make additional modifications to improve the result, you have to pay for Premium ($9.99 per month). Then, you'll be able to use the Erase Brush , which lets you remove additional sections of the picture that weren't deleted automatically.
If you need a quick fix for a picture and don't want to spend any money at all, LunaPic may be the solution for you. This is a free online editor with all of the basic design features, as well as many effects and filters.
You can upload any picture from your computer, or even straight from a URL. Then, navigate to Edit > Transparent Background , and click on the colors you wish to eliminate.
The results are quite good, and there are additional tools for more precise work, as well as a video tutorial to help you out.
6. Remove.bg
Most of the tools we listed until now are well-rounded image and photo editors that come with multiple features. This is not the case with Remove.bg.
The tool, which is now owned by Canva, uses an AI to do just one thing—cut the background out and generate an amazing outcome. All you have to do is upload a picture to the website and then save the transparent creation. It works well with any background, no matter how complex.
The catch here is that if you want to save the picture in its full resolution, you have to pay. One HD download equals one credit (you get the first one free), and you can buy credits in bundles or as a one-time payment.
If you're a videographer, it's worth knowing that Unscreen uses the same technology to remove backgrounds from videos.
7. PowerPoint
You'll be happy to hear that you can even remove the background from an image with the software that's installed on almost all work computers: PowerPoint.
In the Picture Format menu, there is a button called Remove Background. When you click it, the software will identify what it perceives to be the background and make it transparent. In situations where the object is defined and the background is simple, it can work well.
However, if the background consists of several colors, the first click will not generate the best results. This can be fixed with a few more touch-ups. The software will show you the area it wants to remove from the picture.
With the help of the button Mark Areas To Keep , you can go over additional selections very roughly, and it will identify similar areas to complete the selection. The final image with the transparent background can either be used on the presentation or saved as a transparent PNG.
Make a Photo Background Transparent With These Great Tools
After you've learned how to make the background of a picture transparent, you can use this skill to layer several pictures on top of each other and produce new and exciting images. There is a whole world of image editing software out there, with filters, effects, and advanced tools, just waiting to be discovered.

IMAGES
VIDEO
COMMENTS
In this post, we'll feature more than 30 different tutorials for creating amazing backgrounds. The tutorials are broken down into a few categories: abstract, light effects, textures, and patterns. Abstract backgrounds are very common in web design and for other purposes like a poster or wallpaper design. Photoshop provides plenty of potential ...
List of useful Photoshop tutorial, articles, and guides to create different types of cool abstract backgrounds. By Hongkiat Lim. in Photoshop. Updated on October 8, 2022. Backgrounds are perhaps the most multi-purpose design elements that can be used in almost any kind of design. Although you can download different backgrounds from the web but ...
In this tutorial, we're going to learn how to create an abstract background design in Adobe Photoshop.⭐️ Master Adobe Illustrator and unleash your creativi...
How to create or make an abstract wallpaper or background in Photoshop. An Adobe Photoshop tutorial: in this tutorial I'm going to show you how to design an ...
Photoshop Tutorial #16 . A video that explores how the shape, pen and gradient tools in Adobe Photoshop can be used to create abstract art patterns in for an...
The five tools and techniques I use most often to create abstract art in Photoshop are the Clouds and Fibers filters, and the Depth Maps, Warp, and Liquify tools. ... Create a new layer above the background colour by going to the New Layer icon on the Layers panel, or by going Layer > New Layer, then hitting OK.
Creating abstract backgrounds in Photoshop is a fantastic way to add a touch of creativity and uniqueness to your designs. Whether you're designing a website, poster, or any other type of graphic, an abstract background can make your project stand out. In this tutorial, we will explore different techniques to create stunning abstract ...
Step 5. Create a new layer, select the 'pen tool' and click on the option of 'shape layers' from the top options bar. Draw the shape as shown below. Draw few more shapes in different colors as shown below. Step 6. Click on one of the shapes layer and apply the following layer style settings on it.
As most of time, almost all tutorials would label themselves to be good, high quality or even the best photoshop tutorial you can find. When searching through all these tutorials, your time is wasted. In order to save your time, Photoshop Lady come up with 30 Best Photoshop Abstract Effect Tutorials of All Time. These are selected from our ...
Photoshop is a great tool for image creation and editing. Photoshop CS6 in particular has some impressive new functions that allow you to easily create a variety of abstract backgrounds.
Today I will explain how to create with Photoshop, a colored abstract background, simply using one of your photographs. I hope you will enjoy this tutorial! I really like colorful abstract backgrounds. I have seen that despite the large amount in the archive, which has Dreamstime, these images always maintain a constant and in some cases a high ...
🔔SUBSCRIBE http://www.youtube.com/c/garinn__ytArtwork Page http://grnnugroho.comOrder Vector Art : https://www.fiverr.com/grnnugroho/draw-anything-in-an...
How to Make an Abstract Photo Effect in Photoshop. In this "Three Minutes Max" video, Nigel French shows off a quick way to create an abstract look from a photo. As he says, he uses "no artificial intelligence at all" in this old school trick. It may be a simple operation, but it can create a visually interesting—and often quite ...
Create a Unique Abstract Line Background in Photoshop. This tutorial shows how you can create a cool looking abstract line background in Photoshop. Using gradients, vector shapes and layer styles, you learn to create an illusion of depth in your background. View Tutorial. Digital bokeh effect in Photoshop
Step 1: Cut Out the Subject. The first step is removing the subject from the background so that we can place it over the background layer. Load the first image in Photoshop, then go to Select > Subject. Click Select and Mask at the top menu bar. Select the Brush Tool in the upper-left of the screen.
Create an Abstract Geometric Gradient Background with Photoshop. This tutorial will show you the process behind creating one of our most popular recent freebies on Medialoot, the Geometric Gradient Backgrounds pack. This technique uses vector shape layers, layer styles and of course gradients to create a stunning abstract background.Read more
Step 7. Add a new 'Invert' Adjustment layer and create a clipping mask so that it only effects 'Layer 2'. Do the same with a Hue/Saturation adjustment layer and move the Saturation value down to -100. Note: If you are using an older version of Photoshop without Adjustment layers you will need to rasterize the Smart Object first and use the ...
This technique uses vector shape layers, layer styles and of course gradients to create a stunning abstract background. Step 1 Launch Photoshop and create a new 3000 x 3000 pixel document. The size of the document can be changed depending on your intended use. Step 2 Create a new Gradient Fill layer for the background with three stops, #9e7cd1 ...
In this short I'll show you how I create abstract backgrounds in Adobe Photoshop with relative ease. The trick is to generate and distort your clouds render....
Step 3: Create A New Blank Layer. If we look in our Layers palette, we can see that we currently have only one layer, the Background layer. We need to add a new blank layer to the document, so click on the New Layer icon at the bottom of the Layers palette (it's the icon directly to the left of the trash bin): Add a new layer by clicking on the ...
Create Amazing & Unique Artwork. Generate stunning abstract backgrounds, wallpapers, posters, logos, paintings, patterns, icons and avatars. Let your imagination run wild. 4 simple steps for creating your artworks: 1. Launch AbstractCurves. 2. Select a preset from Galleries.
In this Photoshop tutorial for beginners, we'll be learning how to create stunning background designs in seconds!With just a few simple steps, you'll be able...
Draw with the tools around the object you wish to keep. You don't have to be accurate here; a rough sketch will do. Just try to be as close to the object as possible and make sure to close the ...
Learn how to create abstract background in photoshop cc 2022, I'm gonna use filters like twirl, radial blur, mezzotint and some color adjustments to create a...