
Angular Custom Form Validators: Complete Guide
All about custom form validators, including synchronous and asynchronous, field-level, form-level, for both template-driven and reactive forms.

Angular University
High-Quality Angular Courses
More posts by Angular University.
When building large scale forms with the Angular Forms module, the available built-in validators (such as making a field required, etc.) usually won't be sufficient, and so you will have to develop your own custom form validation rules .
In this post, you will learn everything that you need to know in order to implement your own custom form validators, including both synchronous and asynchronous, field-level, form-level, and both for template-driven and reactive forms.
Table of Contents
This post will cover the following topics:
- What is a form field validator?
- Custom Validators for reactive forms
- Displaying error messages for custom validators
- Custom Validators for template-driven forms
- Comparing validation in template-driven vs reactive forms
Form-level (multi-field) Validators
- Asynchronous Validators
How to use the updateOn field property
This post is part of our ongoing series on Angular Forms, you can find all the articles available here .
So without further ado, let's get started learning everything that we need to know to write our own custom form validators!
What is a form field Validator?
If you have used either the Angular Forms or ReactiveForms modules, you will have noticed that every form has a couple of important properties:
- the form value, consisting of the values of all the individual form fields
- a form validity state, which is true if all the form fields are valid, and false if at least one of the forms fields is invalid
Each form field has its own set of business validation rules: the fields can be mandatory, have a minimum length of 10 characters, etc.
Here is an example of a simple reactive form, with a couple of standard validators:
As we can see, this is a simple login form with an email and password fields. We don't see any business validation rules because this is a reactive form, so all validation rules are defined on the component, and not on the template.
Here is the corresponding component class:
There are a lot of validation rules being used here. Let's go through them one at a time, starting with the simpler ones.
In this particular reactive form, we are using the FormBuilder API in order to define our form fields and validation rules in a concise way.
For example, the email field is marked as mandatory via the Validators.required validator, and it also needs to follow the format of a valid email, due to the use of the Validators.email validator.
These are two examples of the several built-in validators that we have available to use, right out of the box.
So how do these validators work, what is a validator?
A form field validator is a function that the form can call in order to decide if a given form field is valid or not.
A validator function returns true if the form field is valid according to the validator rules, or false otherwise.
A validator can be plugged in directly into a reactive form simply by adding it to the validators list. Each form field has its own list of separate validators.
Two alternative syntaxes for configuring validators
If you noticed, the validation rules for the email and the password fields were configured in a slightly different way.
The password field was configured in the way that you are probably the most used to, by using the FormBuilder API simplified array syntax:
With this syntax, each form field has an array containing both the initial value of the form field and its list of synchronous validators.
Although this syntax is compact, it might become a bit difficult to read for fields with a larger number of validators.
An alternative syntax is the one used by the email field:
In this alternative and more powerful syntax, but also slightly more verbose, the second value of the configuration array (after the initial form field value) is a configuration object containing 3 properties that we can optionally use:
- validators : contains the list of synchronous validators for the form field
- asyncValidators : contains the list asynchronous validators for the form field (not used in this example)
- updateOn : specifies the moment when the form should be updated with the new form field value and recalculate the field validity (more on this later).
Our advice is to switch to the more powerful syntax with the configuration object as soon as you need to, either to set the updateOn property or to make the form field definition more readable.
Notice also, in the login reactive form, that next to the standard built-in required and minLength validators of the password field, we have a non-standard validator createPasswordStrengthValidator() .
This is a custom validator, that we have written ourselves.
Custom Validators for Reactive Forms
The password strength validator ensures that the password has enough strength besides a minimum length. The password strength might be used to require the password to contain not only lowercase characters but also upper case and numeric characters, for example.
With reactive forms, writing a custom validator is as easy as writting a new function:
Let's break down what is going on here. As we can see, the createPasswordStrengthValidator() function is not the validator function itself.
This is actually a validator creation function , that returns as its output the validator. So it's a function that returns a function, as we can see this by its return type ValidatorFn .
The validator creation function can have any arguments needed to set up the validator (in this case no arguments were needed), and returns as the output the validator function itself.
The validator function is then going to be called by the form in order to determine if the form field value is valid or not.
And as we can see, the validator function needs to follow certain conventions.
How to write a Validator function
The form field validator function, returned by the validator creation function, needs to follow these rules:
- only one input argument is expected, which is of type AbstractControl . The validator function can obtain the value to be validated via the control.value property
- The validator function needs to return null if no errors were found in the field value, meaning that the value is valid
- If any validation errors are found, the function needs to return an object of type ValidationErrors
- The ValidationErrors object can have as properties the multiple errors found (usually just one), and as values the details about each error.
- The value of the ValidationErrors object can be an object with any properties that we want, allowing us to provide a lot of useful information about the error if needed
- If we just want to indicate that an error occurred, without providing further details, we can simply return true as the value of an error property in the ValidationErrors object
In the particular case of our password strength validator function, we are checking for the presence of all required characters, and in the end, we are either:
- returning null if the password is valid and no errors were found
- returning {passwordStrength:true} as an output error object, in case that the password is not strong enough
As we can see, we are only returning a boolean flag in the error object indicating that an error was found, without more details. But we could instead also return an error object similar to this one:
This ValidationErrors object can have any form that we need. We can return nested objects if we need to, in order to convey all the necessary information about what caused the error.
Once we have a new custom validator function written, all we have to do is plug it in our reactive form:
Let's remember, the createPasswordStrengthValidator() function did not need input arguments, but we could have defined any arguments that we needed in order to perform the validation, and pass them in this function call.
Displaying error messages for custom Validators
In order to inform the user that there is a problem with the password strength, we can add the following message to the template:
As we can see, the ValidationErrors object that we returned as the output of our custom validator was added to the pasword field errors object.
If the password is not strong enough, the ngIf condition will turn to true and the error message will then be shown to the user.
Custom Validators for Template-Driven Forms
For template-driven forms, it takes a bit more work to define a custom form field validator.
With template driven forms, all the business validation rules are defined at the level of the template using directives, and not at the level of the component class.
For example, here is what the same login form would look like in its template-driven version:
As we can see, in the case of template-driven forms, there is a lot more going on in the template.
For example, we can see the standard required , minlength , maxlength and email directives applied to the email and password fields.
The way that these directives work, is that they use internally the corresponding validator functions Validators.required , Validators.minlength , and Validators.maxLength .
Notice also the non-standard passwordStrength directive, applied to the password field. This one we will have to build ourselves!
So in the case of template-driven forms, besides the validator function, we also need to create a custom directive to go along with it.
Otherwise, we won't be able to use our custom validators in our template-driven forms.
How to write a custom Validator directive
Let's have a look at what the custom form field passwordStrength directive looks like:
Let's break this down step by step, starting with the implementation of the validation functionality itself:
- in order to implement a custom validation directive, we need to implement the Validator interface, which only has the validate method
- the validate method is going to call the validation creation function, and pass the control reference (the password control in this case) to the validator
- the validator is going to return null if the password valid is false, on a ValidationErrors error object otherwise
But implementing the Validator interface is not enough to make this a valid custom validation directive. We also have to configure it properly in the Angular dependency injection system.
Understanding the DI configuration of a custom validator directive
The Angular Forms module needs to know what are the multiple custom validation directives available. It does so by asking the dependency injection system for the NG_VALIDATORS injection token (a sort of unique dependency injection key, that uniquely identifies a dependency).
This dependency in of type multi:true meaning that it includes multiple values, and not just one value. This is to be expected, as there are many custom validator directives, and not just one.
We can see in our directive declaration that we are creating a new provider, meaning that we are setting up a new value in the DI system and we are making the PasswordStrengthDirective available to be instantiated by the DI system if needed.
Because the NG_VALIDATORS provider is of type multi:true , we are adding the PasswordStrengthDirective to the list of existing custom validation directives, instead of replacing the new list with a single value.
Notice that adding the proper DI configuration to your custom validation directive is essential for it to work. Without this, the validate() method simply won't get triggered.
Comparing custom Validation in template-driven vs reactive forms
As we can see, it takes a bit more work and also more general Angular knowledge to implement custom validation in template-driven forms.
With reactive forms, all we have to do is to write a function. But in template-driven forms, besides implementing a Validator function, we also have to know how to write our own custom directive and know how to configure the dependency injection system.
But even though things are a bit harder in template-driven forms, it's still quite doable.
If you want to learn more about the differences between template-driven and reactive forms , you can check out our previous article.
Besides being able to define custom validators at the level of each field, we can also define custom validators at the level of the form.
This is very useful in order to do for example multi-field validation, when a validation rule can be true or false depending on the values of multiple different form fields, as opposed to just one field.
Here is an example, imagine a reactive form that takes in two separate input dates, a start date and an end date:
In order for the form to be considered valid, it's not enough to make the two dates mandatory. We also need to put in place a validation rule that says that the start date should be before the end date.
And this can't be done with a custom validator at the level of the form field. Instead, we need to define a validator at the level of the form .
And we can do so also by defining a custom validator function, in a similar way to field-level validators.
Here is an example of a form-level validator for checking if the start date is before the end date:
As we can see, defining a form-level validator is almost the same as a field-level validator! The only difference is that the input of the function is a FormGroup object instead of a form control.
Using the FormGroup , we can easily access any value of the form and compare multiple values together, like for example the start date and end date fields.
Once the form-level validator function is written, all we have to do it is to apply it in the configuration of the form:
As we can see, this type of validator needs to be configured at the level of the form group as a separate configuration object, and not at the level of any of the form fields.
This form-level configuration object can also take the asyncValidators and updateOn property, which we will cover in a moment.
Asynchronous form field Validators
All of the custom validators that we have been showing so far are synchronous , meaning that the new validity state is immediately calculated by the validator as soon as the validator function is called.
For the case of simple validators like mandatory, minimum length, password strength etc. this makes sense, but there are situations where we would like for this new validity state to be calculated in an asynchronous way.
Imagine that in order to determine the new validity state, we would need to perform some sort of asynchronous operation, such as for example calling a backend or using any sort of promise-based library.
In that case, synchronous validators would simply not work. One such example would be the case of the email field. In the case of a user creation form, we want the form button to be enabled only if the user email is not yet used on the backend.
In order to check if the user already exists, we need to call the backend and query the database, which requires an asynchronous operation, and that's where asynchronous validators come in.
Here is what our user creation form would look like:
As we can see, an error message will be shown to the user informing that an user with that email already exists, if the property userExists is present at the level of the field errors object.
Let's now see what the component class looks like, focusing on the email field only:
Synchronous and asynchronous validators cannot be mixed, so that is why we have used the more powerful configuration object syntax to bind an asynchronous validator to the email field.
We are passing to the validator creation function userExistsValidator an input argument of type UserService . This is the service that we are going to be using to call the backend and check if a user with the same email already exists.
How to write an Asynchronous Validator
And here is what our userExistsValidator asynchronous validator looks like:
As we can see, this is very similar to a normal validator like we have implemented before. The main difference is that the type returned by the validator creation function userExistsValidator() is of type AsyncValidatorFn .
This means that the validation function itself needs to return either a promise or an Observable that emits a value of type ValidationErrors .
In the case of our implementation, we have used Observables, by calling the HTTP based UserService that called our backend and checked if the user exists on the database.
The last piece of the puzzle for fully understanding custom validators, is that updateOn property that we have used on the email field.
The updateOn property can be used both at the level of the form control, like the email field, or at the level of the whole form, like in the case of the start date / end date example.
The updateOn property is useful to define when the form value should be updated with the latest form field value.
When we link a form control such as a text input box to a form model, either by using ngModel , formControl , or formControlName , what happens is that the value of the form control will start to be tracked by the parent form.
When the user starts typing new values or changing the value of the form field, that new value will then be communicated back to the parent form.
The parent form will then need to update its global form.value property, but it will also need to determine if the new value is valid or not.
And for that, it needs to call the validators of the form field and calculate a new field validity state, which will then be used to calculate the new form validity state.
The question is, when will the new value of the form field be communicated back to the parent form?
This is important because by default the value is communicated as quickly as possible. For example, in the case of an input text field, this will by default be communicated with each key pressed by the user, which might be too fast for certain scenarios.
For example, in the case of our userExistsValidator , this would be too much because a new HTTP request to the backend would be triggered with each key pressed.
Instead, we would like the request to be done to the backend only when the user finishes typing the email, so that is why we have set the updateOn property to blur .
This way, only when the user finishes interacting with the email field and moves to another field (either by tabbing away or clicking elsewhere), will then a single HTTP request be triggered to validate the email.
Note that while the asynchronous validation is in progress, the ng-pending css state class will be applied to the email field.
This can be used for styling the email field and informing the user that the validation is in progress if needed.
When to set updateOn to blur ?
Besides asynchronous validators, we might also want to set updateOn to blur due to the behavior of certain plain synchronous validators as well.
For example, something as simple as the email validator might not work well if it gets triggered with every key pressed.
When the user starts typing an email, the email will not immediately be valid, which might cause an error message like "The email is invalid" to be shown to the user while he is still typing and then disappear as the email is fully typed, which might be a bit awkward for the user.
What are the different values that updateOn can take?
There are three values that we can set for the updateOn property:
- change : this is the default value. It means that the form will be updated with every new field value (causing all field validators to be triggered). For a select box or checkbox this will happen when the user chooses a new value, but for a text box this will happen with every key pressed
- blur : this means that the form will be updated with the new field value only when the field is blurred, meaning that the user either tabbed away or clicked elsewhere on the page
- submit : this is rarely used, but its available if needed. This means that the form will only be updated with the new value immediately after the form gets submitted.
The updateOn property can be defined both at the level of the form field and also at level of the overall form itself.
Let's now quickly summarize everything that we have learned about custom form validators:
- a custom validator is a function that validates the value of a form field according to a business rule, such as form example the field is mandatory or the password needs to have a certain strength
- With reactive forms, it's much easier to define custom validators. All we have to do is to define a function, and plug it into the form configuration.
- with template-driven forms, it's also possible to do custom form validation but it's a bit trickier. We will have to define besides the validator function a custom directive and plug it into the dependency injection system
- Validators can also be defined at the form level, and this is especially useful for writing validators that depend on the values of multiple fields, such as for example to ensure that the password and confirm password fields in a user creation form are identical
- certain validators can need to perform an asynchronous operation, like calling a backend or a promise-based library. This can be implemented by having the validator return either a promise or an observable
- For validation to work properly, it's usually necessary to fine-tune exactly when the validators of a field are triggered. This can be done using the updateOn property
I hope that you have enjoyed this post, if you would like to learn a lot more about Angular Forms, we recommend checking the Angular Forms In Depth course, where validators, custom form controls, and many other advanced form topics are covered in detail.
Also, if you have some questions or comments please let me know in the comments below and I will get back to you.
To get notified of upcoming posts on Angular, I invite you to subscribe to our newsletter:
And if you are just getting started learning Angular, have a look at the Angular for Beginners Course :

Creating a custom validator
Writing new validator.
- Must be more than 8 characters long
- Must contain at least one upper case character
- Must contain at least one lower case character
- Must contain at least one digit
Registering custom validator
Adding custom message, adding meta data.
- Building a password strength meter
- Localize error messages of a custom validator
- Manage Email Subscriptions
- How to Post to DZone
- Article Submission Guidelines
- Manage My Drafts
Data Engineering: Work with DBs? Build data pipelines? Or maybe you're exploring AI-driven data capabilities? We want to hear your insights.
Modern API Management : Dive into APIs’ growing influence across domains, prevalent paradigms, microservices, the role AI plays, and more.
Programming in Python: Dive into the Python ecosystem to learn about popular libraries, tools, modules, and more.
PostgreSQL: Learn about the open-source RDBMS' advanced capabilities, core components, common commands and functions, and general DBA tasks.
- Angular vs. React: Which To Choose for Front-End in 2024
- The Role of JavaScript Frameworks in Modern Web Development
- The Power of @ngrx/signalstore: A Deep Dive Into Task Management
- Micro Frontends Architecture
- How To Detect Living-Off-The-Land (LOTL) Attacks
- Boomi Unveils AI Innovations and Strategic Acquisitions at Boomi World 2024
- A Comparative Exploration of LLM and RAG Technologies: Shaping the Future of AI
- Mastering Microservice Architecture
How to Create Custom Validators in Angular
In this post, we look at how to create the functionality that tells your user if they've entered in their information correctly. but, you know, in a nice way..
Join the DZone community and get the full member experience.
In this blog post, we will learn how to create custom validators in Angular Reactive Forms. If you are new to reactive forms, learn how to create your first Angular reactive form here .
Let's say we have a login form as shown in the code below. Currently, the form controls do not have any validations attached to it.
Here, we are using FormGroup to create a reactive form. On the component template, you can attach loginForm as shown in the code below. Using property binding, the formGroup property of the HTML form element is set to loginForm and the formControlName value of these controls is set to the individual FormControl property of FormGroup .
This will give you a reactive form in your application:

Using Validators
Angular provides us many useful validators, including required , minLength , maxLength , and pattern . These validators are part of the Validators class, which comes with the @angular/forms package.
Let's assume you want to add a required validation to the email control and a maxLength validation to the password control. Here's how you do that:
To work with validators, make sure to import them into the component class:
On the template, you can use validators to show or hide an error message. Essentially, you are reading formControl using the get() method and checking whether it has an error or not using the hasError() method. You are also checking whether formControl is touched or not using the touched property.
If the user does not enter an email, then the reactive form will show an error as follows:

Custom Validators
Let us say you want the age range to be from 18 to 45. Angular does not provide us range validation; therefore, we will have to write a custom validator for this.
In Angular, creating a custom validator is as simple as creating another function. The only thing you need to keep in mind is that it takes one input parameter of type AbstractControl and it returns an object of a key-value pair if the validation fails.
Let's create a custom validator called ageRangeValidator , where the user should able to enter an age only if it's in a given range.

The type of the first parameter is AbstractControl , because it is a base class of FormControl , FormArray , and FormGroup , and it allows you to read the value of the control passed to the custom validator function. The custom validator returns either of the following:
- If the validation fails, it returns an object, which contains a key-value pair. Key is the name of the error and the value is always Booleantrue .
- If the validation does not fail, it returns null .
Now, we can implement the ageRangeValidator custom validator in the below listing:
Here, we are hardcoding the maximum and minimum range in the validator. In the next section, we will see how to pass these parameters.
Now, you can use ageRangeValidator with the age control as shown in the code below. As you see, you need to add the name of the custom validator function in the array:
On the template, the custom validator can be used like any other validator. We are using the ageRange validation to show or hide the error message.
If the user does not enter an age between 18 to 45, then the reactive form will show an error:

Now the age control is working with the custom validator. The only problem with ageRangeValidator is that the hardcoded age range only validates numbers between 18 and 45. To avoid a fixed range, we need to pass the maximum and minimum age to ageRangeValidator .
Passing Parameters to a Custom Validator
An Angular custom validator does not directly take extra input parameters aside from the reference of the control. To pass extra parameters, you need to add a custom validator inside a factory function. The factory function will then return a custom validator.
You heard right: in JavaScript, a function can return another function.
Essentially, to pass parameters to a custom validator you need to follow these steps:
- Create a factory function and pass parameters that will be passed to the custom validator to this function.
- The return type of the factory function should be ValidatorFn which is part of @angular/forms
- Return the custom validator from the factory function.
The factory function syntax will be as follows:

Now you can refactor the ageRangeValidator to accept input parameters as shown in the listing below:
We are using the input parameters max and min to validate age control. Now, you can use ageRangeValidator with age control and pass the values for max and min as shown in the code below:
On the template, the custom validator can be used like any other validator. We are using ageRange validation to show or hide an error message:
In this case, if the user does not enter an age between 10 and 20, the error message will be shown as seen below:

And there you have it: how to create a custom validator for Angular Reactive Forms.
Published at DZone with permission of Dhananjay Kumar , DZone MVB . See the original article here.
Opinions expressed by DZone contributors are their own.
Partner Resources
- About DZone
- Send feedback
- Community research
- Advertise with DZone
CONTRIBUTE ON DZONE
- Become a Contributor
- Core Program
- Visit the Writers' Zone
- Terms of Service
- Privacy Policy
- 3343 Perimeter Hill Drive
- Nashville, TN 37211
- [email protected]
Let's be friends:
- Privacy Policy
Angular 16 Custom Validation Tutorial with Examples
Sometimes we have to deal with more difficult validation cases in real-world scenario thats where the custom validators help us to deal with the situation.
Implementing custom validators using Angular Reactive Forms is very easy. Custom validators are just like functions which we often use in our day to day programming tasks. You can create custom validators for any given scenario.
Creating custom validation in Angular is pretty simple and easy, like creating other functions.
Let us follow the steps mentioned in this guide.
Create Angular Project
First, Install Angular CLI. Open a command prompt or terminal.
Run the following command to install Angular CLI globally:
Create a new Angular app using given command.
Navigate to the project folder:
No Property Access From Index Signature
To resolve error:
Property ‘xxxName’ comes from an index signature, so it must be accessed with [‘xxxName’]
This setting makes sure profound consistency between accessing a field via the “dot” (obj.key) syntax, and “indexed” (obj["key"]) and the way which the property is declared in the type.
Without this flag, TypeScript will allow you to use the dot syntax to access fields which are not defined:
Make sure to set noPropertyAccessFromIndexSignature property to false under compilerOptions in tsconfig.json file:
Create Custom Validator in Angular
In the following example, we’ll check how does the custom validation work in Angular.
In order to check this out, we need to create a custom validator using Reactive Forms which will validate if the URL starts with https and contains .me .
Let’s create a folder by the name of validators in the application root and then create a file by the name of validators/custom.validators.ts in the same folder.
We define the custom function by the name of urlValidator and passed the control: AbstractControl parameter inside the function we are checking if the URL starts with https and contains .me .
As you can see we are using AbstractControl class, this class is also known as the core class of form groups, form arrays and form controls. It allows us to access the form control value in Angular.
If the custom validation passes the validation, then it returns null otherwise if the validation fails, then it will return an object with the error name.
Using Custom Validator in Angular Component
Let’s understand how to use custom validation in Angular application. First, import the custom validation service and Reactive Forms services in app.component.ts .
Add Forms Module
In this step, you have to register the form modules in app.module.ts file.
Showing Custom Validation Errors
Now, we’ll learn to show custom validators errors using reactive forms. As you can see, we are taking the help of url getter to access the url form control.
Define the ERROR HTML and access the urlValid via custom validation method to show the errors using Angular custom validator.
Add code in app.component.html file.
Run Angular App
Run the following command to serve your app locally:
We can now see your Angular app running on:
Checkout Popular CSS Collection

Hi, I'm Digamber Singh, a New Delhi-based full-stack developer, and tech author with 10+ years' experience in HTML, CSS, JavaScript, PHP, and WordPress.
- CSS Animations
- CodeIgniter
- Angular Material
- React Native
- Advanced Topics
Custom Form Validators
Learning Objectives
Built-in validators, custom model-driven validators, custom template-driven validators, model-driven listing, template-driven listing.
Know how the built-in validators work in both the model-driven and template-driven forms.
Know how to create a basic hardcoded custom validator for both model-driven and template-driven forms.
We have a few built in validators in Angular:
We can use these in two ways:
As functions we can pass to the FormControl constructor in model-driven forms.
The above creates a form control with a required validator function attached
As directives in template-driven forms.
These required , minlength , maxlength and pattern attributes are already in the official HTML specification.
They are a core part of HTML and we don’t actually need Angular in order to use them. If they are present in a form then the browser will perform some default validation itself.
However we do need a way for Angular to recognise their presence and support the same validation logic in our own Angular forms.
If you remember template-driven forms are just model-driven forms but with the creation of the model driven by the template, they still have an underlying model.
Therefore just like model-driven forms we need to attach a validator function to the underlying model form control.
Angular does this by secretly creating special validator directives which have selectors matching required , minlength , maxlength and pattern .
So if you have imported FormsModule into your NgModule then anytime Angular sees a required tag in the HTML it will link it to an instance of a directive called RequiredValidator .
This directive validator applies the same Validators.required function as we use in model-driven forms.
That’s how the built-in validators work, let’s try to create our own custom validators that work with both model and template-driven forms.
Validators at their core are just functions, they take as input a FormControl instance and returns either null if it’s valid or an error object if it’s not.
We’ll create a custom email validator function which only accepts emails on the domain codecraft.tv :
To use this validator in our model-driven form we pass it into the FormControl on construction, like so:
Just like other validators let’s add a helpful message to the user if the validator fails so they know how to fix it:
Now if we try to type in an email address that doesn’t end in codecraft.tv we see this validation message printed on screen:

Next up we’ll look at how we can re-package our validator function for use in template-driven forms.
To use our validator function in a template-driven form we need to:
Create a directive and attach it to the template form control.
Provide the directive with the validator function on the token NG_VALIDATORS .
We declare this new directive on our NgModule :
Finally, we add this directive to our template form control like so:
Now just like the model-driven form when we type into the email field an email that doesn’t end in codecraft.tv we see the same error:

A validator in Angular is a function which returns null if a control is valid or an error object if it’s invalid.
For model-driven forms we create custom validation functions and pass them into the FormControl constructor.
For template-driven forms we need to create validator directives and provide the validator function to the directive via DI.
Through careful planning we can share the same validation code between the model-driven and template-driven forms.
The validator we created in this lecture hardcodes the domain , in the next lecture we will look at how we can make our validators configurable with different domains.
Caught a mistake or want to contribute to the book? Edit this page on GitHub!
Advanced JavaScript
This unique course teaches you advanced JavaScript knowledge through a series of interview questions. Bring your JavaScript to the 2021's today .
Level up your JavaScript now!
This website requires JavaScript.
Navigation Menu
Search code, repositories, users, issues, pull requests..., provide feedback.
We read every piece of feedback, and take your input very seriously.
Saved searches
Use saved searches to filter your results more quickly.
To see all available qualifiers, see our documentation .
- Notifications
custom-validators.md
Latest commit, file metadata and controls, custom validators.
There are several ways to create a custom, reusable validator. The recommended way is to make use of the Predicate Validator to write a custom validation function, but you can also use the Custom method to take full control of the validation process.
For these examples, we'll imagine a scenario where you want to create a reusable validator that will ensure a List object contains fewer than 10 items.
Predicate Validator
The simplest way to implement a custom validator is by using the Must method, which internally uses the PredicateValidator .
Imagine we have the following class:
To ensure our list property contains fewer than 10 items, we could do this:
To make this logic reusable, we can wrap it an extension method that acts upon any List<T> type.
Here we create an extension method on IRuleBuilder<T,TProperty> , and we use a generic type constraint to ensure this method only appears in intellisense for List types. Inside the method, we call the Must method in the same way as before but this time we call it on the passed-in RuleBuilder instance. We also pass in the number of items for comparison as a parameter. Our rule definition can now be rewritten to use this method:
Custom message placeholders
We can extend the above example to include a more useful error message. At the moment, our custom validator always returns the message "The list contains too many items" if validation fails. Instead, let's change the message so it returns "'Pets' must contain fewer than 10 items." This can be done by using custom message placeholders. FluentValidation supports several message placeholders by default including {PropertyName} and {PropertyValue} ( see this list for more ), but we can also add our own.
We need to modify our extension method slightly to use a different overload of the Must method, one that accepts a ValidationContext<T> instance. This context provides additional information and methods we can use when performing validation:
Note that the overload of Must that we're using now accepts 3 parameters: the root (parent) object, the property value itself, and the context. We use the context to add a custom message replacement value of MaxElements and set its value to the number passed to the method. We can now use this placeholder as {MaxElements} within the call to WithMessage .
The resulting message will now be 'Pets' must contain fewer than 10 items. We could even extend this further to include the number of elements that the list contains like this:
Writing a Custom Validator
If you need more control of the validation process than is available with Must , you can write a custom rule using the Custom method. This method allows you to manually create the ValidationFailure instance associated with the validation error. Usually, the framework does this for you, so it is more verbose than using Must .
The advantage of this approach is that it allows you to return multiple errors for the same rule (by calling the context.AddFailure method multiple times). In the above example, the property name in the generated error will be inferred as "Pets", although this could be overridden by calling a different overload of AddFailure :
As before, this could be wrapped in an extension method to simplify the consuming code.
Reusable Property Validators
In some cases where your custom logic is very complex, you may wish to move the custom logic into a separate class. This can be done by writing a class that inherits from the abstract PropertyValidator<T,TProperty> class (this is how all of FluentValidation's built-in rules are defined).
We can recreate the above example using a custom PropertyValidator implementation like this:
When you inherit from PropertyValidator you must override the IsValid method. This method receives two values - the ValidationContext<T> representing the current validation run, and the value of the property. The method should return a boolean indicating whether validation was successful. The generic type parameters on the base class represent the root instance being validated, and the type of the property that our custom validator can act upon. In this case we're constraining the custom validator to types that implement IList<TCollectionElement> although this can be left open if desired.
Note that the error message to use is specified by overriding GetDefaultMessageTemplate .
To use the new custom validator you can call SetValidator when defining a validation rule.
As with the first example, you can wrap this in an extension method to make the syntax nicer:
...which can then be chained like any other validator:
As another simpler example, this is how FluentValidation's own NotNull validator is implemented:
Customizing express-validator
If the application you're building is anything but a very simple one, you'll need validators, sanitizers and error messages beyond the ones built into express-validator sooner or later.
That's why it has a number of ways in which it can be customized, some of which are introduced on this page.
Custom Validators and Sanitizers
A classic need that express-validator can't fulfill for you, and that you might run into, is validating whether an e-mail address is in use or not when a user signing up.
It's possible to do this in express-validator by implementing a custom validator.
Custom validators are simple functions that receive the field value and some information about it, and have to return a value that will determine if the field is valid or not.
Custom sanitizers are similar, except that they instead transform the value of the field.
Implementing a custom validator
Custom validators must return a truthy value to indicate that the field is valid, or falsy to indicate it's invalid.
Custom validators can be asynchronous, in which case it can return a promise. The returned promise is awaited on, and it must resolve in order for the field to be valid. If it rejects, the field is deemed invalid.
If a custom validator throws, it's also considered invalid.
For example, in order to check that an e-mail is not in use:
Or maybe you could also verify that the password matches the repeat:
Implementing a custom sanitizer
Custom sanitizers don't have many rules. Whatever the value that they return, is the value that the field will acquire.
Custom sanitizers can also be asynchronous, so if they return a promise, the promise will be awaited on, and the resolved value is set on the field.
For example, suppose that you'd like to convert an ID from string to the MongoDB ObjectId format:
If you don't return from a custom sanitizer, your field will become undefined !
Error Messages
Whenever a field value is invalid, an error message is recorded for it. The default error message is Invalid value , which is not descriptive at all of what the error is, so you might need to customize it. There are a few ways to do that:
Validator-level message
A validator-level message applies only when the field fails a specific validator. This can be done by using the .withMessage() method :
Custom validator-level message
If a custom validator throws, the thrown value will be used as its error message.
Specifying a message using .withMessage() will have precedence over the thrown value from the custom validator.
Field-level message
A field-level message is set when you create the validation chain. It's used as a fallback message when a validator doesn't override its error message.
Other error messages
Some express-vaildator functions might create a different error type, and they offer a different way to specify an error message:
- checkExact()
The ExpressValidator class
A useful way to reuse certain customizations is to use the ExpressValidator class.
It contains all the functions that you can import directly from express-validator: body , matchedData , oneOf , validationResult , etc, but with customizations that you specify when instantiating it. For example, custom validators, sanitizers , or error formatter .
You can check out the full API of ExpressValidator .
Typescript support
A couple of custom types can be created matching exactly the type of your ExpressValidator instance.
- Implementing a custom validator
- Implementing a custom sanitizer
- Validator-level message
- Custom validator-level message
- Field-level message
- Other error messages
- Typescript support

Writing custom validation

Note that, as with the section on EditContext, FieldIdentifiers, and FieldState , this is an advanced topic.
As mentioned previously, the FieldState class holds meta-state for form data. In addition to indicating whether a value has been manually edited or not, Blazor stores a collection of validation error messages. To understand how it works, this section will explain how to create our own custom validation mechanism that can be used with Blazor to validate user input.
The following UML diagram shows the relationship between an EditForm , and the various classes (grouped in the diagram) that store this meta-state. Remember, whenever EditForm.Model is altered, the EditForm will create a new instance of EditContext . The previous EditContext (which is no longer needed because it contains information about the previous model) can then be garbage collected, and with it all instances of classes that are grouped in the diagram.

Our custom validation will be based on FluentValidation . Once you've finished this section (or if you just want something you can use straight away), please have a look a blazor-validation .
Creating a validator component
Our validator component does not have to descend from any specific class in order to provide validation. It's only requirement is that it descends from the Blazor ComponentBase class so that we can add it inside the <EditForm> mark-up in our view. The purpose of embedding inside the <EditForm> mark-up is so that we can define a Cascading parameter to pick up the current EditContext that is created by the EditForm whenever its Model parameter changes.
First, create a new Blazor app and add a reference to the FluentValidation NuGet package. Then create a class called FluentValidationValidator .
- EditContext A cascading parameter that is passed to our component from its parent <EditForm> component. This will change every time EditForm.Model changes.
- ValidatorType This will specify the class type to use to perform the actual validation. We will check that this is an IValidator (a FluentValidation interface).
- Validator This will hold a reference to an instance of the specified ValidatorType to perform the actual object validation.
- ValidationMessageStore We will create a new one of these every time our EditContext changes (because EditForm.Model has changed).
- ServiceProvider An injected dependency to IServiceProvider that we can use to create an instance of ValidatorType .
- Lines 4-5 SetParametersAsync is executed whenever one of our parameters change (including our EditContext cascading parameter). The first thing we need to do is keep a reference to some original values, so we can see if they have changed and react accordingly.
- Line 7 Calling base.SetParametersAsync will update our object's properties to the new values.
- Lines 9-16 Ensures we have an EditContext and also a ValidatorType that is an IValidator .
- Lines 18-19 If the ValidatorType has changed then we need to create a new instance of that type and assign it to our private Validator field for validating our EditContext.Model .
- Lines 23-24 If the EditContext has changed then we need to hook up to some events so we can validate user input, and we need a new ValidationMessageStore to store any validation errors.
Creating a new instance of ValidatorType is as simple as instructing our ServiceProvider to retrieve an instance.
For this to work, we must register our validator in our app's Startup.ConfigureServices method - which we'll do once we have a validator and something to validate.
Whenever the EditContext changes we need a new ValidationMessagesStore to store our validation error messages in.
We'll also need to hook up some events so we can validate the user input and add errors to our ValidationMessageStore .
- OnValidationRequested This event is triggered when all properties of EditContext.Model need to be validated. This occurs when the user tries to post an EditForm so that Blazor can determine whether the input is valid or not.
- OnFieldChanged This event is triggered whenever a user changes a property value of EditContext.Model by editing it in one of Blazor's InputBase descendant components.
- Line 3 First we clear out all error messages from any previous validations.
- Line 4 Next we instruct the FluentValidation.IValidator to validate the Model being edited in the EditForm (which we access via EditContext.Model ).
- Line 5 Finally we add any validation errors to our ValidationMessageStore , this is done in a separate method because we will use it when validating a whole object and also when validating an individual changed property when notified via EditContext.OnFieldChanged .
Adding error messages to the ValidationMessageStore is simply a case of creating a FieldIdentifier to identify exactly which object/property has an error and using that identifier to add any error messages, and then let the EditContext know that the validation state has changed.
Note that when validation involves long-running asynchronous calls (e.g. to a WebApi to check for UserName availability) we can update the validation errors and make the call to EditContext.NotifyValidationStateChanged multiple times to provide incremental display of validation state in the user interface.
Finally, we need to validate an individual object/property when the user edits a value in a form input control. We are notified when this happens via the EditContext.OnFieldChanged event. Other than the first two lines and the last line, the following code is FluentValidator specific.
- Lines 3-4 Gets the FieldIdentifier (ObjectInstance/PropertyName pair) from the event args and clears down all previous error message for only that property.
- Line 16 Uses the same method used by ValidationRequested to add the errors from FluentValidation to our ValidationMessageStore .
Using the component
First create a model for our user to edit.
Next, use FluentValidation to create a validator for Person .
Because our validation component uses IServiceProvider to create an instance of our validator, we need to register it in Startup.ConfigureServices .
Finally, we need to set up our user interface to edit an instance of our Person class.
Process flow
Page is displayed.
- Our EditForm component is created from the <EditForm Model=@Person> mark-up.
- EditForm.OnParametersSet is executed, as the EditForm.Model has changed from null to our Person , it creates a new EditContext instance.
- The new EditContext instance is cascaded down to all child components via a Cascading value .
- As a consequence of this cascading value changing, each descendant of InputBase<T> has its SetParametersAsync executed and reacts by creating a new instance of FieldIdentifier .
Our validation component is initialized
- Our validation component's SetParametersAsync method is executed with a reference to the new EditContext .
- Our component creates a new ValidationMessageStore .
- Our component listens to events on EditContext for validation requests and input change notifications.
User alters data
- The user edits data within an InputBase<T> descendant.
- The component notifies this change of state (from unmodified to modified) via EditContext.NotifyFieldChanged , passing its FieldIdentifier .
- EditContext triggers its OnFieldChanged , passing the FieldIdentifier .
- Our component's event subscription tells our ValidationMessageStore to clear all error messages for the state identified by the Model and FieldName properties of the FieldIdentifier .
- Our component performs its custom validation for the single property.
- Validation errors are added to our component's ValidationMessageStore , keyed by the FieldIdentifier .
- The ValidationMessageStore executes EditContext.GetFieldState to retrieve the FieldState for the current FieldIdentifier .
- The ValidationMessageStore is added to the FieldState , so that FieldState.GetValidationMessages is able to retrieve all error messages from all ValidationMessageStore instances.
Step 8 is particularly important because Blazor needs to be able to retrieve all validation error messages for a specific input regardless of which ValidationMessageStore they were added to.
User submits the form
- <EditForm> executes EditContext.Validate .
- EditContext triggers its OnValidationRequested event.
- Our component's even subscription tells our ValidationMessageStore to clear out all of its previous validation error messages for all fields.
- Out component performs its custom validation for the whole EditContext.Model object.
- As with validation for individual changes, the errors are added to the ValidationMessageStore , which registers itself with all the relevant FieldState instances within the EditContext .
- <EditForm> triggers the relevant valid/invalid event depending on whether or not there were error messages.
EditForm.Model is changed
If this is a user-interface for creating new people, then after successfully submitting our new Person to a server our app might create a new Person for our form to edit. This will discard all state associated with the previous Person instance (indicated within a dashed-line box), and start afresh with new instances.
- EditContext
- ValidationMessageStore
With some logging added to the demo source, we see the following output.
- Lines 1-3 The relevant state instances are created to support editing of the Person instance.
- Line 4 A name is entered
- Line 5 An age is entered
- Line 6 The user submits the form
- Line 7 The Person instance in Index.razor is changed, resulting in the meta-state instances being discarded and new ones created for the new EditForm.Model .
- No results found
Full Stack Dev
My Coding Journey
Spring Boot Custom Validation With Examples
Spring Boot Validation module provides a number of built-in validators for request validation as covered in my previous tutorial . In some cases built-in validations may not be sufficient. In such cases you can easily create custom validations to validate the request.
In this tutorial, I will explain step by step process to create custom validations and apply them to request. The custom validations can be applied at field level and class level .
Steps to Create custom validation
To create a custom validations, the following three steps are required:
• Create a validation annotation • Implement a validator • Define a default error message
Creating custom field validation
First we will create a custom validation which can be applied to field.
We will consider following acceptance criteria for employee first name.
First name can contain only letters and spaces only.
Note : This validation can be achieved with @Pattern in built validation but demonstration purpose I am taking this scenario.
The validation annotation
First we need to write validation annotation which can be used to validate that first name contains only letters and spaces.
This constraint will be applied to first name field of employee object.
An annotation type is defined using the @interface keyword.
The constraint annotation is decorated with a couple of meta annotations
@Target({ FIELD, METHOD, PARAMETER, ANNOTATION_TYPE, TYPE_USE}) : Defines the supported target element types for the constraint. @ValidName cabe used on fields,method return values,constructor paramters and type argument of parameterized types.
The element type ANNOTATION_TYPE allows for the creation of composed constraints (i.e. we can combine multiple constraints to create single constraint)
@Retention(RUNTIME) : Specifies, that annotations of this type will be available at runtime by the means of reflection.
@Constraint(validatedBy = NameValidator.class) – Marks the annotation type as constraint annotation and specifies the validator to be used to validate elements annotated with
@Documented – use of @ValidName will be contained in the JavaDoc of elements annotated with it
The Jakarta Bean Validation API standard requires that any validation annotation define:
message – returns the default key for creating error messages in case the constraint is violated
groups – allows the specification of validation groups, to which this constraint belongs. For more information refer my previous tutorial
payload – can be used by clients of the Jakarta Bean Validation API to assign custom payload objects to a constraint.
The custom validator
Once we define the annotation need to create a validator which implements the validation logic, which is able to validate the elements with @ValidName annotation.
The ConstraintValidator interface defines two type parameters which are set in the implementation
- Annotation type to validated (ValidName)
- type of element validation is applied (String)
initialize() – The method is useful if you are passing any attributes to the annotation. You can access the attribute values passed to the annotation and store them in fields of the validator.
isValid() – This method contains actual validation logic. Here we check whether name contains only letters and spaces only.
Note : As per the Jakarta Bean Validation specification recommendation null values are considered as being valid.. If null is not a valid value for an element, it should be annotated with @NotNull explicitly.
The error message
Now let’s prepare the error message which should be used in case @ValidName validation fails.
First create ValidationMessages.properties file under resources folder.
Note : By default Spring Boot validation module reads error messages from ValidationMessages.properties file as module internally uses hibernate validator.
Place the following content the file.
The key defined here should match with message of the corresponding containt annotation.
Using the validation
Testing the validator.
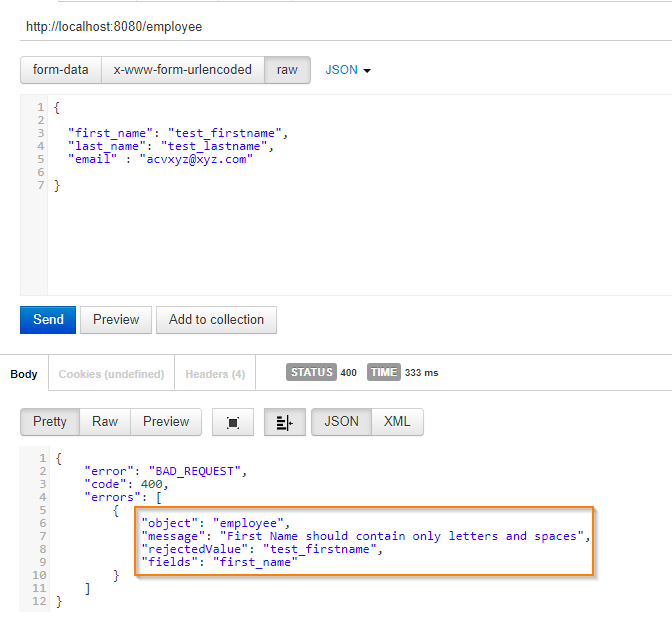
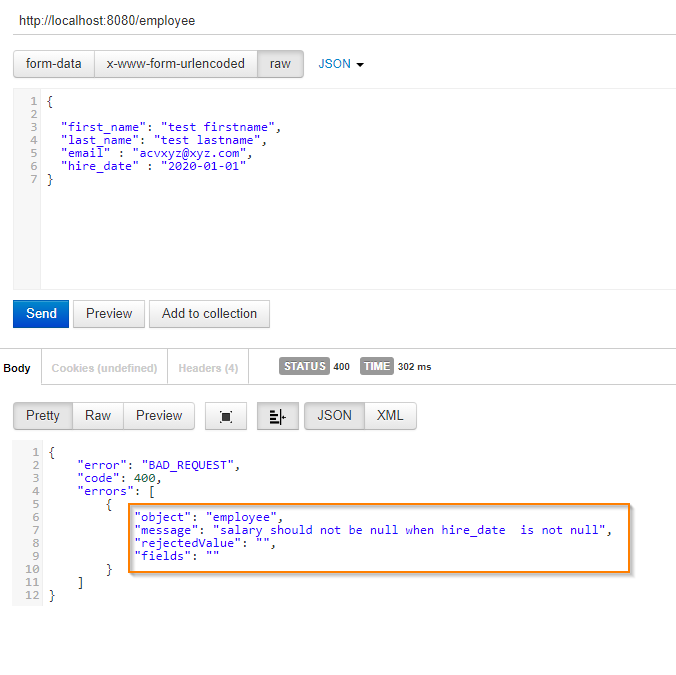
Creating custom class validation
Now let’s create custom validator which can be applied at class level. We should create class level custom validator when validation depends on more than one field.
We are going to use following criteria for validation
When hire date is present in the request, salary and email should not be null.
Creating class level custom validator also follows same 3 step procedure described above
In this case, instead of creating specific validator which checks presence of email and salary when hire date is present in Employee object , we will create a generic validator which can be used for other places with similar scenarios.
I am going name it as ConditionalNotNull validator, and pass two attributes fields and dependson .
fields – you can specify which properties should not be null .
dependsOn – specifies which field presence should be checked.
Let me first show you , how to use ConditionalNotNull validation.
The annotation is similar to field level validator annotation but contains some extra fields.
fields – variable holds the values passed through fields attribute.
dependsOn – variable holds the values passed through dependsOn attribute
@Repeatable(List.class) – Indicates that the annotation can be repeated several times at the same place, usually with a different configuration. List is the containing annotation type.
It allows to specify several @ConditionalNotNull annotations on the class level.
As we are developing the generic validation, we pass generic object as one of parameter to ConstraintValidator ( ConstraintValidator<ConditionalNotNull, Object > ) and use the reflection to get the field values
in initialize method we read the passed in properties to the validator and inside isValid method use the reflection to get field values and validate as per logic.
Now let’s prepare the error message which should be used in case @ConditionalNotNull validation fails.
Place the following content in the ValidationMessages.properties file.
fields, dependsOn acts as place holders in above error message which gets interpolated with passes in attributes of validator.
Testing the validation

If you look at the above error message, fields,dependsOn fields from the error message got interpolated.
If you look at the message, even though email is not null, in above request it is shown the message. If you want to customize the message further by only showing null fields you can do passing fields parameter to the context like below
If you test now, as only Salary field is null, error message’s fields variable is interpolated with
Overriding the Default Error Message
The validation implementations discussed above relies on default error message generation by just returning true or false from the isValid() method. Using the passed ConstraintValidatorContext object, it is possible to either add additional error messages or completely disable the default error message generation and solely define custom error messages.
Let’s demonstrate this with an example.
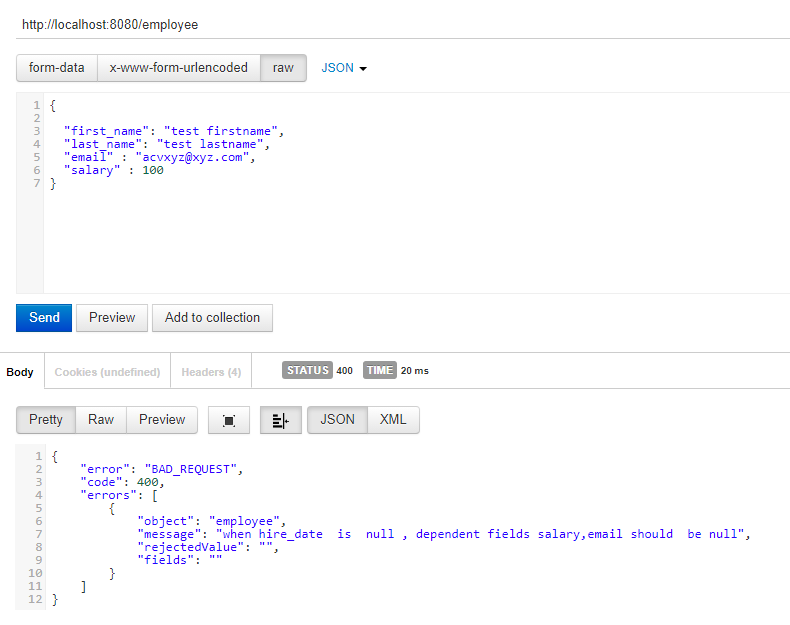
ConditionalNotNull – validation checks that when hire date is not null, email and salary should be not be null..
let’s consider following condition,
When hire_date is null, email and salary should also be null then we can modify the validation logic like below instead of writing another validation.
In above code you can see that we are overriding the default error message configured depending on the scenario.
Below you can see the test scenario.
You can download the source code for this blog post from GitHub
Similar Posts
Generate and verify totp in spring boot applications..
In this blog post, we’ll delve into the world of Time-Based One-Time Passwords (TOTP). Specifically, we’ll learn how to generate and verify TOTP in Spring Boot applications. What is TOTP Before we dive into the coding part, let’s first understand what TOTP is. TOTP is a common mechanism for two-factor authentication (2FA), improving the security…
Build and Release Spring Boot 3 Native Image Binary with GitHub Actions
In this post, how to build and release native image of Spring Boot 3 application with GraalVM using CI/CD pipeline of GitHub Actions. In one of my previous blog posts, I have shown you how to build native image of spring boot 3 framework application in local system. In this blog post, we will take…
Deploying Spring Boot Applications on Oracle Cloud
In this tutorial, I will show how to deploy Spring Boot application on Oracle Cloud in Ubuntu Server and access the API from Internet. Oracle Cloud provides 2 AMD based instances (1 ocpu, 1GB RAM) with their free tier account. We will deploy the spring boot application on the one of AMD instance and make…
Using CloudAMQP RabbitMQ server with Spring Boot Application
In this blog post, I will explain how to use RabbitMQ cluster created in CloudAMQP cloud service to send and receive messages from Spring Boot applications. In my previous blog post , I have explained how to create RabbitMQ cluster for free in CloudAMQP service. Now we are going to use RabbitMQ cluster created in…
Building Native Image of Spring Boot 3 apps with GraalVM
In this post, we will learn what is native image, how to build native image of Spring Boot 3 application with GraalVM. In general we deploy spring boot application by building jar file and run those jar file with jvm installed those systems. The Java code written is first compiled into bytecode during the build…
Creating Spring Boot Docker Images With Paketo Buildpacks
In recent years, containerization has become the de facto standard for deploying applications. It offers numerous benefits, such as improved scalability, portability, and ease of management. However, packaging applications into containers can be a complex task, especially when it comes to configuring and managing dependencies. This is where buildpacks come into play. In this blog,…
The web framework for perfectionists with deadlines.
Documentation
- ♥ Donate
- Toggle theme (current theme: auto) Toggle theme (current theme: light) Toggle theme (current theme: dark) Toggle Light / Dark / Auto color theme
- Getting Help
- Language: en
- Documentation version: 5.0
Validators 
Writing validators ¶.
A validator is a callable that takes a value and raises a ValidationError if it doesn’t meet some criteria. Validators can be useful for reusing validation logic between different types of fields.
For example, here’s a validator that only allows even numbers:
You can add this to a model field via the field’s validators argument:
Because values are converted to Python before validators are run, you can even use the same validator with forms:
You can also use a class with a __call__() method for more complex or configurable validators. RegexValidator , for example, uses this technique. If a class-based validator is used in the validators model field option, you should make sure it is serializable by the migration framework by adding deconstruct() and __eq__() methods.
How validators are run 
See the form validation for more information on how validators are run in forms, and Validating objects for how they’re run in models. Note that validators will not be run automatically when you save a model, but if you are using a ModelForm , it will run your validators on any fields that are included in your form. See the ModelForm documentation for information on how model validation interacts with forms.
Built-in validators 
The django.core.validators module contains a collection of callable validators for use with model and form fields. They’re used internally but are available for use with your own fields, too. They can be used in addition to, or in lieu of custom field.clean() methods.
RegexValidator 
A RegexValidator searches the provided value for a given regular expression with re.search() . By default, raises a ValidationError with message and code if a match is not found. Its behavior can be inverted by setting inverse_match to True , in which case the ValidationError is raised when a match is found.
The regular expression pattern to search for within the provided value , using re.search() . This may be a string or a pre-compiled regular expression created with re.compile() . Defaults to the empty string, which will be found in every possible value .
The error message used by ValidationError if validation fails. Defaults to "Enter a valid value" .
The error code used by ValidationError if validation fails. Defaults to "invalid" .
The match mode for regex . Defaults to False .
The regex flags used when compiling the regular expression string regex . If regex is a pre-compiled regular expression, and flags is overridden, TypeError is raised. Defaults to 0 .
EmailValidator 
An EmailValidator ensures that a value looks like an email, and raises a ValidationError with message and code if it doesn’t. Values longer than 320 characters are always considered invalid.
The error message used by ValidationError if validation fails. Defaults to "Enter a valid email address" .
Allowlist of email domains. By default, a regular expression (the domain_regex attribute) is used to validate whatever appears after the @ sign. However, if that string appears in the allowlist , this validation is bypassed. If not provided, the default allowlist is ['localhost'] . Other domains that don’t contain a dot won’t pass validation, so you’d need to add them to the allowlist as necessary.
In older versions, values longer than 320 characters could be considered valid.
URLValidator 
A RegexValidator subclass that ensures a value looks like a URL, and raises an error code of 'invalid' if it doesn’t. Values longer than max_length characters are always considered invalid.
Loopback addresses and reserved IP spaces are considered valid. Literal IPv6 addresses ( RFC 3986#section-3.2.2 ) and Unicode domains are both supported.
In addition to the optional arguments of its parent RegexValidator class, URLValidator accepts an extra optional attribute:
URL/URI scheme list to validate against. If not provided, the default list is ['http', 'https', 'ftp', 'ftps'] . As a reference, the IANA website provides a full list of valid URI schemes .
Values starting with file:/// will not pass validation even when the file scheme is provided. Valid values must contain a host.
The maximum length of values that could be considered valid. Defaults to 2048 characters.
In older versions, values longer than 2048 characters could be considered valid.
validate_email 
An EmailValidator instance without any customizations.
validate_slug 
A RegexValidator instance that ensures a value consists of only letters, numbers, underscores or hyphens.
validate_unicode_slug 
A RegexValidator instance that ensures a value consists of only Unicode letters, numbers, underscores, or hyphens.
validate_ipv4_address 
A RegexValidator instance that ensures a value looks like an IPv4 address.
validate_ipv6_address 
Uses django.utils.ipv6 to check the validity of an IPv6 address.
validate_ipv46_address 
Uses both validate_ipv4_address and validate_ipv6_address to ensure a value is either a valid IPv4 or IPv6 address.
validate_comma_separated_integer_list 
A RegexValidator instance that ensures a value is a comma-separated list of integers.
int_list_validator 
Returns a RegexValidator instance that ensures a string consists of integers separated by sep . It allows negative integers when allow_negative is True .
MaxValueValidator 
Raises a ValidationError with a code of 'max_value' if value is greater than limit_value , which may be a callable.
MinValueValidator 
Raises a ValidationError with a code of 'min_value' if value is less than limit_value , which may be a callable.
MaxLengthValidator 
Raises a ValidationError with a code of 'max_length' if the length of value is greater than limit_value , which may be a callable.
MinLengthValidator 
Raises a ValidationError with a code of 'min_length' if the length of value is less than limit_value , which may be a callable.
DecimalValidator 
Raises ValidationError with the following codes:
- 'max_digits' if the number of digits is larger than max_digits .
- 'max_decimal_places' if the number of decimals is larger than decimal_places .
- 'max_whole_digits' if the number of whole digits is larger than the difference between max_digits and decimal_places .
FileExtensionValidator 
Raises a ValidationError with a code of 'invalid_extension' if the extension of value.name ( value is a File ) isn’t found in allowed_extensions . The extension is compared case-insensitively with allowed_extensions .
Don’t rely on validation of the file extension to determine a file’s type. Files can be renamed to have any extension no matter what data they contain.
validate_image_file_extension 
Uses Pillow to ensure that value.name ( value is a File ) has a valid image extension .
ProhibitNullCharactersValidator 
Raises a ValidationError if str(value) contains one or more null characters ( '\x00' ).
The error message used by ValidationError if validation fails. Defaults to "Null characters are not allowed." .
The error code used by ValidationError if validation fails. Defaults to "null_characters_not_allowed" .
StepValueValidator 
Raises a ValidationError with a code of 'step_size' if value is not an integral multiple of limit_value , which can be a float, integer or decimal value or a callable. When offset is set, the validation occurs against limit_value plus offset . For example, for StepValueValidator(3, offset=1.4) valid values include 1.4 , 4.4 , 7.4 , 10.4 , and so on.
The offset argument was added.
Additional Information
Support django.
- Hafiz Adewuyi donated to the Django Software Foundation to support Django development. Donate today!
- Writing validators
- How validators are run
- RegexValidator
- EmailValidator
- URLValidator
- validate_email
- validate_slug
- validate_unicode_slug
- validate_ipv4_address
- validate_ipv6_address
- validate_ipv46_address
- validate_comma_separated_integer_list
- int_list_validator
- MaxValueValidator
- MinValueValidator
- MaxLengthValidator
- MinLengthValidator
- DecimalValidator
- FileExtensionValidator
- validate_image_file_extension
- ProhibitNullCharactersValidator
- StepValueValidator
- Prev: Django Utils
- Next: Built-in Views
- Table of contents
- General Index
- Python Module Index
You are here:
Getting help.
Offline (Django 5.0): HTML | PDF | ePub Provided by Read the Docs .
Django Links
- About Django
- Getting Started with Django
- Team Organization
- Django Software Foundation
- Code of Conduct
- Diversity Statement
Get Involved
- Join a Group
- Contribute to Django
- Submit a Bug
- Report a Security Issue
- Getting Help FAQ
- #django IRC channel
- Django Discord
- Official Django Forum
- Fediverse (Mastodon)
- Django Users Mailing List
- Sponsor Django
- Corporate membership
- Official merchandise store
- Benevity Workplace Giving Program
- Hosting by In-kind donors
- Design by Threespot & andrevv
© 2005-2024 Django Software Foundation and individual contributors. Django is a registered trademark of the Django Software Foundation.
Creating and Using a Custom Validator
If the standard validators or Bean Validation don’t perform the validation checking you need, you can create a custom validator to validate user input. As explained in Validation Model , there are two ways to implement validation code:
Implement a managed bean method that performs the validation.
Provide an implementation of the javax.faces.validator.Validator interface to perform the validation.
Writing a Method to Perform Validation explains how to implement a managed bean method to perform validation. The rest of this section explains how to implement the Validator interface.
If you choose to implement the Validator interface and you want to allow the page author to configure the validator’s attributes from the page, you also must specify a custom tag for registering the validator on a component.
If you prefer to configure the attributes in the Validator implementation, you can forgo specifying a custom tag and instead let the page author register the validator on a component using the f:validator tag, as described in Using a Custom Validator .
You can also create a managed bean property that accepts and returns the Validator implementation you create, as described in Writing Properties Bound to Converters, Listeners, or Validators . You can use the f:validator tag’s binding attribute to bind the Validator implementation to the managed bean property.
Usually, you will want to display an error message when data fails validation. You need to store these error messages in a resource bundle.
After creating the resource bundle, you have two ways to make the messages available to the application. You can queue the error messages onto the FacesContext programmatically, or you can register the error messages in the application configuration resource file, as explained in Registering Application Messages .
For example, an e-commerce application might use a general-purpose custom validator called FormatValidator.java to validate input data against a format pattern that is specified in the custom validator tag. This validator would be used with a Credit Card Number field on a Facelets page. Here is the custom validator tag:
According to this validator, the data entered in the field must be one of the following:
A 16–digit number with no spaces
A 16–digit number with a space between every four digits
A 16–digit number with hyphens between every four digits
The f:validateRegex tag makes a custom validator unnecessary in this situation. However, the rest of this section describes how this validator would be implemented and how to specify a custom tag so that the page author could register the validator on a component.
Implementing the Validator Interface
A Validator implementation must contain a constructor, a set of accessor methods for any attributes on the tag, and a validate method, which overrides the validate method of the Validator interface.
The hypothetical FormatValidator class also defines accessor methods for setting the formatPatterns attribute, which specifies the acceptable format patterns for input into the fields. The setter method calls the parseFormatPatterns method, which separates the components of the pattern string into a string array, formatPatternsList .
In addition to defining accessor methods for the attributes, the class overrides the validate method of the Validator interface. This method validates the input and also accesses the custom error messages to be displayed when the String is invalid.
The validate method performs the actual validation of the data. It takes the FacesContext instance, the component whose data needs to be validated, and the value that needs to be validated. A validator can validate only data of a component that implements javax.faces.component.EditableValueHolder .
Here is an implementation of the validate method:
The @FacesValidator annotation registers the FormatValidator class as a validator with the JavaServer Faces implementation. The validate method gets the local value of the component and converts it to a String . It then iterates over the formatPatternsList list, which is the list of acceptable patterns that was parsed from the formatPatterns attribute of the custom validator tag.
While iterating over the list, this method checks the pattern of the component’s local value against the patterns in the list. If the pattern of the local value does not match any pattern in the list, this method generates an error message. It then creates a javax.faces.application.FacesMessage and queues it on the FacesContext for display during the Render Response phase, using a String that represents the key in the Properties file:
Finally, the method passes the message to the constructor of javax.faces.validator.ValidatorException .
When the error message is displayed, the format pattern will be substituted for the {0} in the error message, which, in English, is as follows:
You may wish to save and restore state for your validator, although state saving is not usually necessary. To do so, you will need to implement the StateHolder interface in addition to the Validator interface. To implement StateHolder , you would need to implement its four methods: saveState(FacesContext) , restoreState(FacesContext, Object) , isTransient , and setTransient(boolean) . See Saving and Restoring State for more information.
Specifying a Custom Tag
If you implemented a Validator interface rather than implementing a managed bean method that performs the validation, you need to do one of the following:
Allow the page author to specify the Validator implementation to use with the f:validator tag. In this case, the Validator implementation must define its own properties. Using a Custom Validator explains how to use the f:validator tag.
Specify a custom tag that provides attributes for configuring the properties of the validator from the page.
To specify a custom tag, you need to add the tag to the tag library descriptor for the application, bookstore.taglib.xml .
The tag-name element defines the name of the tag as it must be used in a Facelets page. The validator-id element identifies the custom validator. The validator-class element wires the custom tag to its implementation class.
Using a Custom Validator explains how to use the custom validator tag on the page.
Using a Custom Validator
To register a custom validator on a component, you must do one of the following:
Nest the validator’s custom tag inside the tag of the component whose value you want to be validated.
Nest the standard f:validator tag within the tag of the component and reference the custom Validator implementation from the f:validator tag.
Here is a hypothetical custom formatValidator tag for the Credit Card Number field, nested within the h:inputText tag:
This tag validates the input of the ccno field against the patterns defined by the page author in the formatPatterns attribute.
You can use the same custom validator for any similar component by simply nesting the custom validator tag within the component tag.
If the application developer who created the custom validator prefers to configure the attributes in the Validator implementation rather than allow the page author to configure the attributes from the page, the developer will not create a custom tag for use with the validator.
In this case, the page author must nest the f:validator tag inside the tag of the component whose data needs to be validated. Then the page author needs to do one of the following:
Set the f:validator tag’s validatorId attribute to the ID of the validator that is defined in the application configuration resource file.
Bind the custom Validator implementation to a managed bean property using the f:validator tag’s binding attribute, as described in Binding Converters, Listeners, and Validators to Managed Bean Properties .
The following tag registers a hypothetical validator on a component using a validator tag and references the ID of the validator:
Copyright © 2013, Oracle and/or its affiliates. All rights reserved. Legal Notices
Scripting on this page tracks web page traffic, but does not change the content in any way.
- 1 - Serialization
- 2 - Requests and responses
- 3 - Class based views
- 4 - Authentication and permissions
- 5 - Relationships and hyperlinked APIs
- 6 - Viewsets and routers
- Generic views
- Serializers
- Serializer fields
- Serializer relations
- Authentication
- Permissions
- Content negotiation
- Format suffixes
- Returning URLs
- Status codes
- Documenting your API
- Internationalization
- AJAX, CSRF & CORS
- HTML & Forms
- Browser Enhancements
- The Browsable API
- REST, Hypermedia & HATEOAS
- Tutorials and Resources
- Third Party Packages
- Contributing to REST framework
- Project management
- Release Notes
- 3.15 Announcement
- 3.14 Announcement
- 3.13 Announcement
- 3.12 Announcement
- 3.11 Announcement
- 3.10 Announcement
- 3.9 Announcement
- 3.8 Announcement
- 3.7 Announcement
- 3.6 Announcement
- 3.5 Announcement
- 3.4 Announcement
- 3.3 Announcement
- 3.2 Announcement
- 3.1 Announcement
- 3.0 Announcement
- Kickstarter Announcement
- Mozilla Grant
Documentation search
Validation in rest framework, uniquevalidator, uniquetogethervalidator, uniquefordatevalidator, uniqueformonthvalidator, uniqueforyearvalidator, advanced field defaults, currentuserdefault, createonlydefault, limitations of validators, optional fields, updating nested serializers, debugging complex cases, writing custom validators, function based, class-based.
Validators can be useful for re-using validation logic between different types of fields. — Django documentation
Most of the time you're dealing with validation in REST framework you'll simply be relying on the default field validation, or writing explicit validation methods on serializer or field classes.
However, sometimes you'll want to place your validation logic into reusable components, so that it can easily be reused throughout your codebase. This can be achieved by using validator functions and validator classes.
Validation in Django REST framework serializers is handled a little differently to how validation works in Django's ModelForm class.
With ModelForm the validation is performed partially on the form, and partially on the model instance. With REST framework the validation is performed entirely on the serializer class. This is advantageous for the following reasons:
- It introduces a proper separation of concerns, making your code behavior more obvious.
- It is easy to switch between using shortcut ModelSerializer classes and using explicit Serializer classes. Any validation behavior being used for ModelSerializer is simple to replicate.
- Printing the repr of a serializer instance will show you exactly what validation rules it applies. There's no extra hidden validation behavior being called on the model instance.
When you're using ModelSerializer all of this is handled automatically for you. If you want to drop down to using Serializer classes instead, then you need to define the validation rules explicitly.
As an example of how REST framework uses explicit validation, we'll take a simple model class that has a field with a uniqueness constraint.
Here's a basic ModelSerializer that we can use for creating or updating instances of CustomerReportRecord :
If we open up the Django shell using manage.py shell we can now
The interesting bit here is the reference field. We can see that the uniqueness constraint is being explicitly enforced by a validator on the serializer field.
Because of this more explicit style REST framework includes a few validator classes that are not available in core Django. These classes are detailed below. REST framework validators, like their Django counterparts, implement the __eq__ method, allowing you to compare instances for equality.
This validator can be used to enforce the unique=True constraint on model fields. It takes a single required argument, and an optional messages argument:
- queryset required - This is the queryset against which uniqueness should be enforced.
- message - The error message that should be used when validation fails.
- lookup - The lookup used to find an existing instance with the value being validated. Defaults to 'exact' .
This validator should be applied to serializer fields , like so:
This validator can be used to enforce unique_together constraints on model instances. It has two required arguments, and a single optional messages argument:
- fields required - A list or tuple of field names which should make a unique set. These must exist as fields on the serializer class.
The validator should be applied to serializer classes , like so:
Note : The UniqueTogetherValidator class always imposes an implicit constraint that all the fields it applies to are always treated as required. Fields with default values are an exception to this as they always supply a value even when omitted from user input.
These validators can be used to enforce the unique_for_date , unique_for_month and unique_for_year constraints on model instances. They take the following arguments:
- field required - A field name against which uniqueness in the given date range will be validated. This must exist as a field on the serializer class.
- date_field required - A field name which will be used to determine date range for the uniqueness constrain. This must exist as a field on the serializer class.
The date field that is used for the validation is always required to be present on the serializer class. You can't simply rely on a model class default=... , because the value being used for the default wouldn't be generated until after the validation has run.
There are a couple of styles you may want to use for this depending on how you want your API to behave. If you're using ModelSerializer you'll probably simply rely on the defaults that REST framework generates for you, but if you are using Serializer or simply want more explicit control, use on of the styles demonstrated below.
Using with a writable date field.
If you want the date field to be writable the only thing worth noting is that you should ensure that it is always available in the input data, either by setting a default argument, or by setting required=True .
Using with a read-only date field.
If you want the date field to be visible, but not editable by the user, then set read_only=True and additionally set a default=... argument.
Using with a hidden date field.
If you want the date field to be entirely hidden from the user, then use HiddenField . This field type does not accept user input, but instead always returns its default value to the validated_data in the serializer.
Note : The UniqueFor<Range>Validator classes impose an implicit constraint that the fields they are applied to are always treated as required. Fields with default values are an exception to this as they always supply a value even when omitted from user input.
Note: HiddenField() does not appear in partial=True serializer (when making PATCH request). This behavior might change in future, follow updates on github discussion .
Validators that are applied across multiple fields in the serializer can sometimes require a field input that should not be provided by the API client, but that is available as input to the validator. For this purposes use HiddenField . This field will be present in validated_data but will not be used in the serializer output representation.
Note: Using a read_only=True field is excluded from writable fields so it won't use a default=… argument. Look 3.8 announcement .
REST framework includes a couple of defaults that may be useful in this context.
A default class that can be used to represent the current user. In order to use this, the 'request' must have been provided as part of the context dictionary when instantiating the serializer.
A default class that can be used to only set a default argument during create operations . During updates the field is omitted.
It takes a single argument, which is the default value or callable that should be used during create operations.
There are some ambiguous cases where you'll need to instead handle validation explicitly, rather than relying on the default serializer classes that ModelSerializer generates.
In these cases you may want to disable the automatically generated validators, by specifying an empty list for the serializer Meta.validators attribute.
By default "unique together" validation enforces that all fields be required=True . In some cases, you might want to explicit apply required=False to one of the fields, in which case the desired behavior of the validation is ambiguous.
In this case you will typically need to exclude the validator from the serializer class, and instead write any validation logic explicitly, either in the .validate() method, or else in the view.
For example:
When applying an update to an existing instance, uniqueness validators will exclude the current instance from the uniqueness check. The current instance is available in the context of the uniqueness check, because it exists as an attribute on the serializer, having initially been passed using instance=... when instantiating the serializer.
In the case of update operations on nested serializers there's no way of applying this exclusion, because the instance is not available.
Again, you'll probably want to explicitly remove the validator from the serializer class, and write the code for the validation constraint explicitly, in a .validate() method, or in the view.
If you're not sure exactly what behavior a ModelSerializer class will generate it is usually a good idea to run manage.py shell , and print an instance of the serializer, so that you can inspect the fields and validators that it automatically generates for you.
Also keep in mind that with complex cases it can often be better to explicitly define your serializer classes, rather than relying on the default ModelSerializer behavior. This involves a little more code, but ensures that the resulting behavior is more transparent.
You can use any of Django's existing validators, or write your own custom validators.
A validator may be any callable that raises a serializers.ValidationError on failure.
Field-level validation
You can specify custom field-level validation by adding .validate_<field_name> methods to your Serializer subclass. This is documented in the Serializer docs
To write a class-based validator, use the __call__ method. Class-based validators are useful as they allow you to parameterize and reuse behavior.
Accessing the context
In some advanced cases you might want a validator to be passed the serializer field it is being used with as additional context. You can do so by setting a requires_context = True attribute on the validator class. The __call__ method will then be called with the serializer_field or serializer as an additional argument.
IMAGES
VIDEO
COMMENTS
All about custom form validators, including synchronous and asynchronous, field-level, form-level, for both template-driven and reactive forms. When building large scale forms with the Angular Forms module, the available built-in validators (such as making a field required, etc.) usually won't be sufficient, and so you will have to develop your ...
Custom Validators¶. There are several ways to create a custom, reusable validator. The recommended way is to make use of the Predicate Validator to write a custom validation function, but you can also use the Custom method to take full control of the validation process.. For these examples, we'll imagine a scenario where you want to create a reusable validator that will ensure a List object ...
Writing new validator. A validator has to follow the syntax: const customValidator = function {return {validate: function (input) ... Basically, the custom validator above works fine. It returns false if the password doesn't satisfy any of conditions we define. The limitation here is that the user don't know which condition the password doesn't ...
Introduction. Validators are used to ensure that the values in a form meet certain requirements. They are available to Template-Driven Forms or Reactive Forms in Angular applications.. There are several built-in validators like required, email, pattern, and minLength.It is also possible to develop custom validators to address functionality that is not handled by a built-in validator.
Custom Validators. Let us say you want the age range to be from 18 to 45. Angular does not provide us range validation; therefore, we will have to write a custom validator for this.
In this Angular custom validation example tutorial, we will look at how to create a custom validators in Angular 16 using reactive forms API.Angular is a robust front-end framework; it comes with powerful built-in validators like minLength, maxLength, pattern, and required. Sometimes we have to deal with more difficult validation cases in real ...
Step 2 - Building a Custom Validator. The example custom validator for this tutorial will take a URL string and ensure that it starts with the https protocol and ends with the .io top-level domain. First, in your terminal, create a shared directory: mkdir src/shared Then, in this new directory, create a new url.validator.ts file. Open this ...
Custom Template-Driven Validators. To use our validator function in a template-driven form we need to: Create a directive and attach it to the template form control. Provide the directive with the validator function on the token NG_VALIDATORS. TypeScript. import {NG_VALIDATORS} from '@angular/forms'; . . . @Directive({.
Form validation is an essential feature of any web application that collects user input. Angular provides various ways to validate forms, such as template-driven, reactive, and custom validators. Learn how to use Angular's built-in directives and classes to perform common validation tasks and display user-friendly feedback.
The recommended way is to make use of the Predicate Validator to write a custom validation function, but you can also use the Custom method to take full control of the validation process. For these examples, we'll imagine a scenario where you want to create a reusable validator that will ensure a List object contains fewer than 10 items.
Implementing a custom validator Custom validators must return a truthy value to indicate that the field is valid, or falsy to indicate it's invalid. Custom validators can be asynchronous, in which case it can return a promise. The returned promise is awaited on, and it must resolve in order for the field to be valid. If it rejects, the field is ...
Our custom validation will be based on FluentValidation. Once you've finished this section (or if you just want something you can use straight away), please have a look a blazor-validation. Creating a validator component. Our validator component does not have to descend from any specific class in order to provide validation.
3. Custom Validation. Creating a custom validator entails rolling out our own annotation and using it in our model to enforce the validation rules. So let's create our custom validator, which checks phone numbers. The phone number must be a number with at least eight digits, but no more than 11 digits. 4.
121. To create a custom data annotation validator follow these gudelines: Your class has to inherit from System.ComponentModel.DataAnnotations.ValidationAttribute class. Override bool IsValid(object value) method and implement validation logic inside it. That's it.
How Validations Work. Before we dive into writing custom validations, it's important to determine when & how validations work. When a developer first creates an object (using the new method, for example), the object is created but it still hasn't been saved to the database yet — only once it's saved will it be stored into the appropriate database table.
The validation annotation. First we need to write validation annotation which can be used to validate that first name contains only letters and spaces. This constraint will be applied to first name field of employee object. public @interface ValidName {. String message() default " {validation.validName} ";
Writing validators ¶ A validator is a ... Note that validators will not be run automatically when you save a model, but if you are using a ModelForm, it will run your validators on any fields that are included in your form. ... They can be used in addition to, or in lieu of custom field.clean() methods.
For example, an e-commerce application might use a general-purpose custom validator called FormatValidator.java to validate input data against a format pattern that is specified in the custom validator tag. This validator would be used with a Credit Card Number field on a Facelets page. Here is the custom validator tag:
Field-level validation. You can specify custom field-level validation by adding .validate_<field_name> methods to your Serializer subclass. This is documented in the Serializer docs. Class-based. To write a class-based validator, use the __call__ method. Class-based validators are useful as they allow you to parameterize and reuse behavior.
You can define your custom validator inside AppServiceProvider like this: <?php namespace App\Providers; use Illuminate\Support\ServiceProvider; use Illuminate\Support\Facades\Validator; class AppServiceProvider extends ServiceProvider { /** * Bootstrap any application services. ... I am writing this answer because I believe bunch of people are ...
We often need to validate fields that are passed through a struct in Ecto. Changesets. Custom validations are very straightforward to write and can be. composed with one another easily. By using ...